GoVerse — Complete User Guide
Every feature, end to end, in one document. This consolidates the individual feature pages; use the left-hand pages for the same content split by feature.
Getting started
Signing in
- Go to your GoVerse URL (the beta environment is https://beta.goverse.ai).
- Enter your email and password and select Sign in.
- You'll land on the Dashboard.
If you don't have an account, ask your account owner to invite you from Settings → User Management.
Finding your way around
GoVerse has three main regions:
- Left menu — moves you between features (Dashboard, Requisitions, Talent Sourcing, and so on). It collapses to icons using the arrow at the top.
- Header — shows your AI Credits remaining and your account menu (top-right), where you can switch to your profile and sign out.
- Main area — the current feature.
AI Credits
Some AI-powered actions (for example generating email copy, or AI screening) consume AI credits, shown in the header. When credits run out, those actions show a clear "out of credits" message instead of running; everything that doesn't use AI keeps working. Credits are managed per account/seat.
Roles
| Role | Can do |
|---|---|
| Owner | Everything in the account, including billing and user management. |
| Admin | Manage most settings and users. |
| Member | Day-to-day recruiting work. |
Why some features may be hidden
The left menu adapts to your plan and role. Advanced capabilities (AI Screening, Talent Search, Talent Pools, AI Agents, Engagement) are enabled per plan. See Plans & feature access for the full breakdown.
Dashboard
Menu: Dashboard · Available on every plan
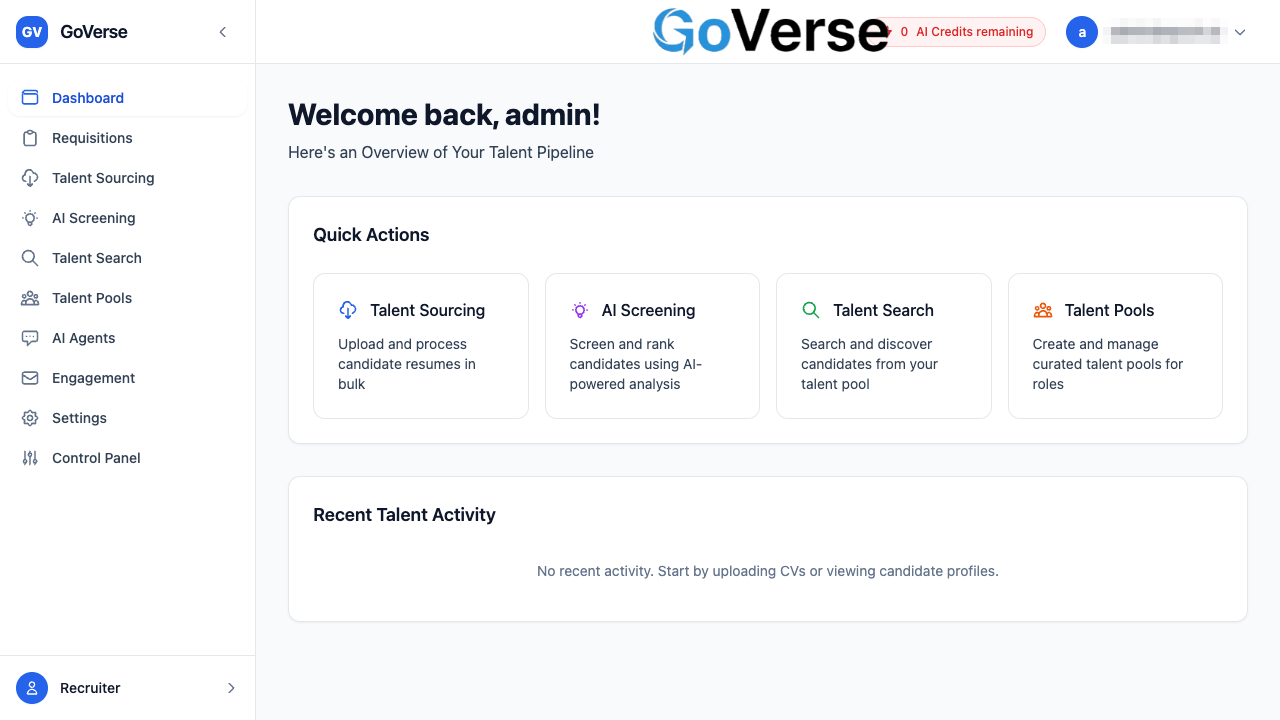
The Dashboard is your landing page — the first screen you see after signing in to GoVerse. It greets you by name, gives you one-click shortcuts into the parts of the platform you use most, and shows a running list of the work you've done recently.
What you'll find here
- A personal welcome — "Welcome back, your name!" followed by the line Here's an Overview of Your Talent Pipeline.
- Quick Actions — four large buttons that jump straight to the main tools for bringing in and working with candidates.
- Recent Talent Activity — a short, clickable history of things you've recently done, such as uploading a batch of CVs or opening a talent pool.
How to get there
Select Dashboard at the top of the left-hand menu. You also land here automatically every time you sign in.
Quick Actions
The Quick Actions panel is a shortcut launcher. Each card shows an icon, a title, and a one-line description, and clicking it takes you directly to that tool.
| Action | What it's for | Where it takes you |
|---|---|---|
| Talent Sourcing | Upload and process candidate resumes in bulk | Talent Sourcing |
| AI Screening | Screen and rank candidates using AI-powered analysis | AI Screening |
| Talent Search | Search and discover candidates from your talent pool | Talent Search |
| Talent Pools | Create and manage curated talent pools for roles | Talent Pools |
A faster route than the menu
The Quick Actions are the same destinations you'll find in the left menu — they're placed on the Dashboard so your most common starting points are one click away when you first log in.
Start with Talent Sourcing to upload your first CVs. Once candidates are in the system, use AI Screening to rank them and Talent Pools to group the ones you want to keep track of.
Jump straight to Talent Search to find people already in your talent pool, or Talent Pools to open a curated list you've built for a role.
Recent Talent Activity
Below the Quick Actions, the Recent Talent Activity panel lists your most recent actions in GoVerse — up to the five newest items. Each row shows an icon indicating the kind of activity, a short title, and the date and time it happened.
The icon tells you what type of item it is:
- Sourcing batch — a group of CVs you uploaded for processing.
- Talent pool — a pool you created or opened.
- Candidate profile — an individual candidate you viewed.
Click any row to jump straight back to that item, and use the arrow on the right as a visual cue that the row is clickable.
When the list is empty
If you haven't done anything yet, this panel reads "No recent activity. Start by uploading CVs or viewing candidate profiles." The list fills in on its own as you work — there's nothing to set up.
Recent activity is tied to this browser
The recent activity list is remembered in the browser you're using. If you sign in from a different computer or browser, or clear your browsing data, the list may appear empty even though your candidates, pools, and batches are all safely stored in GoVerse.
Tips
- Use the Dashboard as your daily starting point. The Quick Actions cover the four things recruiters do most, so you rarely need the menu first thing.
- The welcome line is just a greeting — the real work starts in the Quick Actions and the tools they link to.
- If something looks off while the page loads, give it a moment. The Dashboard briefly shows a shimmering placeholder while it gets ready, then fills in.
- Seeing a red message at the top? That's an error notice. Read it, then close it with the ✕ on the right; if it keeps coming back, contact your administrator.
Requisitions
Menu: Requisitions · Available on every plan
A requisition is a single job you're hiring for. It's the home base for a role: you create it here, collect and review the people who apply, move them through your hiring stages, and invite the colleagues who help you decide. Every other part of GoVerse — sourcing, screening, talent pools, engagement — feeds candidates into a requisition, so this is the screen most recruiters live in day to day.
What it's for
- Open a new role with its title, location, salary, description, and the set of stages candidates will move through.
- Keep every applicant in one place — whether they were added inside GoVerse or imported from an outside system.
- Track progress by moving candidates from stage to stage and marking them hired, rejected, or withdrawn.
- Bring in your team so hiring managers, recruiters, and interviewers can collaborate on the same role.
- Report the outcome by marking a role Filled (with a little celebration) or Cancelled when it's no longer needed.
Available on every plan
Requisitions are part of the core product, so the Requisitions menu item is always visible regardless of your subscription. Some related features linked from a requisition — such as pipeline templates or AI screening — may depend on your plan.
How to get there
Select Requisitions in the left-hand menu. You land on the requisitions list, which shows every role in your account.
The requisitions list
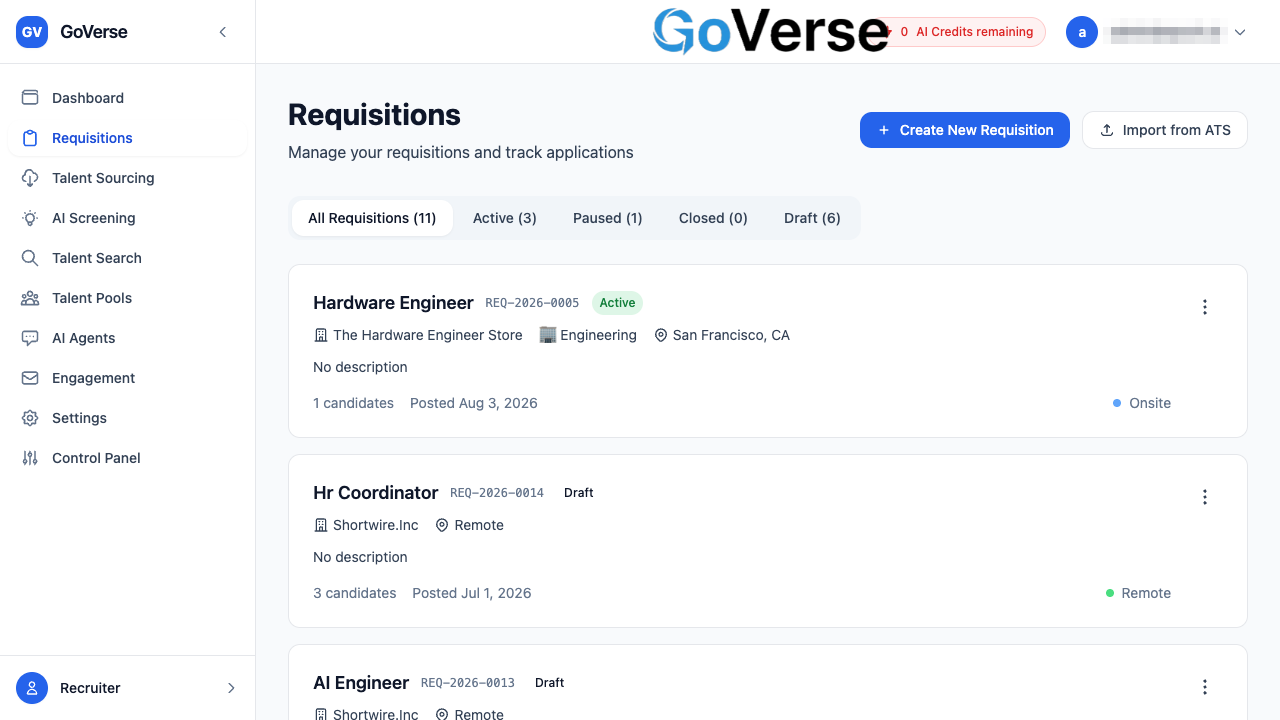
The list is the first thing you see. At the top are the page title and two buttons; below them a row of filter tabs; and then one card per requisition.
The two action buttons
| Button | What it does |
|---|---|
| Create New Requisition | Opens the requisition form so you can add a brand-new role from scratch. |
| Import from ATS | Pulls existing jobs in from a connected system (SmartRecruiters or Workday) instead of retyping them. See Importing from an ATS. |
Filtering the list
Just under the buttons is a row of tabs. Each one shows a live count in brackets, so you can see at a glance how many roles are in each state:
- All Requisitions — everything.
- Active — roles that are open and accepting candidates.
- Paused — roles temporarily on hold.
- Closed — roles that have been closed off.
- Draft — roles you've started but not opened yet.
Selecting a tab instantly narrows the cards below to just that state.
Reading a requisition card
Each card is a compact summary of one role. Depending on what's been filled in, a card can show:
- The job title (select it to open the role).
- A requisition number (a short reference code).
- A status badge — colour-coded Active (green), Paused (yellow), Closed (grey), or Draft.
- An ATS badge — 🔶 Workday or 🔷 SmartRecruiters — if the role was imported.
- Company, department (🏢), and location (📍).
- The salary range, formatted with its currency.
- A two-line preview of the description.
- The candidate count ("12 candidates") and when the role was posted.
- A coloured dot showing the work mode: Remote (green), Hybrid (yellow), or On-site.
The card menu (⋮)
Every card has a ⋮ (three-dots) button on the right. Opening it gives you quick actions without leaving the list:
- View Details — opens the full requisition.
- Edit Requisition — opens the form pre-filled so you can change anything.
- Pause / Activate / Close — the options shown depend on the current status (for example, an Active role offers Pause and Close; a Paused role offers Activate).
- Delete Requisition — permanently removes the role. You'll be asked to confirm first, and this cannot be undone.
Delete is permanent
Deleting a requisition removes it and its tracking for good. If you just want to stop advertising a role, Pause or Close it instead — those keep the record and its candidates.
When the list is empty
- With no roles at all, you'll see "No requisitions created yet" and a Create Your First Requisition button.
- With a filter applied but nothing matching, you'll see "No [status] requisitions" — switch back to All Requisitions to see everything.
Creating a requisition
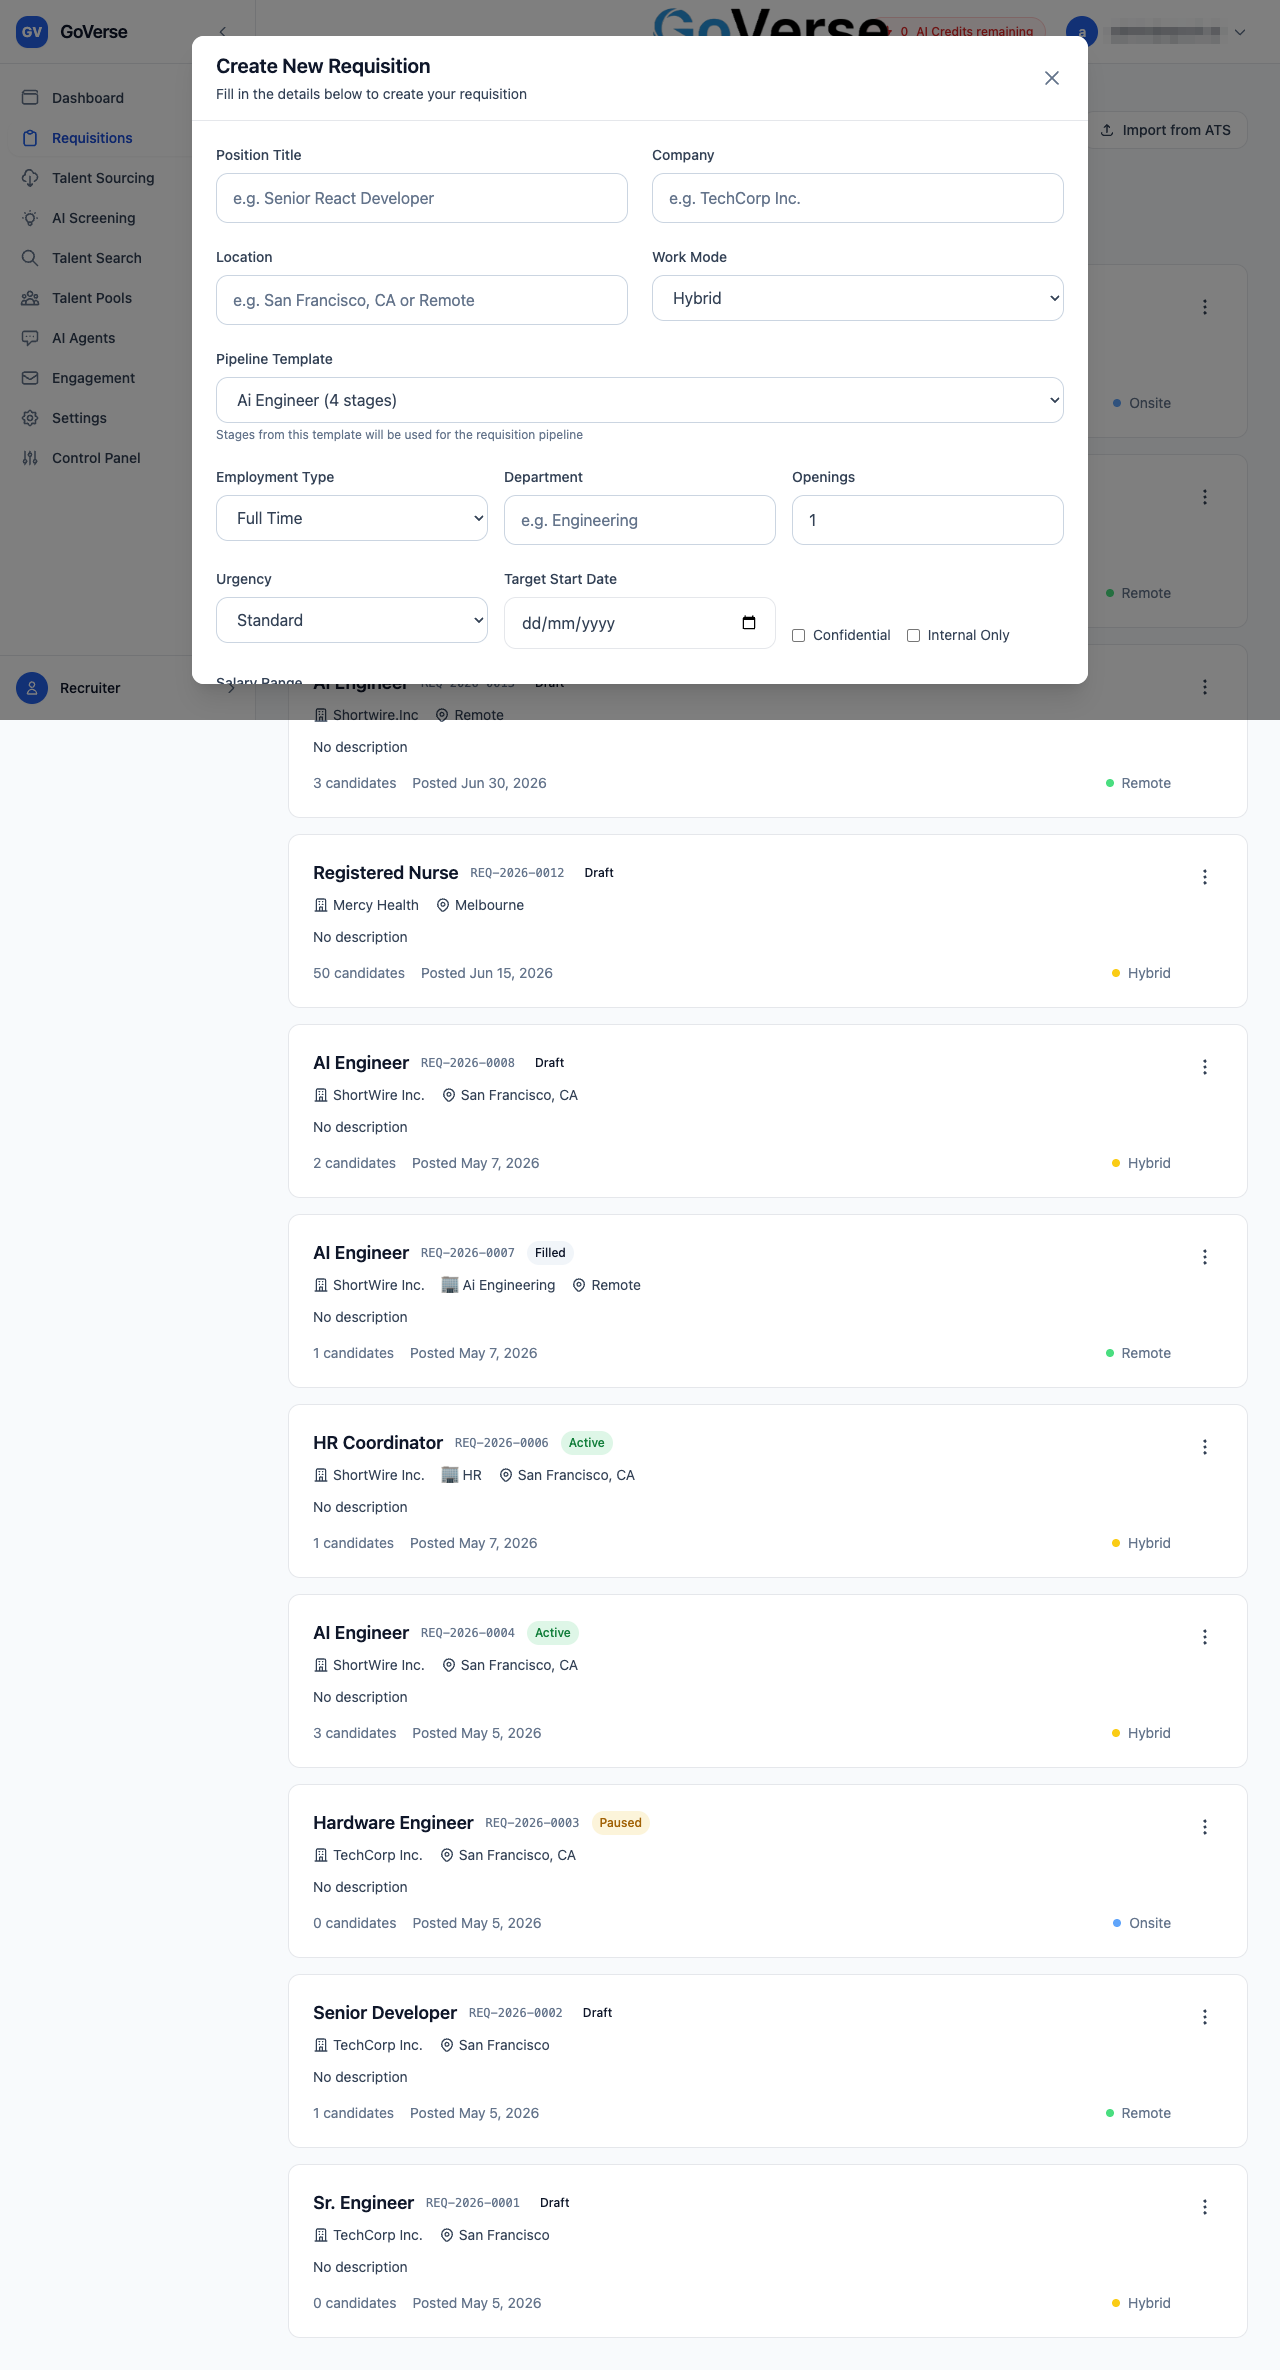
Select Create New Requisition (from the list or its card menu). A form opens as a large pop-up window. It's a single scrolling form — no multi-step wizard — so you can fill it top to bottom and submit once.
The fields, top to bottom
Fields marked required must be filled in before you can save.
| Field | Type | Notes |
|---|---|---|
| Position Title (required) | Text | e.g. Senior React Developer |
| Company (required) | Text | e.g. TechCorp Inc. |
| Location (required) | Text | e.g. San Francisco, CA or Remote |
| Work Mode (required) | Dropdown | Remote · Hybrid · On-site (default Hybrid) |
| Pipeline Template | Dropdown | Create mode only. Chooses the set of stages the role starts with. The organisation default is marked with a ★. |
| Employment Type | Dropdown | Full Time · Part Time · Contract · Casual · Internship |
| Department | Text | e.g. Engineering |
| Openings | Number | How many people you're hiring for this role (default 1) |
| Urgency | Dropdown | Standard · Urgent · Critical |
| Target Start Date | Date | When you'd like the hire to begin |
| Confidential | Checkbox | Flags the role as confidential |
| Internal Only | Checkbox | Marks the role as internal |
| Salary Range | Min / Max / Currency | Two numbers plus a currency (AUD · USD · EUR · GBP · NZD, default AUD) |
| Position Description (required) | Long text | The role, responsibilities, and what makes it exciting |
| Requirements | Repeatable list | Select Add Requirement for each must-have; remove any extra rows |
| Preferred Skills (optional) | Repeatable list | Select Add Skill for each nice-to-have |
The pipeline template sets your stages
The Pipeline Template you pick decides which hiring stages the new role starts with (for example Screening → Interview → Offer). Pick the one that best fits the job — you're not locked in, and templates are managed separately by your admins.
Requirements and skills
Requirements and Preferred Skills are lists you build one line at a time. Select Add Requirement (or Add Skill) to add a row, type the item, and repeat. Use the Remove link beside a row to delete it. Blank rows are ignored when you save.
Saving
At the bottom are Cancel and Create Requisition. If a required field is missing, an inline red message points you to it. While the role is being saved the button reads Saving…; once it succeeds the form closes and you're returned to the list with the new role in place.
Editing an existing requisition
Choosing Edit Requisition opens the same form, pre-filled with the current details and titled Edit Requisition. Make your changes and select Update Requisition. (The pipeline template chooser only appears when creating a role, not when editing one.)
Importing from an ATS
If your roles already live in SmartRecruiters or Workday, select Import from ATS on the list to bring them across instead of retyping.
- Pick the source system from the dropdown — SmartRecruiters or Workday.
- GoVerse shows the jobs it found. Each row lists the title, location (📍), department (🏢), company, its candidate count (👤), and status.
- Tick the jobs you want. Select all / Deselect all toggles everything at once. Jobs you've already imported are dimmed and tagged Imported.
- Select Import [N] selected.
When it finishes you'll see a result line such as "✅ 3 imported, 1 skipped", and the new roles appear in your list carrying the matching ATS badge.
Imported candidates arrive in the background
After an ATS import, GoVerse downloads the associated CVs and builds candidate profiles behind the scenes. While that's happening the role's Applications tab shows a "Syncing candidates from ATS…" banner — it clears on its own once the import completes.
The requisition detail view
Selecting a role opens its detail page. A breadcrumb at the top (Requisitions / [job title]) takes you back to the list.
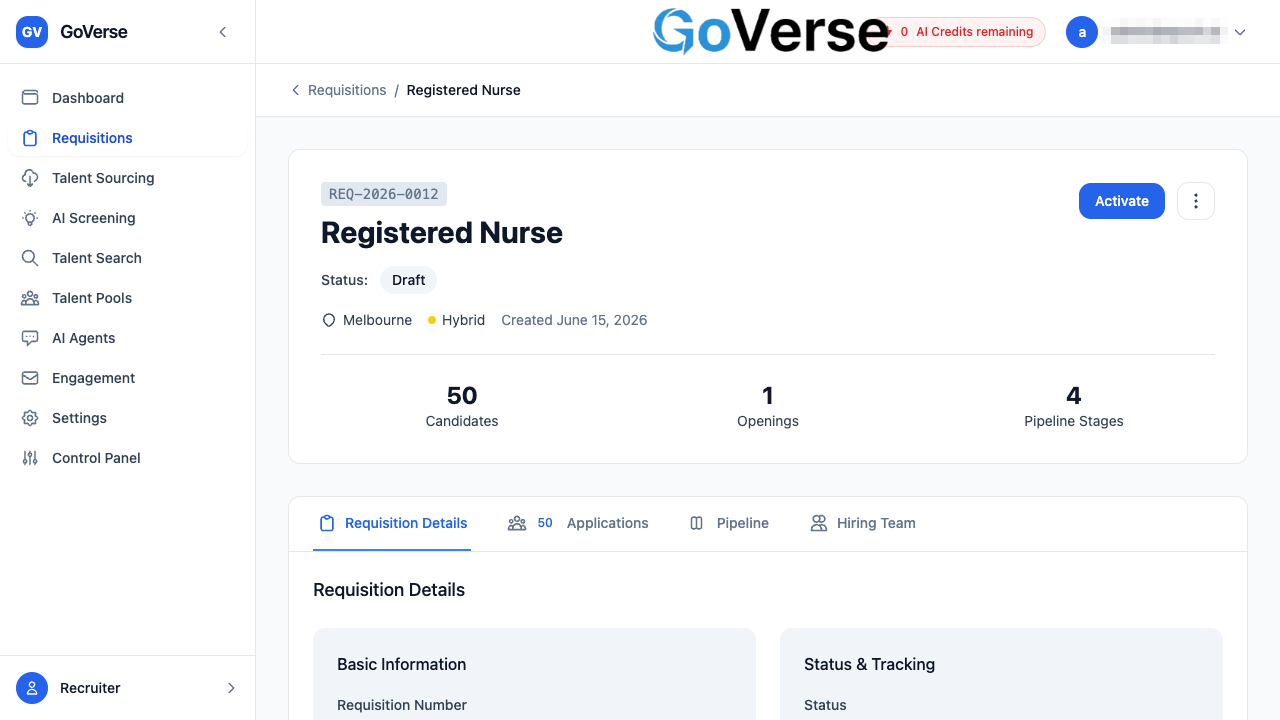
The header
The header summarises the role and is where you change its overall status:
- The requisition number, plus badges for ATS Import and Confidential where they apply.
- The job title.
- The Status with a colour-coded badge (Active, Paused, Filled, Cancelled, Pending Approval, or Draft), and for imported roles an ATS sync indicator.
- A metadata row: location, work mode, department, salary, and the created date.
- Three headline metrics: Candidates, Openings, and Pipeline Stages.
Changing a role's status
The buttons on the right of the header change depending on where the role is:
| Current status | Buttons available |
|---|---|
| Draft | Activate |
| Active | Pause, Mark Filled |
| Paused | Resume, Mark Filled |
| Filled or Cancelled | Reactivate |
A ⋮ menu on active/paused roles adds Cancel Requisition and Delete Requisition.
- Mark Filled asks you to confirm, then closes any active postings and celebrates the hire — complete with a confetti animation and the names of the hired candidates. Once filled, the header lists the Hired Candidate(s); you can select any of them to open their profile.
- Cancel Requisition permanently cancels the role and rejects remaining candidates — it asks you to confirm and can't be undone.
- Reactivate brings a Filled or Cancelled role back to Active. As a safety step you must type REACTIVATE to confirm.
Confirmations protect the big actions
Filling, cancelling, reactivating, and deleting all ask you to confirm first, so you won't trigger them by accident.
The four tabs
Below the header the role is organised into four tabs:
- Requisition Details — the full role definition.
- Applications — everyone who's applied, with a live count on the tab.
- Pipeline — a visual board of your hiring stages.
- Hiring Team — the colleagues collaborating on the role.
Requisition Details tab
A read-only summary of everything about the role, laid out in cards:
- Basic Information — requisition number, title, company, department, location, work mode, employment type, salary, and number of openings.
- Status & Tracking — status, origin (created in GoVerse vs. ATS Import), total candidates, urgency, key dates, and when it was created / last updated / closed.
- ATS Integration — only for imported roles — the source system, external ID, sync mode, and sync status.
- Position Description, Requirements (a bulleted list), and Preferred Skills (shown as tags).
To change any of this, use Edit Requisition (from the list or the card menu).
Applications tab
This is where you work with the actual people. At the top, four tiles summarise the role: Active, Hired, Rejected, and Withdrawn. A Status dropdown (All · Active · Hired · Rejected · Withdrawn) filters the list below, and a count shows how many applications match.
Each applicant appears as a card showing their initials avatar, name, a status badge, their current stage, where they came from (GoVerse or ATS Import), the application number, headline, email, location, when they applied, and — when available — their AI Score and top skills. Selecting the avatar or name opens that person's full candidate profile.
For applicants who are still Active, each card has action buttons:
| Action | What happens |
|---|---|
| Move Stage | Opens a menu of your pipeline stages; pick one to move the candidate there. A Notify candidate checkbox controls whether they're emailed about the move. |
| Hire | Marks the candidate hired (closes their application as a win). |
| Reject | Marks the candidate rejected. |
| Withdraw | Records that the candidate withdrew. |
Moving candidates happens here
The Pipeline tab is a visual overview; the actual moving of a candidate from one stage to the next is done from the Applications tab using Move Stage. Keep the Notify candidate box ticked to let them know automatically.
If no one has applied yet, the tab shows "No Applications."
Pipeline tab — working the stages
The Pipeline tab lays your hiring stages out left to right as columns, with arrows showing the flow between them. It's your at-a-glance board for seeing where everyone stands.
- Each column is a stage, shown in its configured order with an icon (📋 standard, 🤖 AI suggestions, 🎉 offer), the stage name, and a big count of how many candidates are in it.
- Inside each column, candidates appear as small cards with their initials, name, and headline. Selecting one opens their candidate profile.
- An Outcomes column (🏁) collects candidates who've reached a final result: ⭐ hired, ❌ rejected, or 🚪 withdrawn.
- Any candidates not yet placed in a stage are gathered under No stage assigned.
If the board looks different
- If this role doesn't use a pipeline, you'll see a note that candidates are "shown without stage assignment" and a simple flat list instead of columns.
- If no stages have been set up, you'll see "No pipeline stages configured."
To move someone forward, switch to the Applications tab and use Move Stage (the Pipeline tab reflects the change immediately).
Hiring Team tab
This tab lists the colleagues collaborating on the role and lets you manage who's involved.
- Select Add Member to open a short form: choose a person from the user dropdown (people in your account), pick their role, and select Add.
- Each team member appears in a row with their avatar, email, a role dropdown (change it right there to reassign them), and a Remove button.
The available roles are:
| Role |
|---|
| Hiring Manager |
| Recruiter |
| Sourcer |
| Technical Interviewer |
| Engineering Manager |
| HRBP |
Who can be added
Only people who already have an account in your GoVerse workspace can be added to a hiring team. If you try to add someone who isn't set up yet, you'll see "User not found in this account" — ask an admin to invite them first. You also can't add the same person twice.
If no one has been added, the tab reads "No hiring team members assigned yet."
Quick reference
| I want to… | Where to go |
|---|---|
| Open a new role | Create New Requisition on the list |
| Bring roles in from SmartRecruiters / Workday | Import from ATS on the list |
| Change a role's details | Card menu → Edit Requisition |
| Pause, close, or delete a role | Card menu, or the header buttons on the detail page |
| See everyone who applied | Detail page → Applications tab |
| Move a candidate to the next stage | Applications tab → Move Stage |
| See the whole pipeline at a glance | Detail page → Pipeline tab |
| Add a hiring manager or interviewer | Detail page → Hiring Team tab |
| Mark the role as successfully hired | Header → Mark Filled |
Talent Sourcing
Menu: Talent Sourcing → Sourcing Batches · Available on every plan
Talent Sourcing is how candidates get into GoVerse. You upload CVs — one at a time or a whole folder at once — and GoVerse reads each one with AI, pulls out the important details, and turns it into a structured candidate profile. Those profiles then become searchable across the rest of the platform, so you can find, screen, and pool the people you've sourced.
Every upload you do is grouped into a Sourcing Batch — a named collection of CVs you can track from start to finish.
What it's for
- Bring candidates into GoVerse — upload resumes so they become profiles you can work with.
- Process CVs in bulk — drop in an entire folder (say, everything you collected at a career fair) instead of adding people one by one.
- Track progress — watch each batch as GoVerse reads and processes every CV, and see exactly which ones succeeded and which need attention.
- Turn resumes into searchable profiles — completed CVs become candidate profiles that show up in Talent Search, AI Screening, and Talent Pools.
Upload limits depend on your plan
The number of resumes you can upload each month varies by plan. Higher-volume bulk uploads require a plan that includes bulk operations. See Plans & feature access for the exact monthly limits on your plan.
How to get there
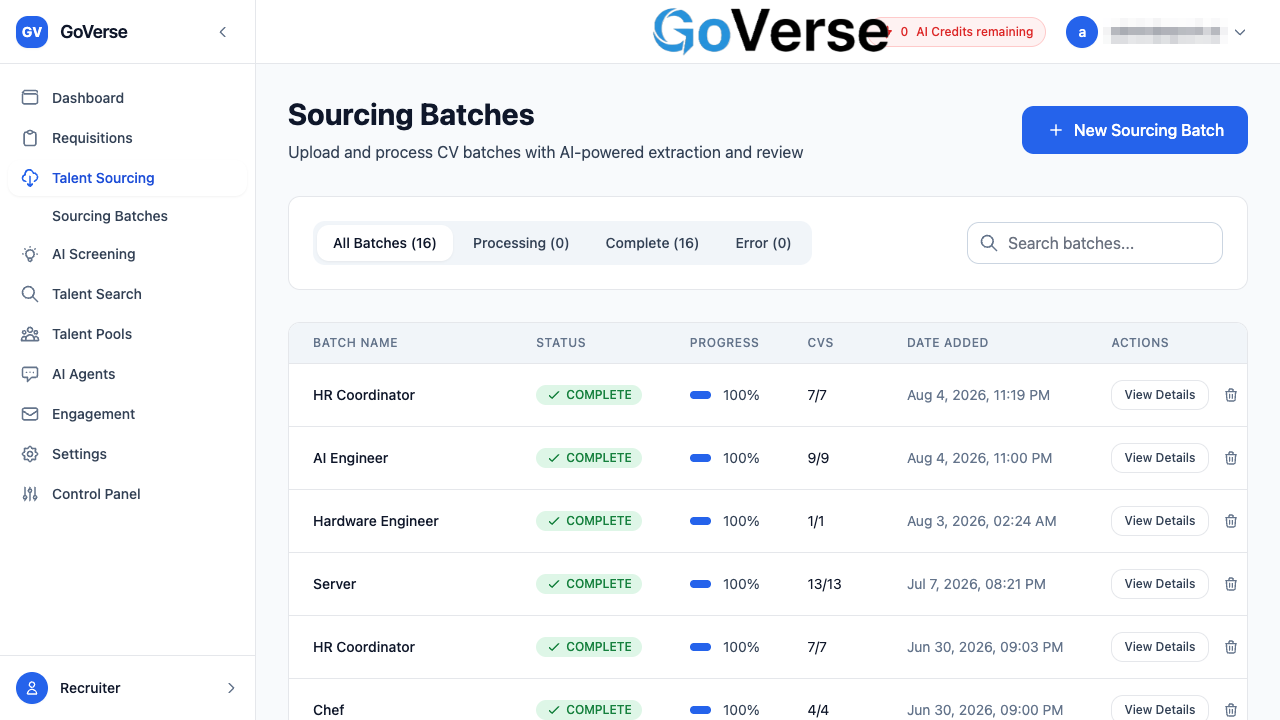
Select Talent Sourcing in the left menu, then Sourcing Batches. This opens your batches list — the home base for all sourcing work.
Uploading CVs
Everything starts with the New Sourcing Batch button at the top-right of the Sourcing Batches page.
If your account is connected to an ATS (like SmartRecruiters or Workday), clicking it first asks how you want to build the batch:
- Sync from ATS — pull candidates straight from one of your ATS job postings.
- Manual Upload — upload CV files or folders from your own computer.
If you don't have an ATS connected, the button takes you straight to manual upload.
Manual upload — the Create New Sourcing Batch page
The upload page has two things to fill in: a batch name and your files.
- Name the batch. Give it something you'll recognise later, for example University Career Fair '25. This is how the batch is labelled in your list.
- Add your CVs. Drag and drop files or a whole folder onto the drop zone, or
use the buttons:
- Browse Folder — pick an entire folder; GoVerse pulls the CVs out of it (including files inside sub-folders).
- Browse Files — pick individual files.
- Start the upload. Once the batch has a name and at least one valid file, the Start Upload button becomes active. Click it, and GoVerse takes you straight to that batch's status page to watch it process.
Use Browse Files and pick one resume. It's added to the file list, ready to upload. Perfect for adding a single candidate you just received.
Use Browse Folder (or drag a folder onto the drop zone) to add many CVs at once. GoVerse walks through the folder, picks up every supported CV, and adds them all to one batch. This is the fast way to load a large stack of resumes.
Tip
Bulk uploads count toward your monthly upload limit and, for larger volumes, need a plan that includes bulk operations. Check Plans & feature access.
Accepted formats and size
| Requirement | Details |
|---|---|
| File types | PDF and DOCX (Word) only |
| Maximum file size | 10 MB per file |
If you add a file that isn't a PDF or DOCX, GoVerse flags it in the list as unsupported and won't let you start the upload until you remove it. You'll see a message like "Please remove the unsupported files from the list to enable start upload." Just click the ✕ next to any flagged file to take it out.
What the AI produces from each CV
Once uploaded, GoVerse reads each resume and builds a structured candidate profile from it. From the raw document it extracts and organises:
- Contact details — first name, last name, and email.
- Work experience — job history laid out consistently (title, company, dates, responsibilities).
- Education — schools, degrees, and qualifications.
- Skills — tidied into a standard, consistent form so similar skills match.
- Certifications — professional accreditations identified and structured.
- Expertise signals — scores that indicate how strong the candidate is in different areas.
This is why an uploaded PDF becomes something you can actually search and screen — GoVerse turns unstructured resume text into clean, comparable data.
The Sourcing Batches list
The Sourcing Batches page lists every batch you've created, newest work at your fingertips. For each batch you can see its name, status, a progress bar, how many CVs it holds (processed out of total), and when it was added.
Finding a batch:
- Filter tabs — switch between All, Processing, Complete, and Error. Each tab shows a count so you can see at a glance how many batches are in each state.
- Search — type in the Search batches… box to find a batch by name.
Opening a batch: click any row (or its View Details button) to open the batch status page.
Deleting a batch: use the trash icon on a batch row. GoVerse asks you to confirm, because deleting a batch permanently removes all candidates and screening data associated with it. This can't be undone.
Deleting a batch is permanent
Removing a batch also removes the candidate profiles and screening history that came from it. If you only want to remove one candidate, open the batch and delete that individual instead.
Batch statuses
A batch moves through a few states as GoVerse works on it. In the list, statuses are shown simply as Processing, Complete, or Error:
| Status | What it means | What to do |
|---|---|---|
| Processing | GoVerse is still reading and processing the CVs in this batch. The progress bar and the "processed / total" count climb as it works. | Nothing — just wait. The page updates on its own. |
| Complete | Every CV in the batch has finished processing. | Open the batch to review the resulting candidate profiles. |
| Error | The batch as a whole failed to process. | Open the batch to read the error message and details, then try again. |
Live updates
While a batch is processing, its status page refreshes automatically every few seconds — you don't need to reload the page to see progress.
Inside a batch — the status page
Opening a batch shows everything about that upload run in one place.
At the top, a summary card shows the batch name, its current status, when it was created, last updated, and (once done) completed.
Processing Status gives you the headline numbers plus a progress bar:
| Metric | Meaning |
|---|---|
| Total Applicants | How many CVs are in the batch |
| Processed | How many have been worked through so far |
| Completed | How many finished successfully and became profiles |
| Failed | How many couldn't be processed |
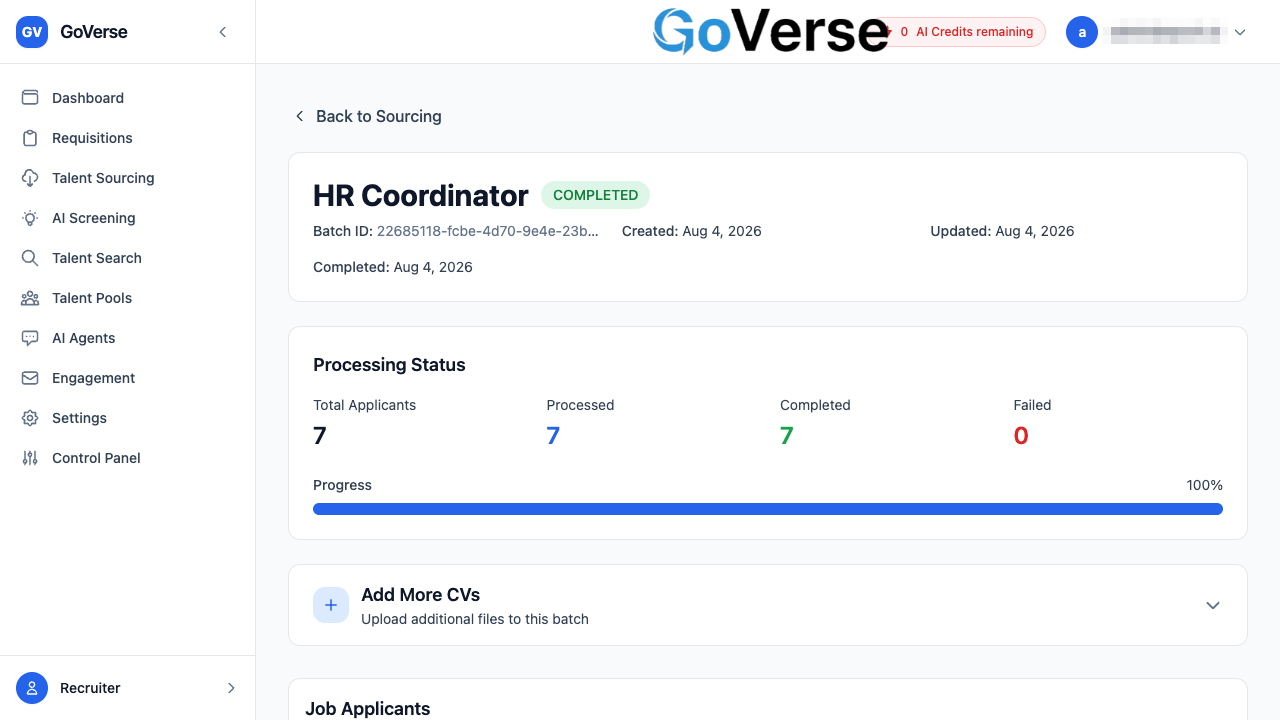
Job Applicants lists every individual CV in the batch and its own status, so you can see file-by-file exactly what happened.
Individual CV statuses
Each file in the batch carries its own status:
| Status | Meaning |
|---|---|
| Queued | Waiting in line to be processed |
| Processing | Currently being read and enriched by GoVerse |
| Completed | Successfully turned into a candidate profile |
| Failed | Couldn't be processed (the reason is shown next to the file) |
For a Completed CV, you get action buttons to:
- View Profile — open the candidate's full profile.
- Download CV — download the original resume file.
- Delete Profile — remove that candidate.
For a Failed, Queued, or Processing file, you can remove the record from the batch.
Adding more CVs to an existing batch
You don't have to get everything in on the first go. On the batch status page, expand the Add More CVs panel to drop in additional files or folders. They're processed and added to the same batch — same format rules apply (PDF/DOCX, up to 10 MB each).
Handling failures
A failure doesn't stop the rest of the batch — the CVs that can be processed still go through. When something goes wrong:
- A single CV failed. Look at the failed row in the Job Applicants list — the reason appears right there (for example, a corrupt or unreadable file). Fix or re-export the file and add it again using Add More CVs, then remove the failed record.
- The whole batch failed. The status page shows a red error box with a plain-language message, an expandable View Error Details section, and an error code. If it isn't clear how to resolve it, share the error code with your GoVerse contact.
Most single-file failures are the file itself
Password-protected PDFs, scanned images with no selectable text, or files that aren't really PDF/DOCX are the usual culprits. Re-saving or re-exporting the resume and re-uploading usually fixes it.
How sourced candidates become searchable profiles
This is the payoff of sourcing. When a CV reaches Completed, GoVerse has already:
- Read the document and pulled out its sections (experience, education, skills, contact info).
- Cleaned and standardised the details so they're consistent with everyone else's.
- Indexed the profile for search, so it can be matched by meaning — not just exact keywords.
From that point on, the candidate is a first-class profile in GoVerse. You can:
- Find them in Talent Search.
- Rank them against a role in AI Screening.
- Add them to a Talent Pool.
In other words: sourcing is the front door, and every completed CV walks through it to become a candidate you can act on across the whole platform.
Related
- AI Screening — rank your sourced candidates against a role.
- Talent Search — find sourced candidates by skills and background.
- Talent Pools — group candidates for ongoing engagement.
- Plans & feature access — monthly upload limits and which plans include bulk operations.
AI Screening
Menu: AI Screening · Requires a plan with advanced search (Premium+)
AI Screening reads a group of candidates, scores each one against the qualities you decide matter, and ranks them from best fit to worst — with a written explanation of why every candidate landed where they did. Instead of opening 50 CVs one by one, you tell GoVerse what a great hire looks like and let it do the first read for you.
What it's for
Use AI Screening when you have a pool of candidates and need to quickly find the strongest few. It is built for jobs like:
- Shortlisting a batch of applicants — you sourced or imported dozens (or hundreds) of candidates and want the top 10, 20 or 50 surfaced first.
- Comparing applicants to a specific role — screen everyone who applied to a requisition against that job's real requirements.
- Re-ranking a talent pool — take an existing pool and re-order it for a new opening.
- Keeping your standards consistent — save your criteria once and reuse the exact same yardstick across every candidate and every role.
The result is always the same shape: a ranked list, a score out of 100 for each person, and plain-language reasoning you can trust and share.
AI Screening assists — it does not decide
Every candidate stays fully visible with their score, evidence and CV. The ranking is a starting point to speed up your review, not a final hiring decision. You remain in control of who moves forward.
How to get there
Select AI Screening in the left-hand menu.
Don't see it in the menu?
AI Screening is part of the advanced-search capability, which is included in Premium and higher plans. If the menu item is missing, your current plan doesn't include it — contact your GoVerse administrator to upgrade.
You'll also need to be signed in. If you open the page while logged out, GoVerse shows an "Authentication Required" notice and the tools stay disabled until you log in.
Starting a screening
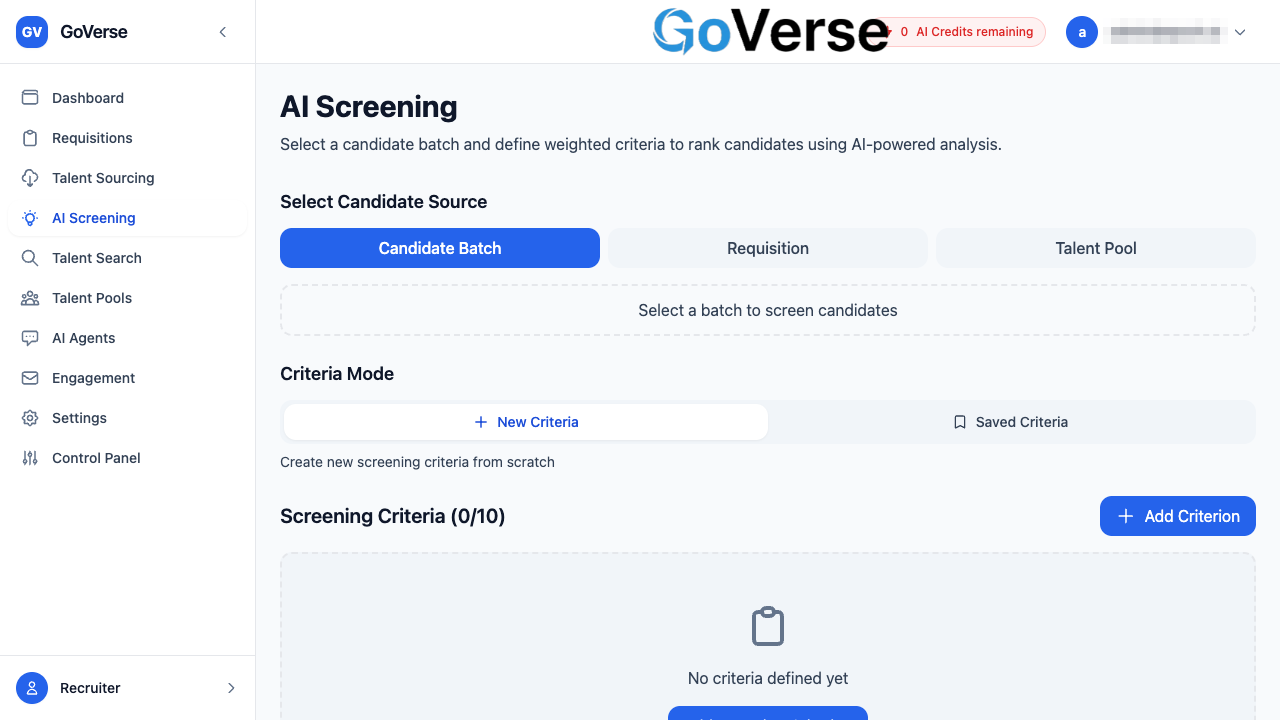
A screening is built in a few short steps on one page: pick who to screen, tell GoVerse what you're looking for, choose how many results you want, and press Start.
Step 1 — Choose who to screen (candidate source)
At the top of the page, pick one of three sources using the toggle buttons:
A batch is a group of candidates you sourced or uploaded together. Click Select a batch to screen candidates and choose from your completed batches. Each batch shows how many candidates it holds and the date it was created.
Only batches that have finished processing appear here.
Screen the people who applied to a specific job opening. Click Select a requisition to screen its applicants and pick from your open requisitions — each shows its requisition number, number of applicants and location.
Only requisitions that already have applicants are listed. Choosing a requisition also pulls in that job's description automatically (see Step 2).
Screen and re-rank an existing talent pool. Click Select a talent pool to screen candidates and pick an active pool — each shows its candidate count and whether it's a short-lived or long-lived pool.
Once you've chosen a source, its name appears in a highlighted card. Use the Change button on that card to switch to a different batch, requisition or pool at any time.
Step 2 — Review the job description (optional but recommended)
When you select a batch tied to a job, or a requisition, GoVerse shows a Job Description panel. Click the arrow to expand it and read the full description.
Let the job inspire your criteria
The job description is there to help you write better screening criteria — scan it for the must-have skills and experience, then turn those into the criteria in Step 3.
Step 3 — Define your screening criteria
Criteria are the qualities GoVerse scores each candidate against — things like "5+ years of Python experience" or "has managed a team". This is the heart of the screening.
To add a criterion: click Add Criterion, then type a short, specific description of what you're looking for.
Weighting — telling GoVerse what matters most: each criterion has a weight slider. Slide it up to make a criterion count for more in the final ranking, or down to make it count for less. GoVerse automatically balances all your weights so they add up to 100%, and shows each one's share as a percentage.
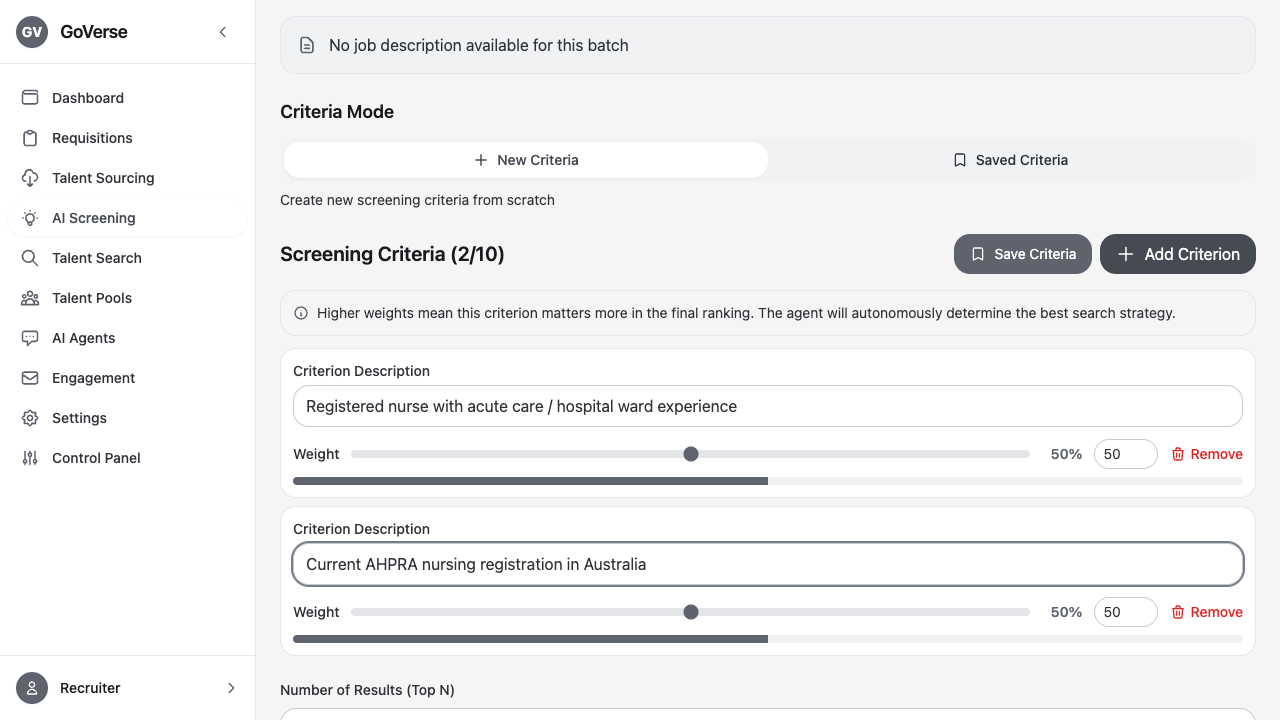
| Rule | Detail |
|---|---|
| Minimum | At least 1 criterion is required to start |
| Maximum | Up to 10 criteria per screening |
| Length | Each criterion can be up to 500 characters |
| Weights | Automatically normalised to total 100% — you don't have to do the maths |
Write criteria the way you'd brief a colleague
Clear, concrete criteria give the best results. Prefer "Experience leading enterprise SaaS sales teams" over a vague "good leader". GoVerse works out the best way to search for and evaluate each one on its own.
Step 4 — Choose how many results
Under Number of Results (Top N), pick how many top candidates you want back: 10, 20, 30 or 50. GoVerse still evaluates everyone in your source — this just controls how many of the highest-ranked candidates it returns.
Step 5 — Start the screening
Press the Start Screening button (it shows the name of your chosen source, e.g. "Screen Senior Engineer Applicants").
Before it runs, GoVerse automatically checks your criteria against your organisation's active policies (see the Compliance section below). If everything passes, the screening kicks off and you're taken to the live status page.
Saved screening criteria (create & reuse)
Rather than retype the same criteria for every role, you can save a criteria set and reuse it later — keeping your screening standards consistent across candidates and across your team.
Saving a set
After building your criteria, click Save Criteria (or Save As New if you've edited a set you loaded). Give it a name (required, up to 100 characters) and an optional description of when to use it, then save.
Saving runs a policy check too
When you save, GoVerse validates the set against your active policies. If it violates a policy, saving is blocked and the reason is shown so you can fix the wording first.
Reusing a set
On the AI Screening page, switch the Criteria Mode toggle from New Criteria to Saved Criteria. A picker appears listing every set you've saved — with its criteria count and when it was last used. Select one and its criteria load instantly, ready to screen or tweak.
Non-compliant sets are locked
Each saved set shows a shield: a green Compliant badge or a red Non-Compliant one. Sets that violate an active policy are greyed out and can't be selected until they're edited to comply.
If you load a saved set and change it without saving, GoVerse marks it with an "Unsaved changes" badge and warns you before you switch modes and lose those edits.
Managing your saved sets
To rename, edit, preview or delete saved sets, go to Settings → Screening Criteria Management. There you can:
- Preview a set to see its criteria and weights.
- Edit the name, description, criteria and weights (weights are shown as percentages; the total must not exceed 100%).
- Delete a set you no longer need (this can't be undone).
- Validate All to re-check every set against your current policies at once.
Watching a screening run
After you start, GoVerse takes you to the live Screening Status page, which refreshes on its own every few seconds. You'll see:
- A progress bar with the current step, a short status message and an estimated time remaining.
- Agent Reasoning (Live) — a running commentary of what GoVerse is doing and why, step by step, including any retries it makes to get better results.
- Search Attempts — each strategy it tried and how many candidates each one returned.
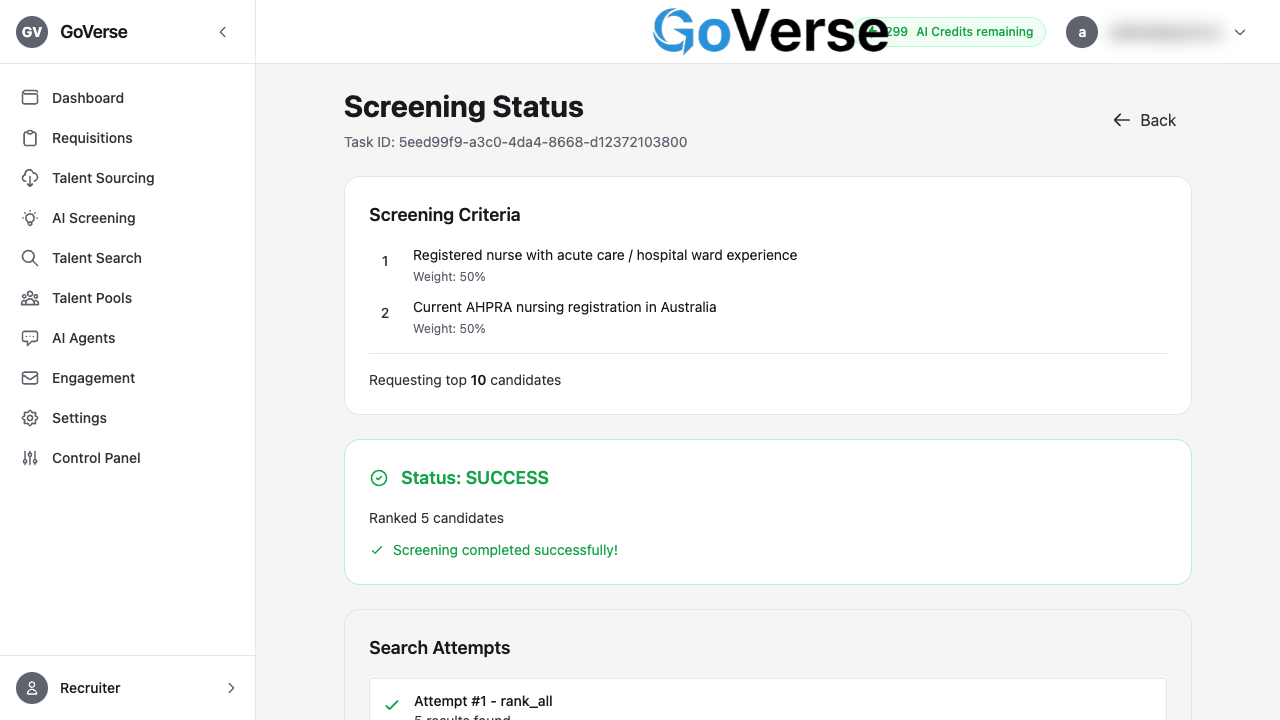
When it finishes, a View Results button appears. If a screening ever fails, you'll get a clear error and a Retry with Modified Criteria option. For the full technical trail, View Full Execution Log shows every logged step.
Screenings don't live forever
Results are kept for a limited time. If you open an old screening and see "Screening results expired", just run a new one — it only takes a moment.
Reading the AI scores and reasoning
The Screening Results page shows your candidates ranked best-first. At the top you'll see how many candidates were ranked and how long the screening took, plus a reminder of the source and the exact criteria that were used.
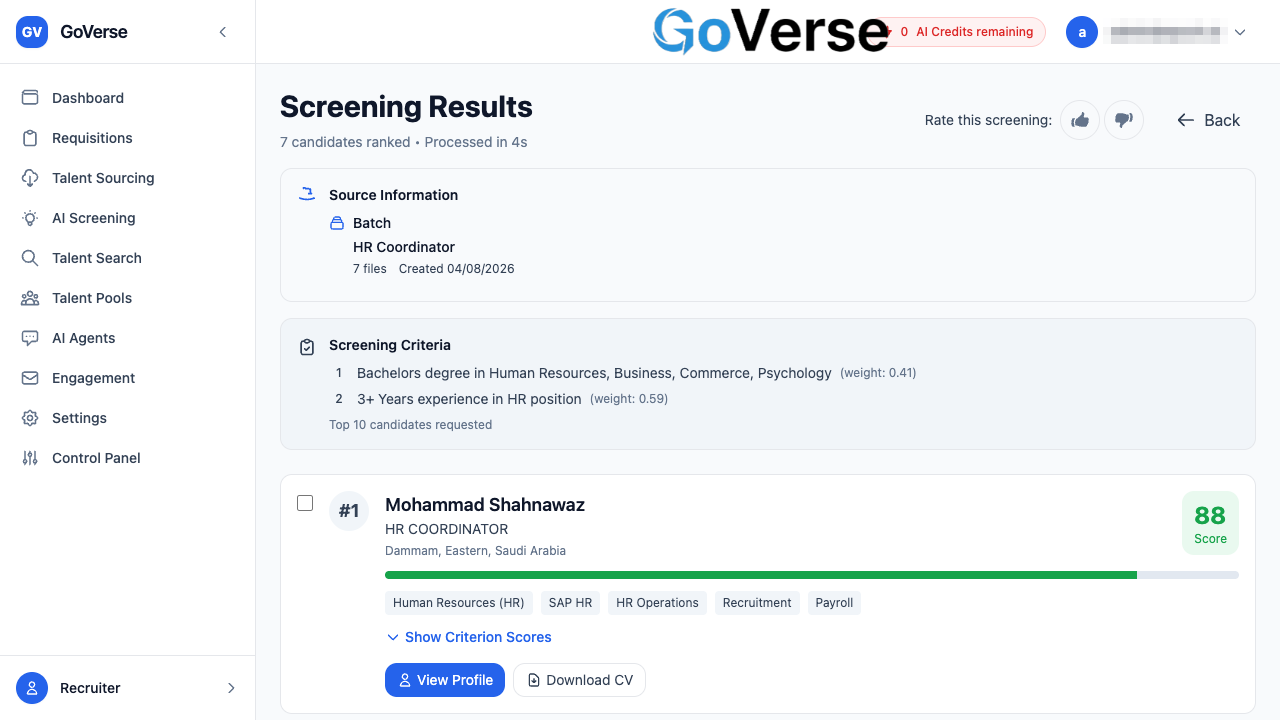
The overall score
Every candidate gets a single score out of 100 and a coloured bar so you can scan the list at a glance. The colour is a quick health signal:
| Score | Colour | Read it as |
|---|---|---|
| 80–100 | Green | Strong match |
| 60–79 | Blue | Good match |
| 40–59 | Yellow | Partial match |
| 0–39 | Red | Weak match |
The reasoning behind the score
Click Show Criterion Scores on any candidate to open the full explanation. For each of your criteria you'll see:
- The criterion and its weight (how much it counted).
- A score out of 100 for that specific criterion.
- A confidence level — how sure GoVerse is about that judgement.
- A short evidence quote pulled from the candidate's profile or CV that backs up the score.
Below the criteria, an Overall Assessment summarises the fit with a Strong / Moderate / Weak Match label and a plain-language summary.
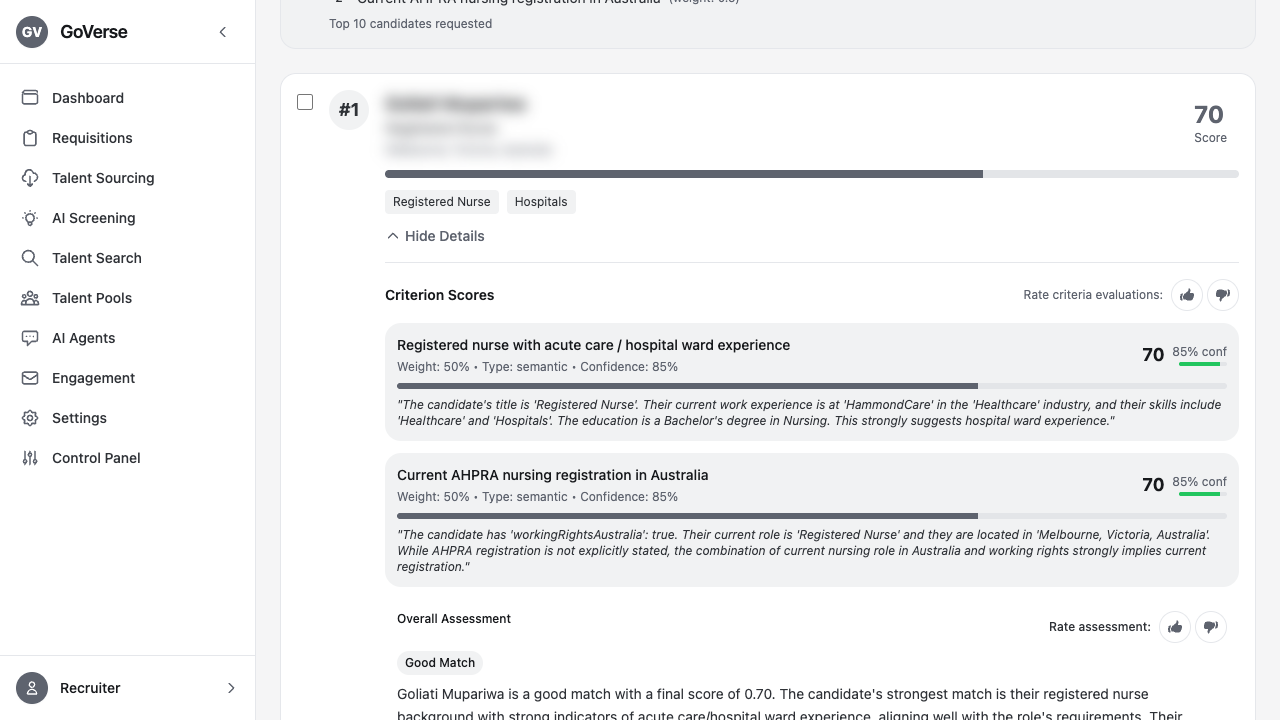
The evidence is the point
The number tells you the what; the evidence quote tells you the why. Skim the evidence to confirm a score makes sense before you act on it.
Tell GoVerse when it's right (or wrong)
Throughout the results you'll find thumbs-up / thumbs-down rating controls — on the whole screening, on the criterion scores, and on each candidate's overall assessment. Your feedback helps improve future screenings, so use it whenever a judgement looks especially good or off.
Acting on the results
Once you've reviewed the ranking, you can move candidates forward without leaving the page.
On a single candidate card:
- View Profile — open the candidate's full profile (their score and reasoning travel with you).
- Download CV — save the candidate's CV.
- Move Stage — for candidates sourced from Workday, advance them to the next hiring stage right from the card.
In bulk — tick the checkboxes on the candidates you want, and an action bar appears:
- Add to Requisition — attach the selected candidates to a job opening. You can search your active requisitions and add everyone in one go, with a progress bar as they're added.
- Add to Talent Pool — drop the selected candidates into a talent pool. Pick an existing pool from the picker; a confirmation banner tells you how many were added.
- Clear — deselect everyone and start over.
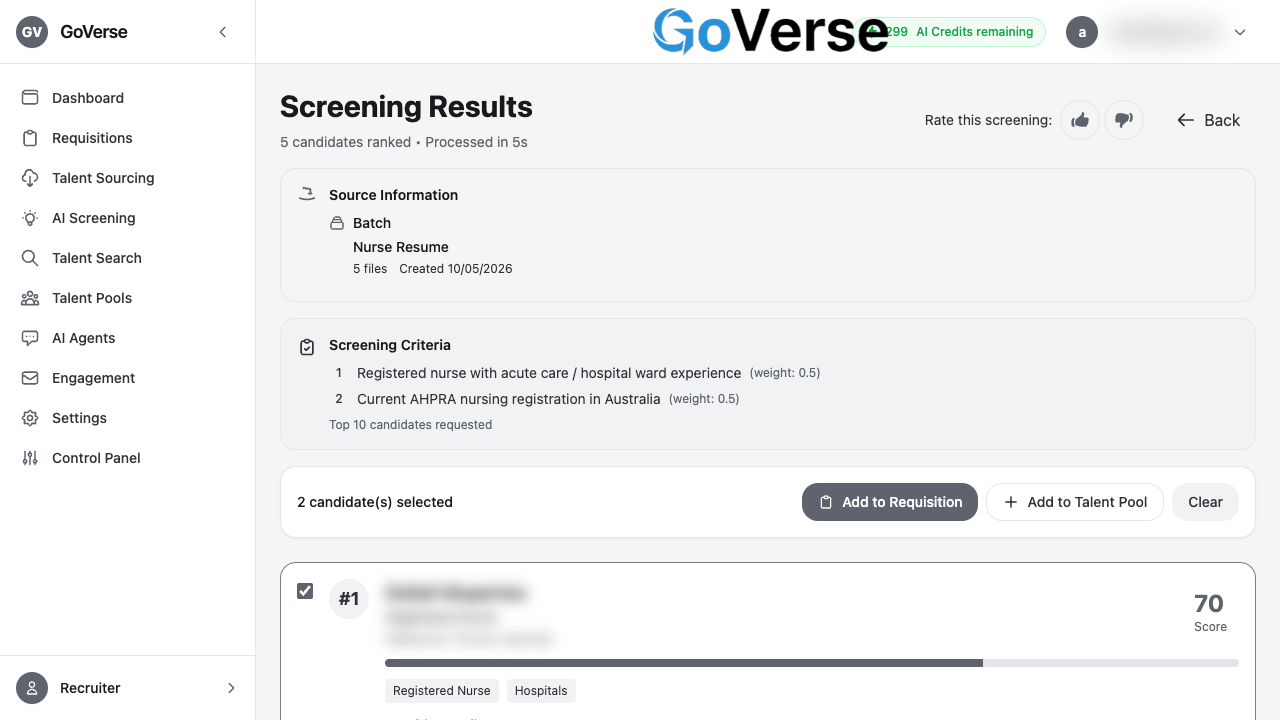
When you're done, use New Screening to start another run, or View Execution Log to inspect the details of this one.
Staying compliant
GoVerse checks your screening criteria against your organisation's active policies at two moments: when you save a criteria set, and again right before a screening runs. This helps keep your screening fair and within your company's hiring guidelines.
If a check fails, a Policy Compliance Check Failed window explains exactly what happened. For each policy it shows:
- Whether the criteria are Compliant or Non-Compliant, with a confidence level.
- The reasoning for the decision.
- Practical recommendations for how to reword your criteria to comply.
Adjust the flagged criteria and try again — the screening only proceeds once your criteria pass.
No policies set up? No problem
If your organisation hasn't configured any policies, the compliance check simply passes and your screening runs as normal.
Quick reference
| I want to… | Do this |
|---|---|
| Screen a group of candidates | AI Screening → pick a source → add criteria → Start Screening |
| Focus the ranking on what matters | Slide each criterion's weight up or down |
| Reuse the same criteria next time | Save Criteria, then load it via the Saved Criteria toggle |
| See why a candidate scored as they did | Open results → Show Criterion Scores |
| Move strong candidates forward | Tick candidates → Add to Requisition or Add to Talent Pool |
| Manage or delete saved criteria | Settings → Screening Criteria Management |
Talent Search
Menu: Talent Search · Requires a plan with advanced search (Premium+)
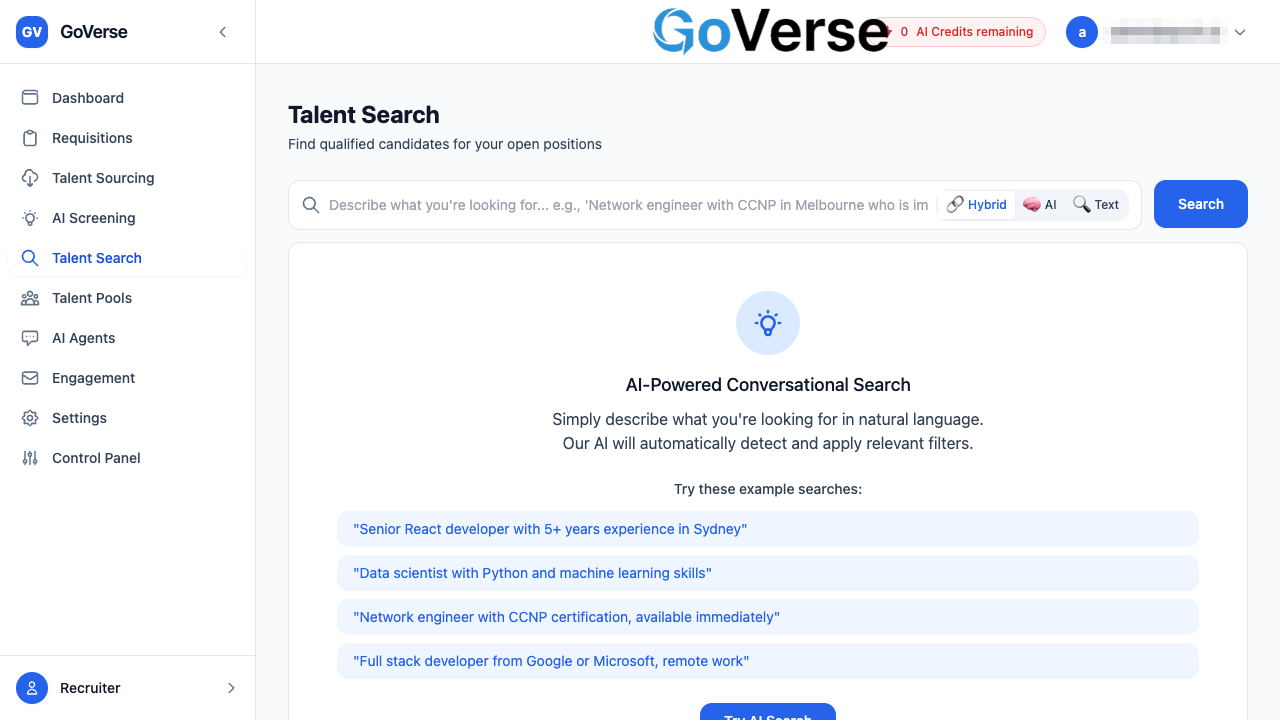
Talent Search lets you find candidates in your GoVerse talent database by simply describing who you're looking for in plain English. You don't build a query out of boxes and drop-downs — you type a sentence like you'd say it to a colleague, and GoVerse works out the roles, skills, locations and experience you mean, finds matching people, and ranks them by how well they fit.
What it's for
Use Talent Search when you want to discover people already in your database for an open role — not to review one specific applicant, but to surface the best matches from everyone you have on file.
Typical uses:
- Find candidates for a role you're about to open ("who do we already have?").
- Build a shortlist to add to a requisition or a talent pool.
- Start outreach by enrolling promising people into an email sequence.
How this is different from AI Screening
Talent Search finds and ranks people across your whole database from a plain-language description. AI Screening takes a specific set of candidates and scores them in depth against a role's criteria. Search first to build the list; screen later to go deep.
How to get there
Select Talent Search in the left-hand menu.
Don't see it?
Talent Search is part of GoVerse's advanced search capability and appears only on plans that include it (Premium and above). If the menu item isn't there, your plan doesn't currently include advanced search — contact your administrator.
Entering a natural-language query
The search bar sits across the top of the page. Type your request the way you'd describe the person out loud, then press Enter or click Search.
You can mention any mix of:
- Role or title — "senior React developer", "network engineer"
- Skills — "Python", "machine learning", "CCNP"
- Location — "in Melbourne", "Sydney", "remote"
- Experience — "5+ years"
- Availability — "available immediately"
- Company background — "from Google or Microsoft"
Example queries
Not sure how to phrase it? The landing page offers ready-made examples you can click to run instantly:
| Example query | What GoVerse picks up |
|---|---|
Senior React developer with 5+ years experience in Sydney |
Title, skill, experience, location |
Data scientist with Python and machine learning skills |
Title + two skills |
Network engineer with CCNP certification, available immediately |
Title, certification, availability |
Full stack developer from Google or Microsoft, remote work |
Title, company background, work mode |
Write it like a sentence
You don't need special syntax, quotes, or operators. A full, natural sentence such as "Network engineer with CCNP in Melbourne who is immediately available" works better than a list of disconnected words.
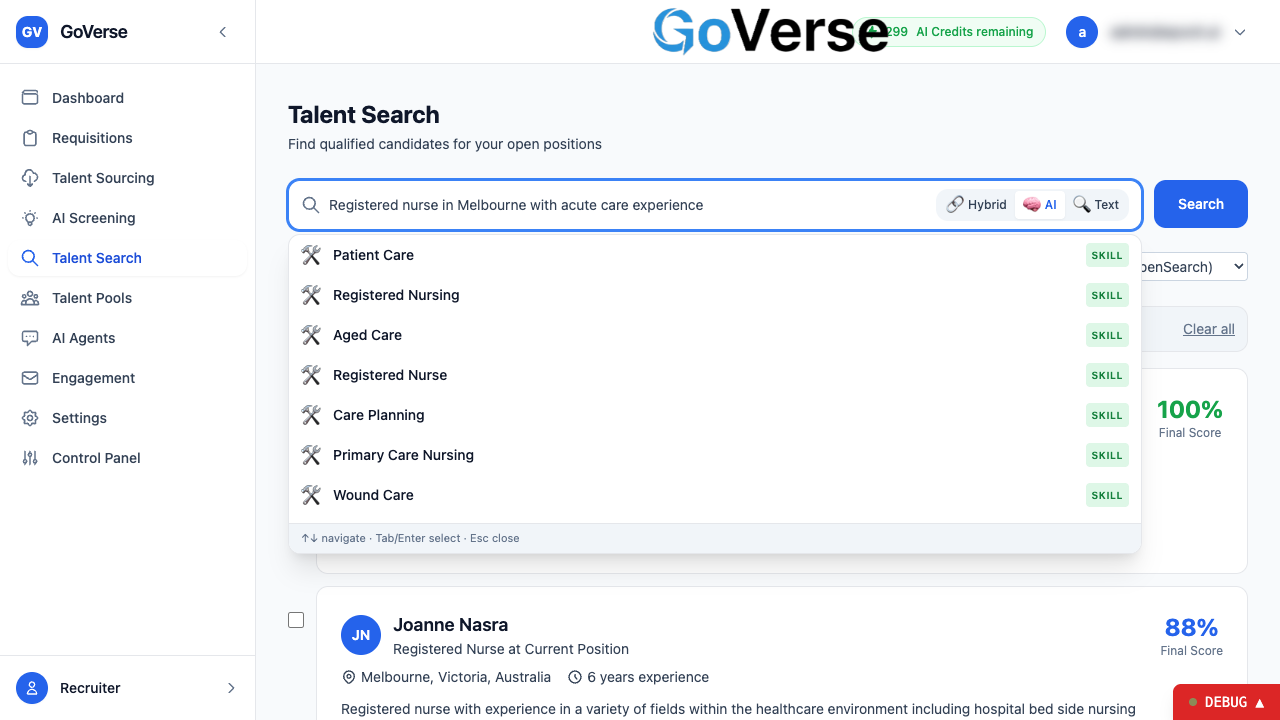
As-you-type suggestions
Once you've typed two or more letters, GoVerse offers autocomplete suggestions drawn from the skills, job titles and locations already in your database. Each suggestion is tagged so you know what it is:
| Tag | Meaning |
|---|---|
| 🛠️ Skill | A skill, tool, or certification |
| 👔 Title | A job title or role |
| 📍 Location | A city or region |
You can pick a suggestion with the mouse, or use the keyboard:
- Up / Down — move through the list
- Tab or Enter — select the highlighted suggestion
- Esc — close the list
Filters and refinements
GoVerse turns the important parts of your query into filter chips — small coloured tags that sit inside the search bar. This is how you refine a search: add or remove chips, and the results update to match.
When you pick an autocomplete suggestion, it becomes a chip:
- 🛠️ Skill chips are green
- 👔 Title chips are blue
- 📍 Location chips are purple
Working with chips:
- Add a chip by choosing an autocomplete suggestion.
- Remove a chip by clicking the ✕ on it — or press Backspace when the text box is empty to remove the last one.
- Free text you leave in the box is searched alongside your chips.
When one or more chips are active, a banner in the top-right reads "AI Search Intelligence Active — Automatically detected N filters from your search query", and a summary line above the results shows your query text plus how many filters are applied. Use Clear all there to reset the search.
Where did the filters come from?
GoVerse detects these criteria from your sentence automatically — that's the "AI Search Intelligence". You're always in control: any chip you don't want, just remove.
Choosing a search mode
At the right end of the search bar is a three-way toggle that controls how GoVerse matches candidates. Hybrid is the default and is right for almost everyone.
Combines exact word matching with meaning-based matching for the best all-round results. Start here.
Meaning-based matching. Finds relevant candidates even when their profile uses different words than your query (for example, matching "front-end engineer" to a query for "React developer"). Good when you care about the kind of person more than exact wording.
Plain keyword matching. Returns candidates whose profiles contain the exact words you typed. Good when you're looking for a specific certification name or an exact term.
Switching modes re-runs your current search automatically.
Understanding the ranked results
Each result is a candidate card. Cards are ordered by how well GoVerse thinks the person fits your search, best matches first.
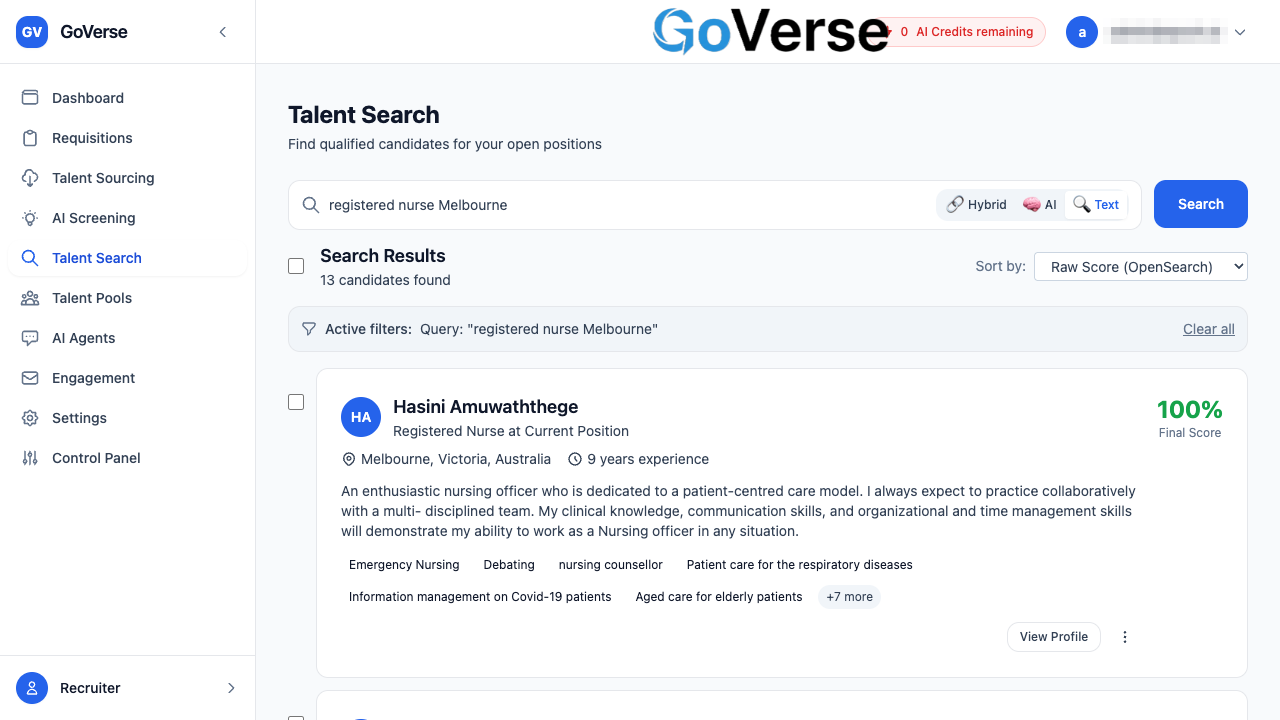
A card shows:
- Name and current role — e.g. "Senior Engineer at Acme", or "Not currently employed" if no current job is on file.
- Location 📍 and years of experience.
- Profile summary — a short description of the candidate.
- Matched-filter ticks — for each filter chip the candidate satisfies, a green ✓ tag appears (Title, Skill, or Location). If some of your filters aren't met, a small grey note says "N filters not matched", so you can see at a glance how complete the match is.
- Skills — up to six skills, with any that match your search highlighted in green and ticked (✓). A "+N more" tag indicates additional skills.
- Salary expectation — shown when the candidate has provided one.
The match score
On the right of each card is a score. Higher is a stronger fit. When the score is shown as a percentage, its colour gives you an instant read:
| Colour | Score | Read as |
|---|---|---|
| 🟢 Green | 90%+ | Excellent match |
| 🔵 Blue | 80–89% | Strong match |
| 🟡 Yellow | 70–79% | Reasonable match |
| 🔴 Red | Below 70% | Weaker match |
The results header tells you the total number of candidates found, and how many you currently have selected.
Re-ordering results
Use the Sort by drop-down (top-right of the results) to change the order. The default, relevance-based order is recommended for most searches.
| Sort option | Orders by |
|---|---|
| Raw Score (OpenSearch) | The underlying search engine's raw relevance score |
| Normalized Score (0–100) | Relevance rescaled to an easy 0–100 range |
| Final Score (After AI) | The fit score after GoVerse's AI re-ranking |
| Experience | Years of experience |
| Salary | Salary expectation |
| Location | Location |
Load more
GoVerse shows the first batch of matches. Scroll to the bottom and click Load More Candidates to bring in the next batch.
Acting on candidates
There are two ways to act on results: on a single candidate from its card, or on many at once using the selection bar.
From a single card
- View Profile — opens the candidate's full profile page, where you can see their complete history and details.
- ⋮ (more actions) — opens a small menu with quick shortcuts, including Add to Requisition (see below), plus bookmark and talent-list shortcuts.
Selecting several candidates
Tick the checkbox to the left of any card to select it. The checkbox at the top of the results list selects or clears all candidates on the page. As soon as one or more are selected, an action bar appears along the bottom of the screen showing how many are selected, with three buttons.
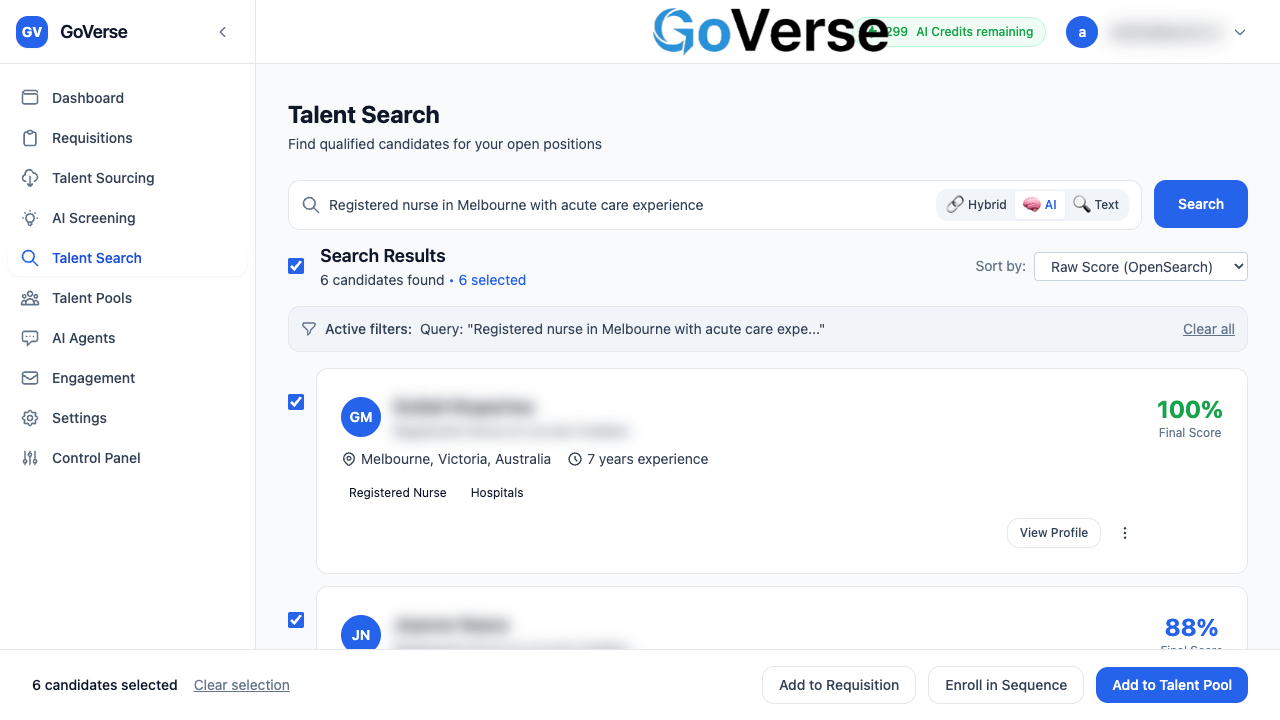
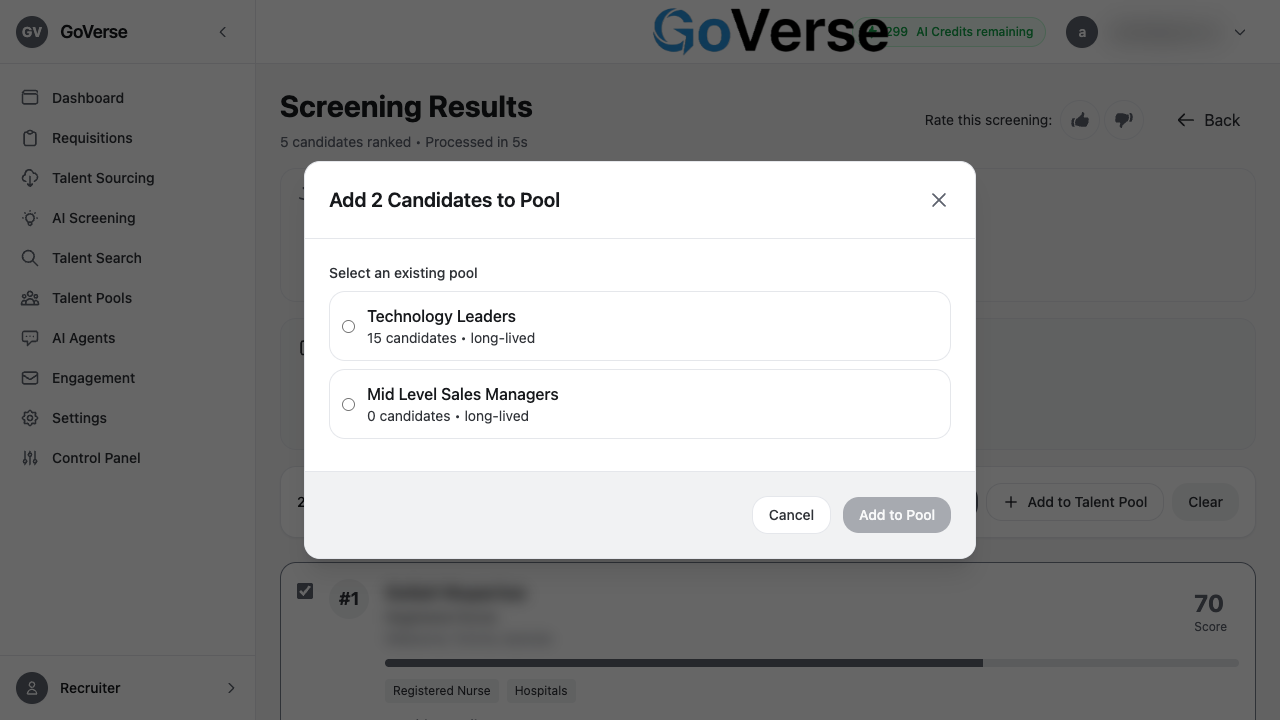
Opens a window listing your active talent pools (each showing its current candidate count). Pick one and click Add to Pool to add all selected candidates. If you have no pools yet, you'll be prompted to create your first pool; you can also start a new pool from the selected candidates.
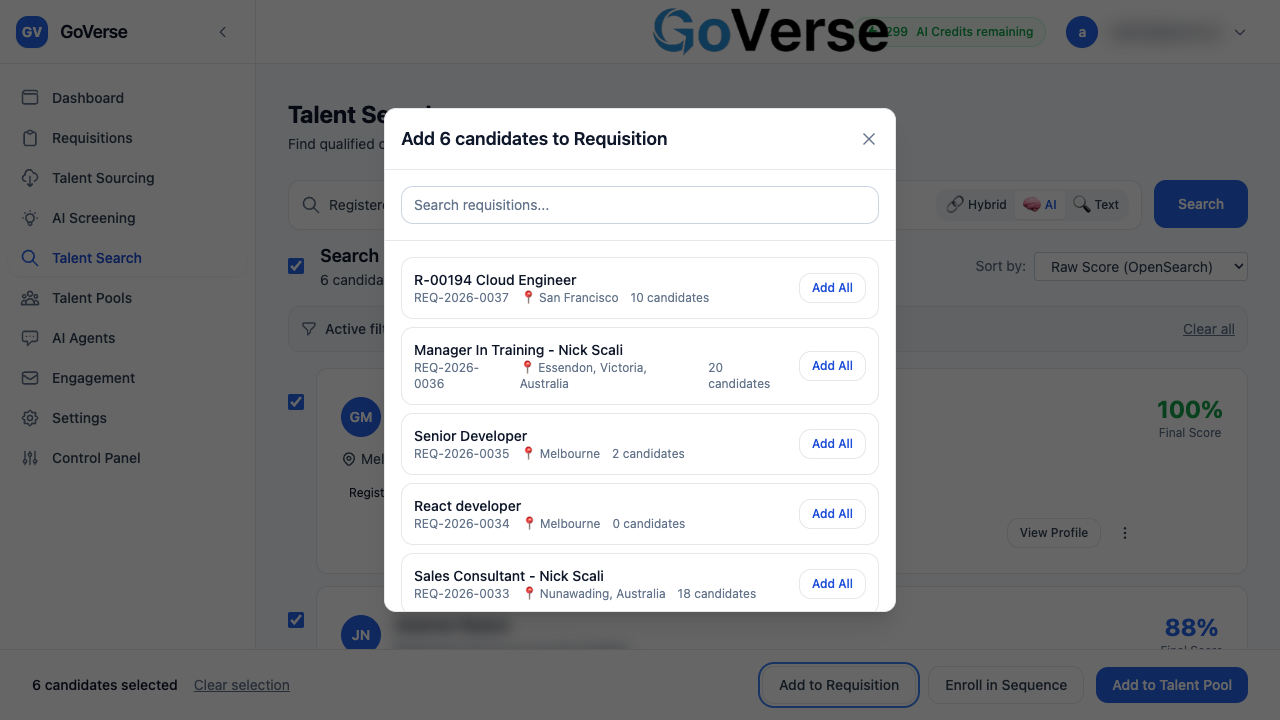
Opens a window where you search your active and draft requisitions and add the selected candidates to one. Each requisition shows its number, location, and current candidate count. Click Add All and a progress bar tracks the additions, ending with a summary such as "8 of 10 added" (anyone already on that requisition is skipped).
From a single card's ⋮ menu, the same Add to Requisition option adds just that one candidate; you'll see a ✓ Added confirmation on each requisition.
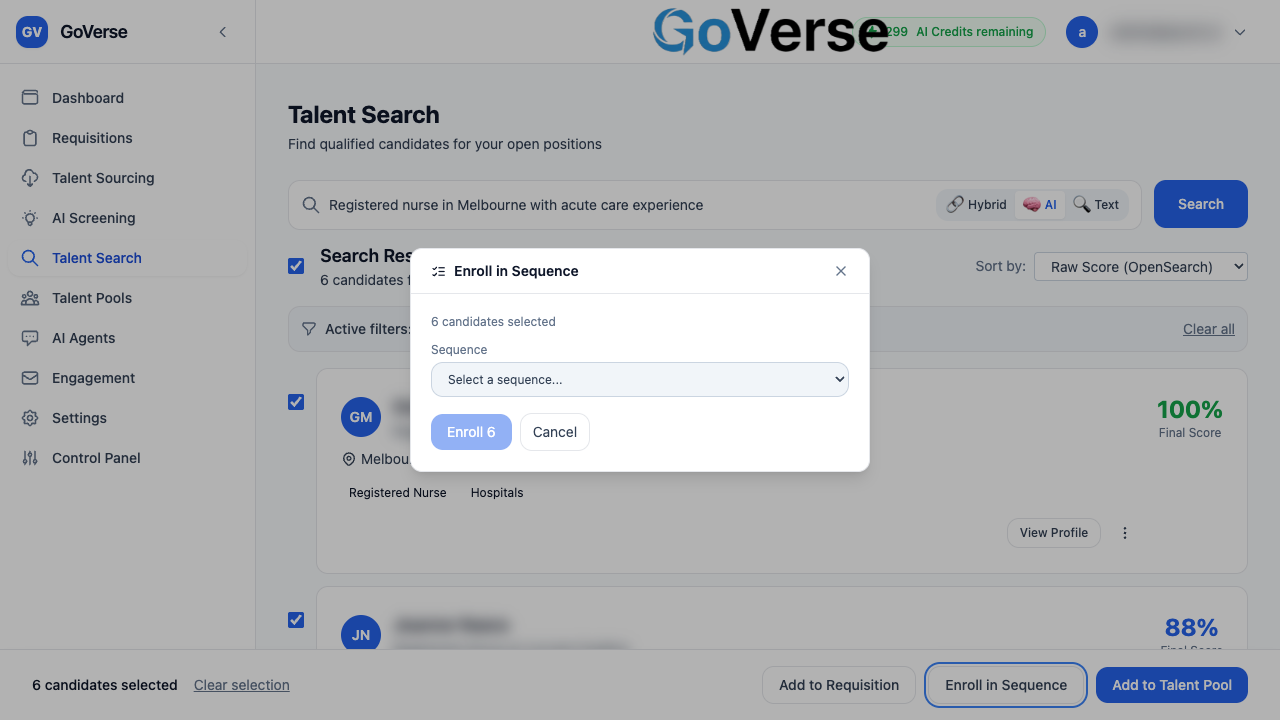
Opens a window to enrol the selected candidates into an active email sequence for outreach. Choose a sequence from the list — each is marked as a Nurture or Requisition sequence. If you pick a requisition sequence, you'll also be asked to choose a requisition, because the sequence's job details (title, link) are filled in from it. Click Enrol to finish.
Clear your selection
Use Clear selection in the action bar to deselect everyone and start over, without losing your search results.
Quick troubleshooting
No candidates found
Try loosening your search — remove a filter chip, use fewer specific terms, or switch to Hybrid or AI mode so GoVerse matches on meaning rather than exact words. Use Clear All Filters to reset and try again.
The search is taking a while
Very broad or very long queries take longer. If a search times out, try a shorter, more specific description.
Talent Pools
Menu: Talent Pools · Requires a plan with advanced search (Premium+)
Talent Pools are named, reusable collections of candidates — for example a pool per role family ("Senior Software Engineers"), per campaign ("Q1 Sales Drive"), or per location. Every pool is tied to a set of screening criteria, so the moment you add a candidate, GoVerse scores them with AI against those criteria and shows you a match percentage with a plain-English breakdown of why. From there you review, shortlist, and move the strongest people into a requisition or an engagement sequence.
What makes a pool an AI pool
A pool always carries a screening criteria set (chosen when you create it). Candidates added to the pool are automatically evaluated against that criteria set — you don't run scoring manually. The list page calls these "AI Talent Pools" for that reason.
What it's for
- Group candidates into meaningful, named lists you can come back to.
- Rank automatically — each candidate gets a 0–100% match score against the pool's criteria, so the best fits float to the top.
- Understand the score — every score comes with a per-criterion breakdown and a short written explanation ("evidence") for each criterion.
- Take action in bulk — shortlist people, enrol a group into an email sequence, or remove candidates who aren't a fit.
- Two lifespans — keep an evergreen pipeline (long-lived) or spin up a short-term pool for a single hiring campaign (short-lived).
How to get there
Select Talent Pools in the left-hand menu. (The item is hidden if your plan doesn't include advanced search.)
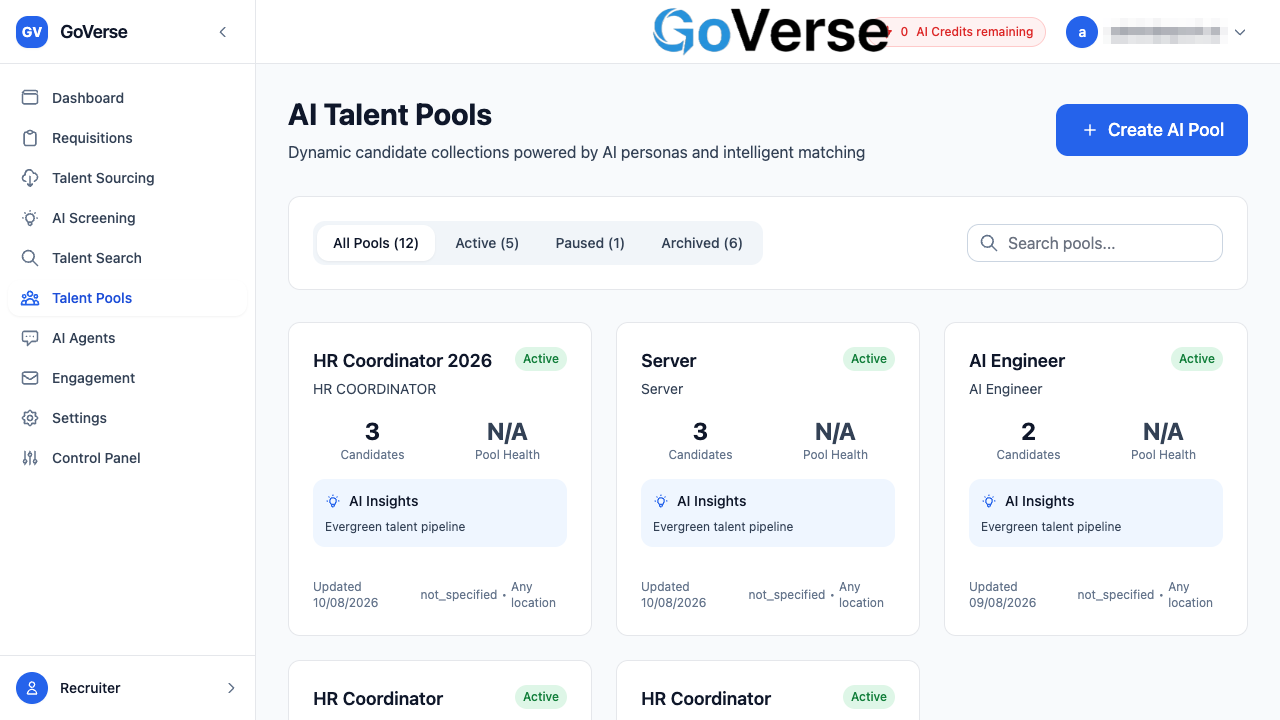
The landing page — AI Talent Pools — shows every pool as a card. Each card displays the pool name, description, status, how many Candidates it holds, a Pool Health figure, the pool's top skill tags, and when it was last updated.
You can narrow the list with the tabs and search box at the top:
| Control | What it does |
|---|---|
| All Pools / Active / Paused / Archived tabs | Filter by status. Each tab shows a live count. |
| Search pools… box | Find a pool by name or description. |
If you don't have any pools yet, the page shows an empty state with a Create Your First AI Pool button.
Creating a pool
- On the Talent Pools page, select Create AI Pool (top right).
-
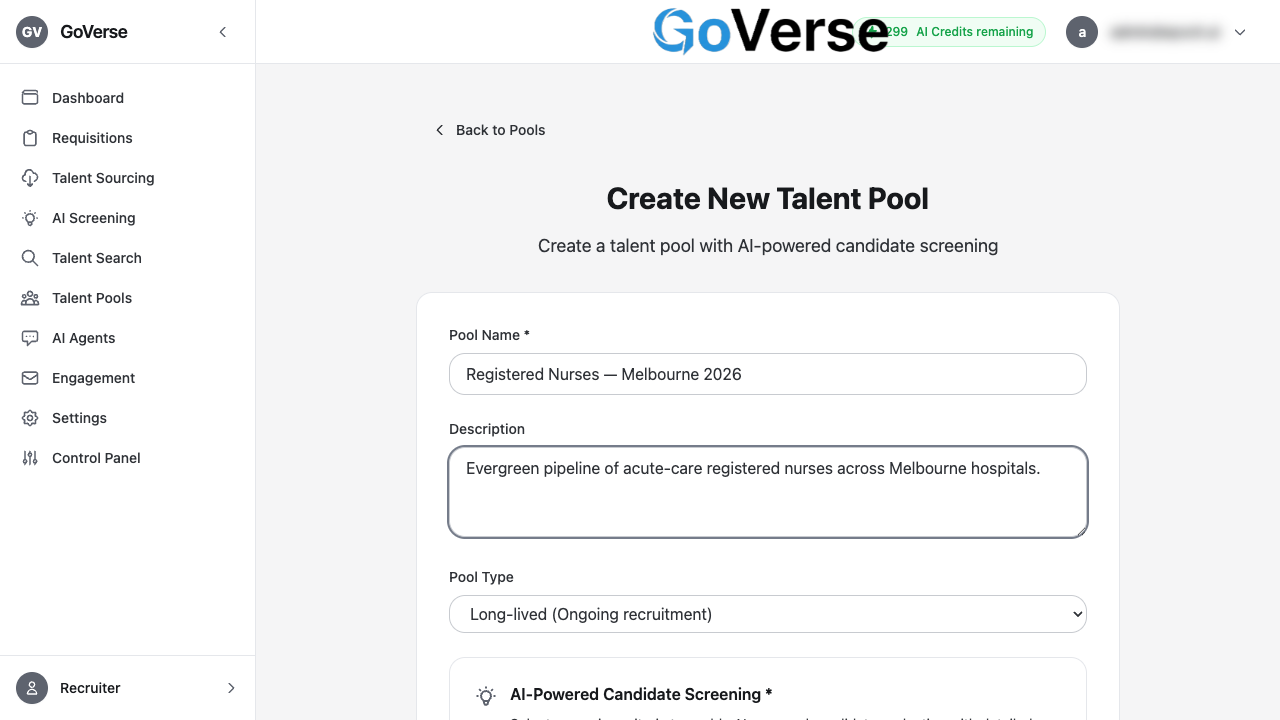
Fill in the pool details:
Field Notes Pool Name (required) A recognisable name, e.g. Senior Software Engineers Q1 2026. Description A short line describing who belongs in this pool. Pool Type Long-lived — an ongoing pipeline you keep topped up. Short-lived — a campaign or single-project pool. -
Under AI-Powered Candidate Screening, choose a Screening Criteria Set from the dropdown. When you pick one, its individual criteria and their weights are listed so you can confirm you've chosen the right one.
- Select Create Pool.
A screening criteria set is required
You can't create a pool without selecting a screening criteria set — the Create Pool button stays disabled until you do. This is what powers the automatic AI scoring later. Criteria sets are created and managed in Talent Search / Screening Criteria, and the same set can be reused across many pools.
Editing later
You can rename a pool, change its description, switch its status, or swap the screening criteria set at any time from the pool's detail page (Edit Pool).
Adding candidates
You don't add people from inside a pool — you send them to a pool from wherever you're looking at candidates, using the shared Add to Pool window. Two places open it:
- Run a search under Talent Search.
- Tick the candidates you want (or use select-all).
- In the action bar that appears at the bottom, select Add to Pool.
- Open a completed screening under AI Screening.
- On a candidate in the results, select Add to Talent Pool.
In both cases the same Add to Pool window opens:
- It lists your active pools, each showing its name, current candidate count, and type.
- Pick one pool, then select Add to Pool.
- If you have no active pools yet, the window shows a Create your first pool link instead.
Where the candidates land
Added candidates appear in the pool's detail page as New. If the pool has a screening criteria set (it always does), AI scoring kicks off automatically — see the next section.
Automatic AI scoring
This is the core of what a pool does. As soon as a candidate is added, GoVerse scores them against the pool's screening criteria using AI — you never trigger it by hand.
What you'll see on each candidate once scoring finishes:
- An AI Scored badge.
-
A large match percentage (0–100%), colour-coded so quality is obvious at a glance:
Match score Colour 80% and above Green (strong) 60–79% Blue (good) 40–59% Amber (borderline) Below 40% Red (weak) -
A Show Criterion Scores toggle. Expand it to see, for every criterion in the pool's set: the criterion's score, its weight (how much it counts toward the overall match), a progress bar, and a short evidence line explaining the score in words.
Scoring runs in the background
Scoring may take a moment. A status badge shows progress while a candidate is still being evaluated, and if scoring fails for someone you can retry it on that candidate. Candidates with a completed score simply show their match %.
Tell the AI when it's off
Each scored candidate has a Rate this overall match score control (thumbs up / thumbs down). Your rating feeds back to improve scoring — a thumbs-down lets you add a short comment explaining why.
The pool detail view
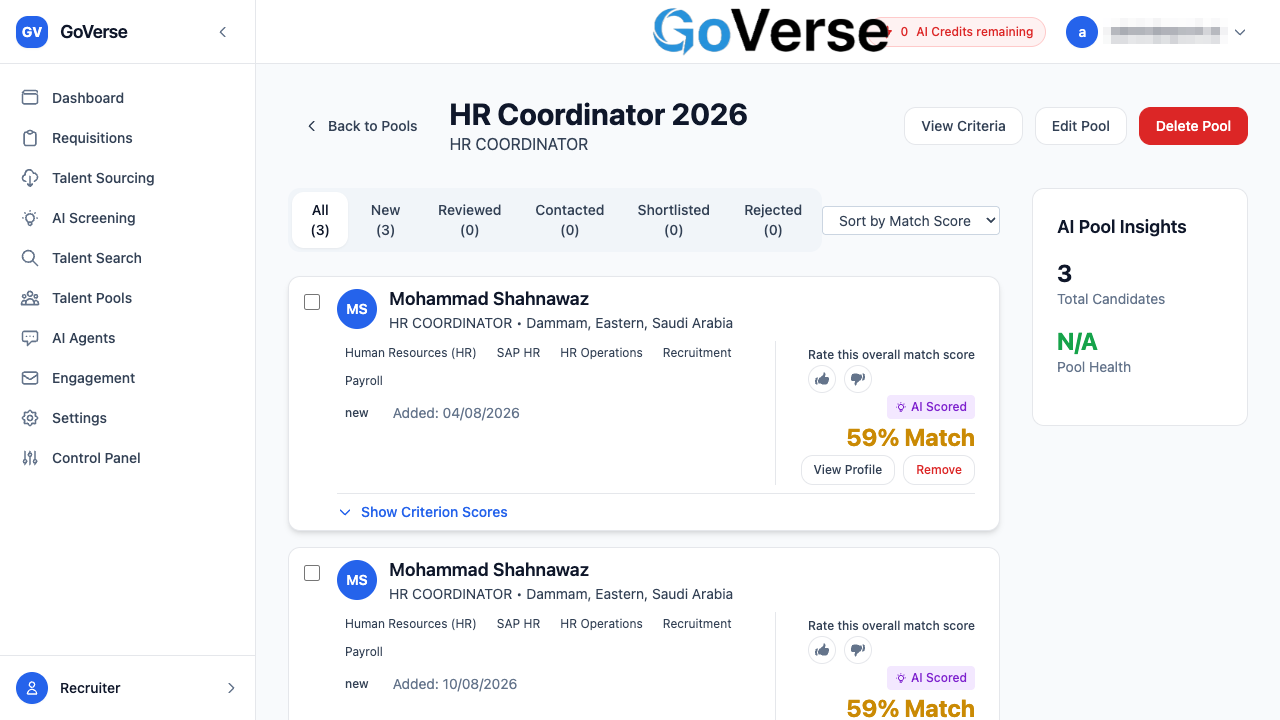
Selecting a pool card opens its detail page. It has three parts:
1. Header actions
| Button | What it does |
|---|---|
| View Criteria | Opens a summary of the pool: name, description, type, status, and the full screening criteria set (each criterion and its weight). |
| Edit Pool | Change the name, description, status, or screening criteria set. |
| Delete Pool | Permanently deletes the pool. You must type delete to confirm. |
2. Candidate list (main area)
- Status tabs — All / New / Reviewed / Contacted / Shortlisted / Rejected, each with a count, to filter the list by where each candidate is in your process.
- Sort — order the list (e.g. by match score).
- Each candidate row shows their name, title, experience, location, top skills, current status, when they were added, their AI match score and breakdown, plus View Profile and Remove actions.
3. AI Pool Insights (side panel)
A summary panel showing the pool's Total Candidates and Pool Health.
Pool Health
Pool Health is an at-a-glance indicator of how strong the pool is overall. It also appears on each pool card on the landing page (green when healthy, amber/red when the pool needs attention).
Working a pool: review, shortlist, act
Once candidates are scored, the pool becomes your shortlisting workspace.
Review individually. Expand a candidate's Criterion Scores to see exactly why they scored as they did, or select View Profile to open their full candidate profile.
Filter as you go. Use the status tabs to separate people you've already Reviewed or Shortlisted from those still New.
Act in bulk. Tick one or more candidates (checkbox on each card) and a bar appears at the bottom of the page with these actions:
Select Enroll in Sequence to add the selected candidates to an engagement email sequence — for example a nurture sequence for a long-lived pool, or a requisition sequence tied to a specific job. Pick the sequence in the window that opens.
Select Remove from Pool to take the selected candidates out of this pool.
Remove is safe
Removing a candidate only takes them out of this pool — it never deletes their candidate profile or affects other pools.
Move toward a requisition. For requisition-focused hiring, enrol your shortlist into the requisition's sequence (above) to start outreach, and use the candidate's profile to progress them into the requisition's pipeline.
Notes & tips
- Every pool needs criteria. Scoring, breakdowns, and match percentages all come from the pool's screening criteria set — that's why one is required at creation. Reuse proven criteria sets across pools rather than rebuilding them.
- Long-lived vs short-lived is about intent, not a hard limit: use long-lived for an ongoing pipeline you keep warm, short-lived for a single campaign.
- Statuses (New → Reviewed → Contacted → Shortlisted, or Rejected) are yours to manage — they help you track where each candidate is, and drive the filter tabs.
- Deleting a pool is permanent and requires typing
delete; removing a candidate from a pool is not — it leaves the profile untouched.
AI Agents (GoVerse Agents)
Menu: AI Agents · Requires a plan with advanced AI (Premium+)
GoVerse Agents is a conversational AI assistant built into GoVerse. You chat with it in plain language and it can use recruitment tools on your behalf — answering questions and helping with tasks across your data.
Key tasks
- Ask questions — about candidates, requisitions, and your recruiting data.
- Get help with tasks — the assistant can use connected tools to fetch and act on information.
- Work conversationally — follow-up questions keep their context.
Uses AI credits
Conversations with GoVerse Agents consume AI credits (shown in the header).
How to get there
Select AI Agents in the left menu. (Hidden if your plan doesn't include advanced AI.)
Being expanded
A detailed walkthrough (starting a conversation, what the assistant can do, and good prompts) with screenshots is being added to this page.
Engagement
Menu: Engagement → Sequences / Templates · Requires a plan with engagement (Premium+)
Engagement is how you nurture candidates over time with email. Instead of one-off messages, you build multi-step sequences that send the right email on the right day, and reuse templates for consistent, on-brand copy.
In this section
- Sequences — build and manage multi-step email journeys.
- Create a sequence with AI — let AI draft a full sequence from a short brief, or assemble one from existing templates.
- Templates — the reusable emails your sequences send.
How it fits together
A sequence is an ordered set of steps. Each step sends an email on a set day, using a template. Sequences auto-pause when a candidate replies, so you never keep emailing someone who's already engaged. Nothing sends until you activate a sequence and enrol candidates.
How to get there
Select Engagement in the left menu, then Sequences or Templates. (Hidden if your plan doesn't include engagement.)
Sequences
Menu: Engagement → Sequences
A sequence is an automated series of messages GoVerse sends to candidates on your behalf — a first email today, a follow-up a few days later, and so on. You build the steps once, enrol candidates, and GoVerse spaces the messages out and sends them for you. The moment a candidate replies, the sequence pauses so a real person can take over.
What a sequence is for
Two kinds of sequences share one builder:
- Nurture — general outreach that isn't tied to a specific job (keeping passive talent warm, re-engaging a pool).
- Requisition — outreach tied to one open job, so the copy can mention the role and link to the posting.
The Sequences list
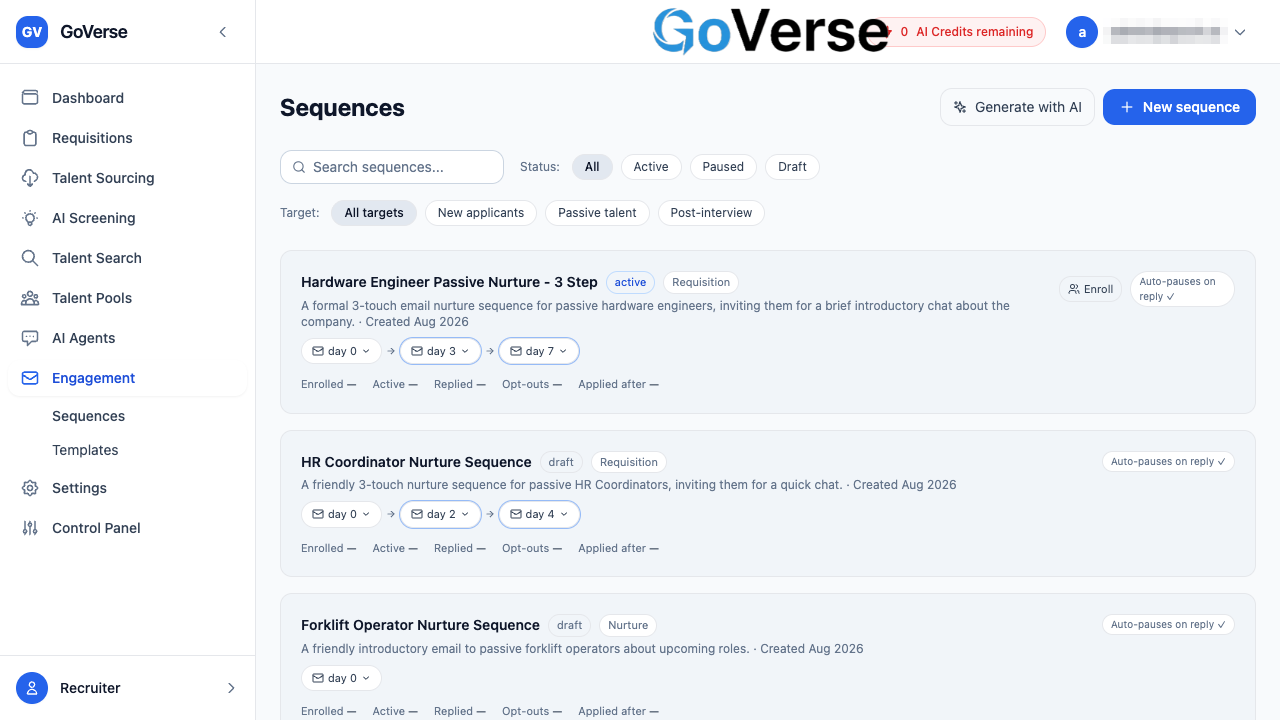
The Sequences page is your home base. Each card is one sequence, showing its name, status, type, the message steps at a glance, and quick actions.
Status: what the coloured label means
Every sequence carries one status label:
| Status | Meaning |
|---|---|
| Draft | Still being built. Nothing sends. Safe to edit freely. |
| Active | Live. Candidates you enrol will start receiving messages. |
| Paused | Temporarily stopped. Appears dimmed. No new messages go out until it's active again. |
| Archived | Retired and hidden from the everyday list. |
Each card also shows a second badge — Nurture or Requisition — so you can tell the two types apart at a glance, plus an Auto-pauses on reply ✓ reminder.
Finding a sequence
At the top of the list you have three controls:
- Search — type any part of a sequence's name or description to filter the list instantly.
- Status — chips for All / Active / Paused / Draft to narrow the list to one state.
- Target — chips for the audience a sequence is aimed at (New applicants, Passive talent, Post-interview).
Reading a sequence card
The row of pills on each card is the message plan. Every pill shows the channel icon (email, SMS, or WhatsApp) and the day that message goes out. Click a pill to expand it and see that step's channel, delay, and which template it uses.
Timing warning
If two steps are scheduled fewer than 7 days apart, GoVerse highlights the later step and warns you — sending again too soon can push people to opt out.
The counters at the bottom of each card (Enrolled, Active, Replied, Opt-outs, Applied after) are placeholders for live performance figures.
Create a sequence manually
Select + New sequence (top right) to open the Sequence Editor on a blank sequence. (Prefer to have GoVerse draft the copy for you? See Create a sequence with AI.)
1. Describe the sequence
At the top of the editor, fill in the basics:
| Field | What it does |
|---|---|
| Name | How the sequence appears in your list. |
| Description | A note on who it's for and what it does. |
| Purpose | Nurture (no job) or Requisition (job-specific). Requisition unlocks job merge variables like {{job_title}} and {{requisition_link}}. |
| Default channel | The channel new steps use unless you override them — Email (fallback), SMS, or WhatsApp. |
| Sender identity | Who the messages come from — the Assigned recruiter or a shared Account sender. |
| Send time window | When messages may go out — Any time, 9am–6pm local, or 9am–12pm local. |
Requisition sequences
When Purpose is Requisition, job details (title, link) aren't fixed into the sequence — you choose the specific job later, at the moment you enrol candidates. That's what fills in the job variables.
2. Build the steps
Every sequence starts from an Enrolment trigger · candidate added marker. Below it you add message steps.
- Select + Add step to add a message. The first step goes out on day 0 (on enrolment); each new step defaults to 3 days after the one before.
- On each step card, pick the channel (Email / SMS / WhatsApp) and the template that supplies the subject and body. The template dropdown only lists templates that match the step's channel and the sequence's purpose.
- Between two steps sits a Wait N days connector. Select it to open the delay editor and change how long GoVerse waits before that step.
SMS length
On an SMS step, GoVerse shows the character count so you can keep messages to a single segment.
If a step arrived as AI-generated copy (from the Generate with AI wizard), it shows an editable subject and body with a template name box. That copy is saved as a brand-new reusable template when you save the sequence — see the Templates note below.
3. Set how the sequence responds
Further down, Response detection controls what happens when a candidate reacts:
- Pause sequence when candidate replies — always on and can't be turned off. This is the safety net that stops a real conversation being interrupted by an automated follow-up.
- Notify recruiter on reply — on by default.
- Notify recruiter on email open — off by default.
4. Preview the journey
The right-hand panel shows a Candidate journey preview — each message plotted on its day, in order, ending with a Sequence complete marker and a 30-day cooldown before someone can be re-enrolled. Below it, Exit conditions list every way a candidate leaves the sequence early: they reply, they opt out, an application is created, they're hired, all steps finish, or a recruiter removes them. Most exit conditions are always on; Application created is one you can switch off.
Save as a draft vs. activate
The editor's top bar gives you two ways to save:
Stores your work without sending anything. Available as soon as the sequence has a name. Use this while you're still writing steps or waiting on templates. The sequence stays in Draft status.
Saves and turns the sequence Active so enrolled candidates start receiving messages. This becomes available only once the sequence has a name, at least one step, and every step has a template (or copy) to send.
Editing a live sequence
If a sequence is already Active, the editor reminds you that your changes apply to future enrolments only — candidates already partway through keep the plan they started on.
Enrolling candidates
Enrolment is what actually puts candidates into a sequence. A sequence must be Active to enrol into it.
- On the Sequences list, an active sequence's card shows an Enroll button.
- Selecting it opens the Enroll Candidates window.
- If the sequence is a Requisition sequence, you must first choose the Requisition (job) — this is what fills in the job title and link in the messages.
- Pick one or more candidates, then select Enroll.
Enrol from elsewhere
You can also enrol candidates into a sequence directly from Talent Search and Talent Pools using the same Enroll in sequence action.
Auto-pause on reply
This is the behaviour that keeps automation from talking over a live conversation. The instant a candidate replies to any message in the sequence, GoVerse stops sending them further steps — the exit condition Candidate replies is permanent and can't be switched off. The same happens if a candidate opts out. On the sequence's detail view those candidates show as Replied or Opted out rather than continuing to receive messages.
Viewing a sequence
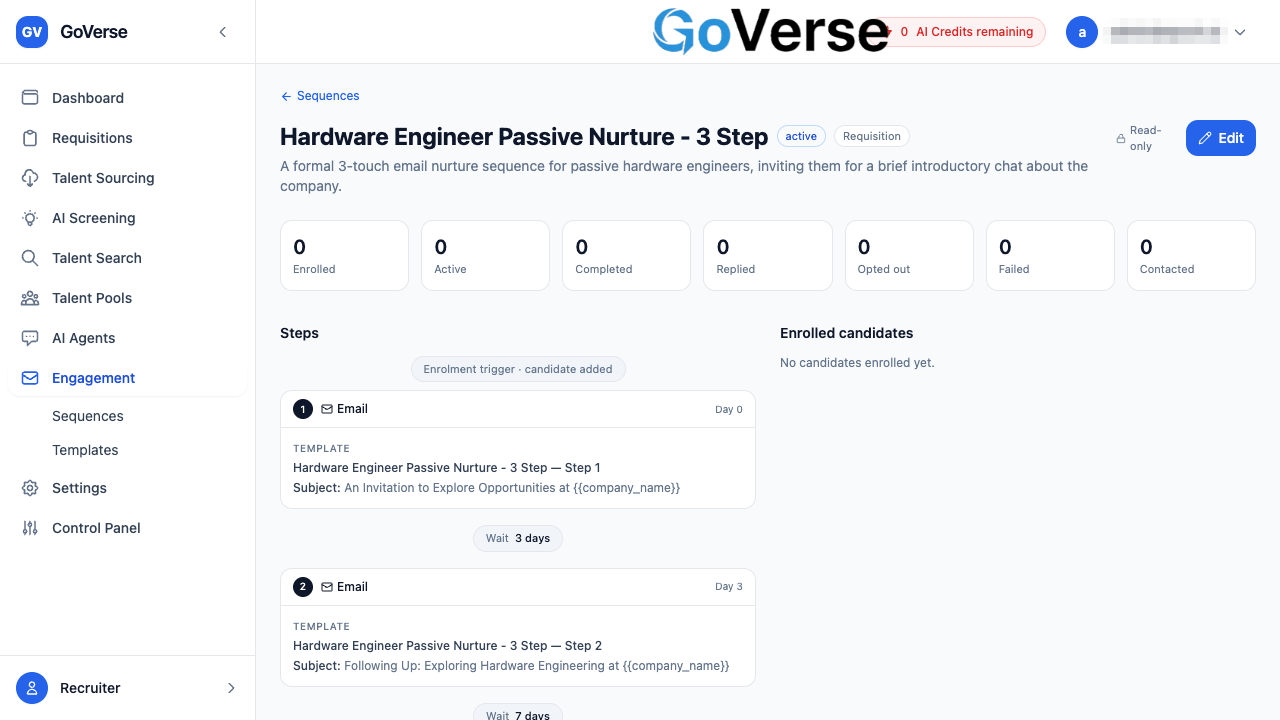
Selecting any card opens its read-only detail view — safe to look at without risk of changing a live sequence. It shows:
- Headline stats: Enrolled, Active, Completed, Replied, Opted out, Failed, and Contacted.
- The steps laid out in order, each on its cumulative day, with the template it uses.
- An Enrolled candidates table listing each candidate by name and location, their status, which step they've reached, and when they were enrolled.
To make changes, select Edit — the detail page never edits in place, so you won't alter a running sequence by accident.
Create a sequence with AI
The Generate with AI wizard builds a multi-step nurture or requisition email sequence for you — either by drafting the copy from a short brief, or by letting you pick existing templates for each step. You review and edit everything before anything is saved, and generated copy is saved as reusable templates that the sequence then references (exactly like a manually-built sequence).
Scope today
Email only. The generated copy uses only the merge variables valid for the chosen purpose, and nothing is ever sent automatically — the wizard only produces a draft for you to review and save.
1. Open the wizard
Go to Engagement → Sequences and select Generate with AI (top right).
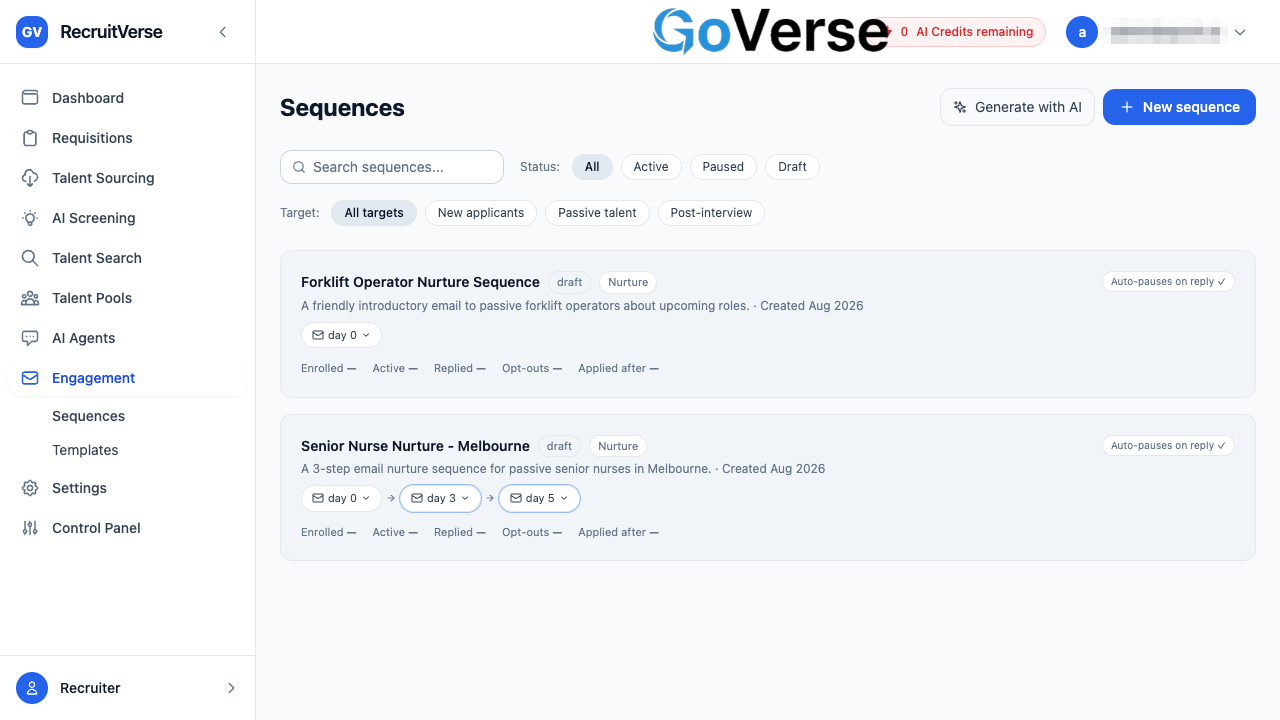
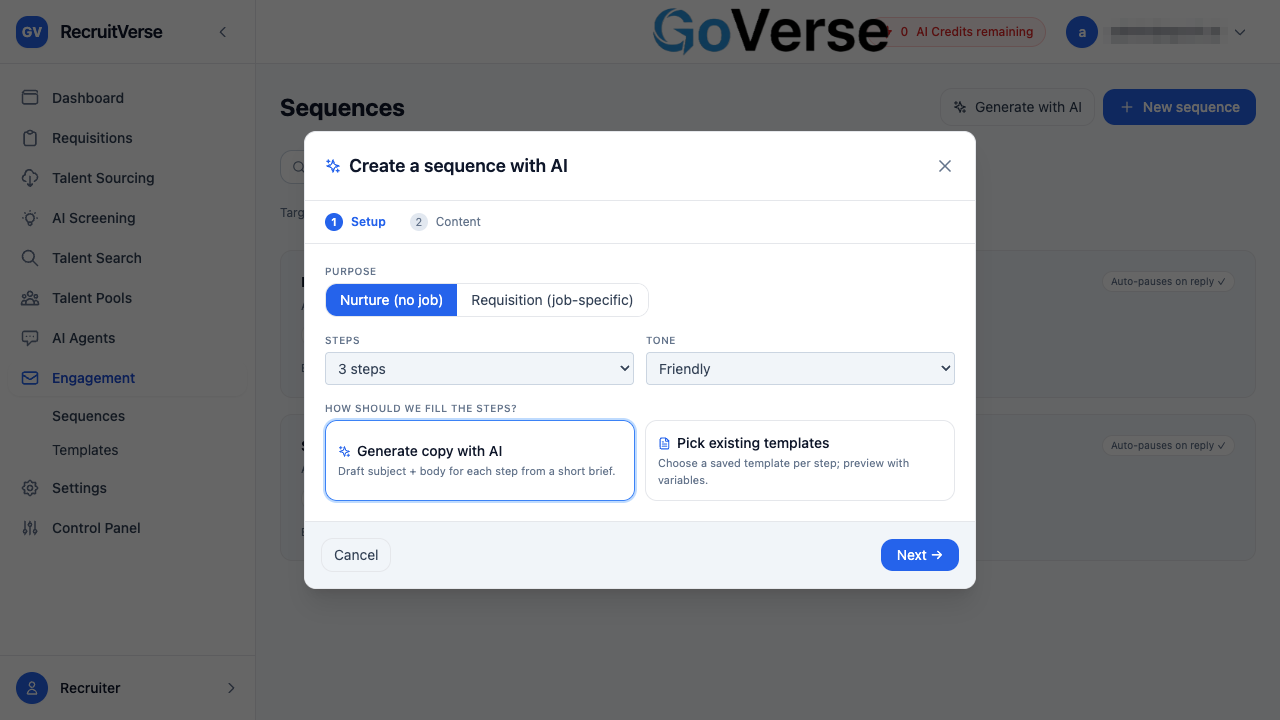
2. Step 1 — Setup
Choose how the sequence should be built:
- Purpose — Nurture (no specific job) or Requisition (job-specific). If you
pick Requisition, a requisition picker appears and is required — this is
what lets the copy use job variables like
{{job_title}}and{{requisition_link}}. - Steps — how many emails in the sequence (1–7).
- Tone — Friendly, Formal, or Concise.
- How should we fill the steps?
- Generate copy with AI — the AI drafts a subject + body for every step.
- Pick existing templates — you choose a saved template for each step.
Select Next →.
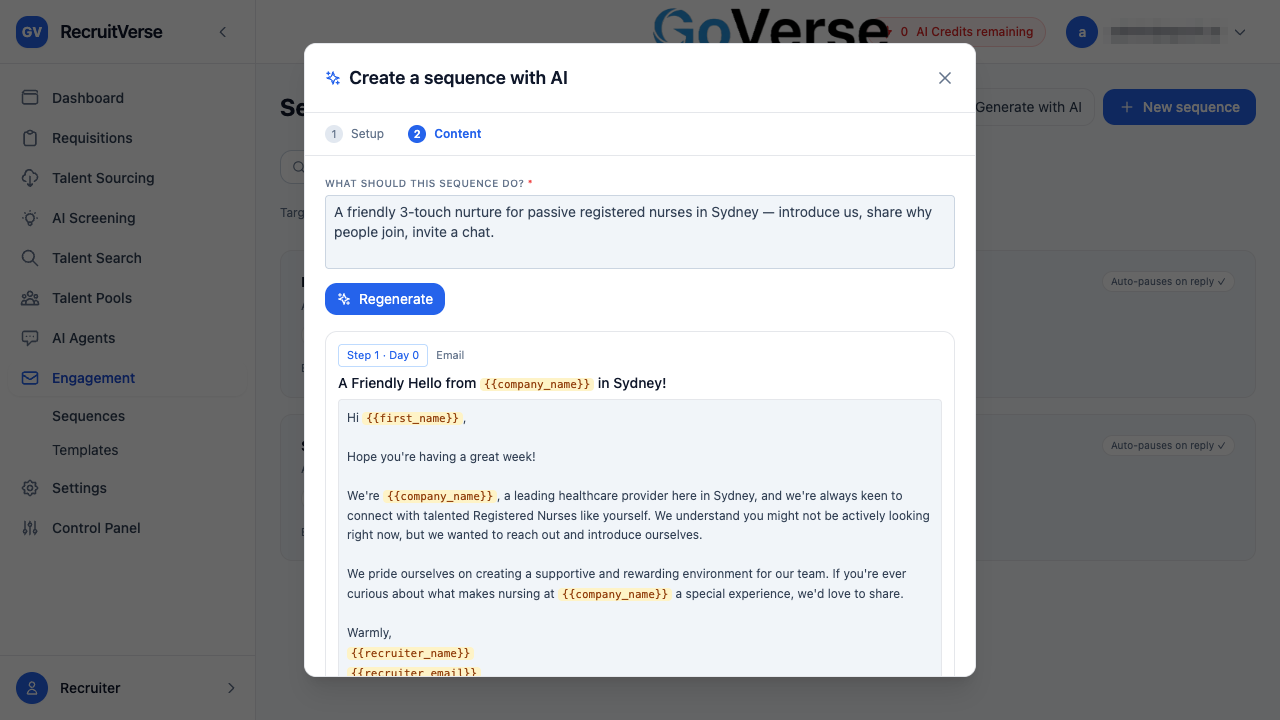
3. Step 2 — Content
Describe what the sequence should do in the brief box, then select Generate. The AI returns a subject + body for each step, with merge variables highlighted. Use Regenerate to try again with a tweaked brief. When you're happy, select Open in editor →.
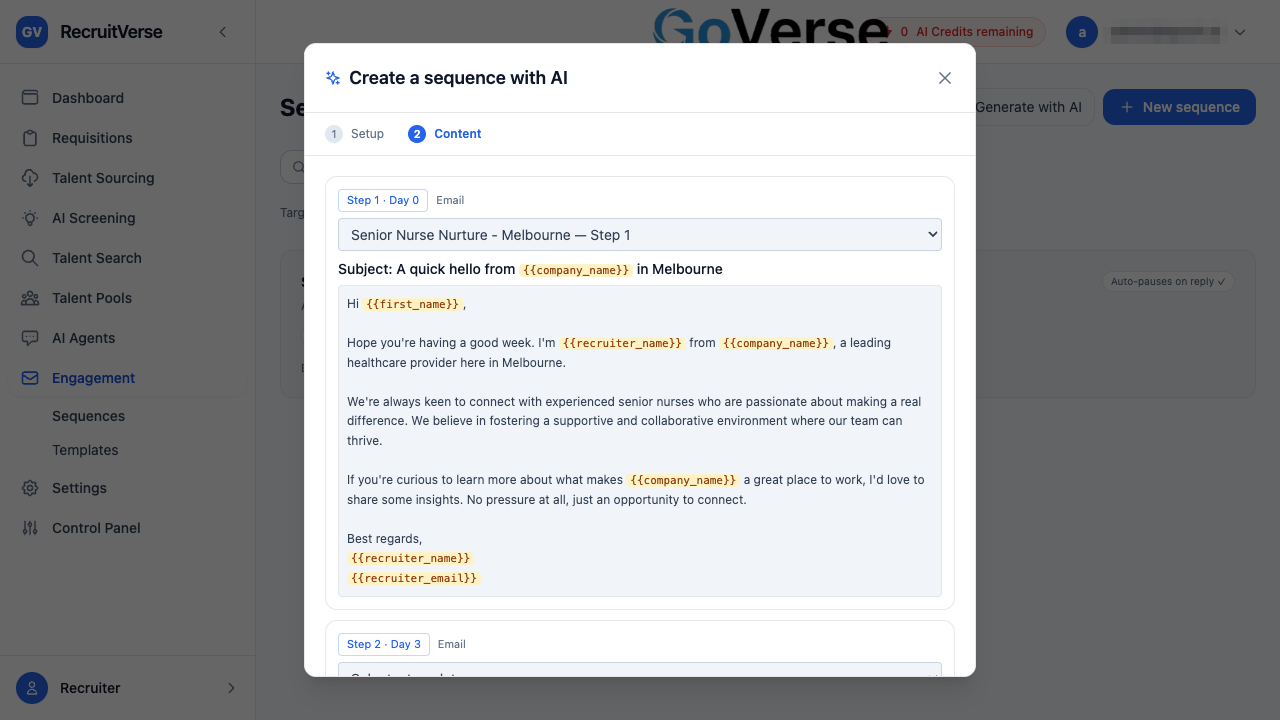
Choose a template from the dropdown for each step. The selected template's subject and body are shown with merge variables highlighted so you can confirm the content before continuing. When every step has a template, select Open in editor →.
4. Review in the editor
The wizard drops you into the normal Sequence Editor with the draft pre-filled (name, description, purpose, steps and cadence).
- For generated steps, each step shows an editable Template name, Subject and Body. Edit them freely. The name defaults to "<sequence name> — Step N" — change it to something you'll recognise.
- For picked steps, the chosen template is already selected on the step.
- The right-hand Candidate journey preview shows the send day and subject for each step.
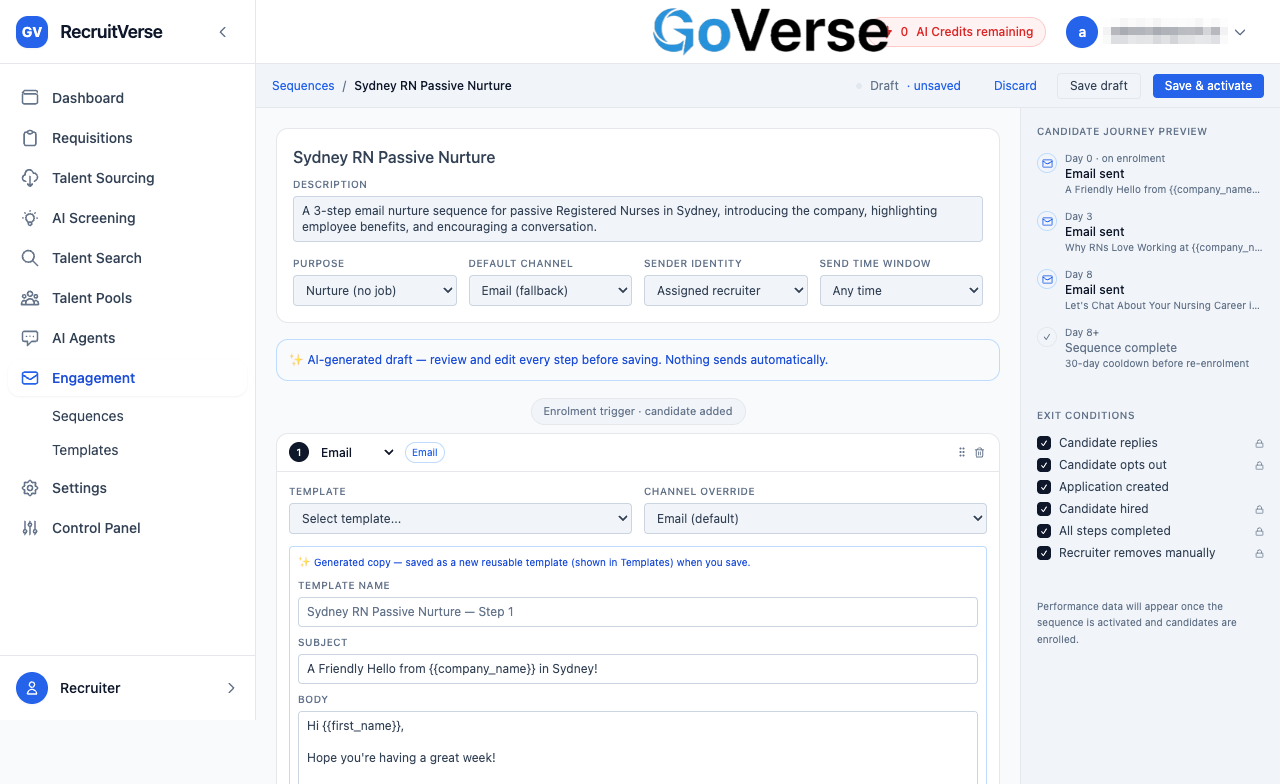
5. Save
Select Save draft (or Save & activate). On save:
- Every generated step's copy is saved as a new reusable template (using the name you set) under Engagement → Templates.
- The sequence step then references that template by id — the copy is not duplicated inside the sequence. This matches how manually-built sequences work: the template is the single source of truth, and it's rendered with the candidate/account variables at send time.
Your new sequence appears in the Sequences list as a draft. Activate it and enrol candidates when you're ready (for a requisition sequence you'll pick the requisition at enrolment).
Notes & tips
- AI credits: the Generate copy with AI option consumes AI credits (per seat). If you're out of credits you'll see a clear "out of AI credits" message instead of generated copy — the Pick existing templates option does not use credits.
- Variables: generated copy only uses variables valid for the purpose. Nurture
copy can't use job variables (
{{job_title}},{{requisition_link}}); those are requisition-only and resolve at send once an enrolment is tied to a requisition. - Nothing auto-sends: the wizard always produces a reviewable draft. Sending only happens after you activate and enrol candidates.
- Editing later: the templates it creates are normal templates — edit or reuse them anytime from Engagement → Templates.
Templates
Menu: Engagement → Templates
A template is a reusable message — a subject line and body you write once and
send many times. Instead of retyping the same outreach, you save it as a template
and drop it into as many sequence steps as you like. Templates also use merge
variables (placeholders like {{first_name}}) that GoVerse fills in with each
candidate's real details when the message is sent.
The Templates library
The Templates page lists everything you can send, grouped into sections so it's easy to browse.
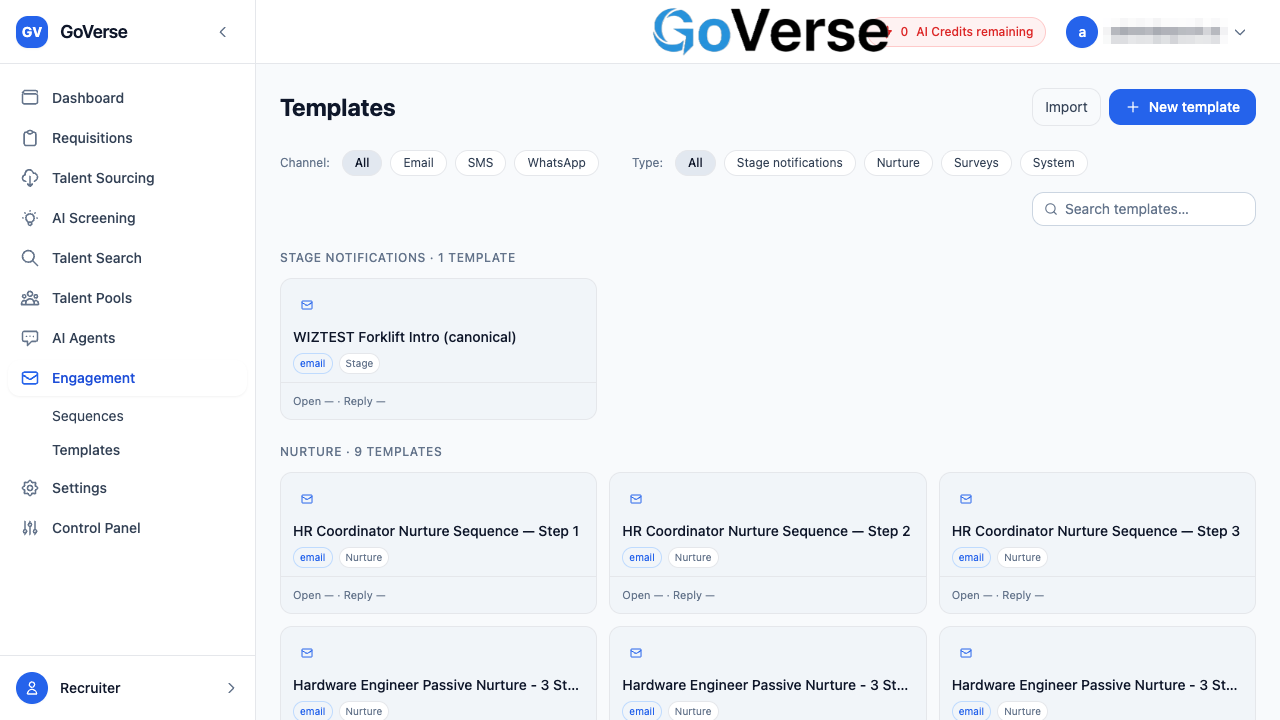
How templates are grouped
GoVerse sorts your templates into four sections:
| Section | What lives here |
|---|---|
| Stage notifications | Messages tied to pipeline stages (interview, offer, rejection, assessment). |
| Nurture | General outreach and talent-pool / reminder messages. |
| Surveys | Feedback and NPS messages. |
| System | Built-in templates GoVerse ships with — read-only (marked with a lock). |
Finding a template
Three controls sit above the list:
- Channel — chips for All / Email / SMS / WhatsApp.
- Type — chips for All / Stage notifications / Nurture / Surveys / System.
- Search — type any part of a template's name or description.
Reading a template card
Each card shows the channel icon, the template name and description, and small pills for its channel, category, and — for built-ins — a System tag. WhatsApp templates also show their approval status (pending / approved / rejected). Hovering a card reveals quick actions (Clone, and a menu with Edit / Clone / Preview / Archive). System templates show a lock instead, because they can't be edited.
Create or edit a template
Select + New template to start a fresh one, or select any card to open it. Both open the template editor as a panel that slides in from the side.
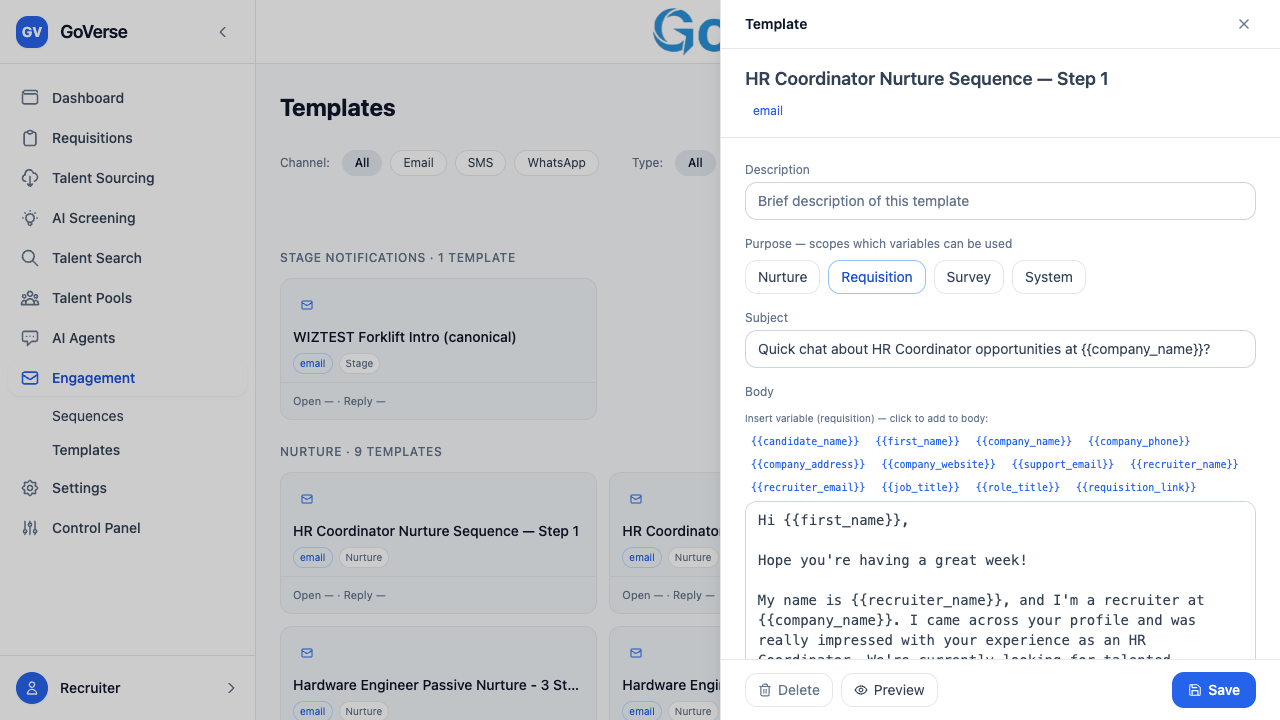
Fill in the template:
| Field | Notes |
|---|---|
| Name | How the template appears in your library. |
| Channel | Email, SMS, or WhatsApp. You choose this only when creating; it's fixed afterwards. |
| Description | A short note on when to use this template. |
| Purpose | Nurture, Requisition, Survey, or System. This decides which merge variables you're allowed to use (see below). |
| Subject | Email only — supports merge variables. |
| Body | The message itself. Also supports merge variables. |
Email templates have both a Subject and a Body, and both can contain merge variables.
SMS templates are body-only. As you type, GoVerse shows a live character and segment counter (and whether the text fits the standard GSM-7 set or needs Unicode), so you can keep a message to a single segment where it matters.
WhatsApp templates are body-only and must be registered with the WhatsApp provider before they can be used. Use the Register with WhatsApp provider button in the editor; once approved, the template becomes read-only.
To save, select Create (or Save). The button stays disabled until the template has a name and a body — and it will block if you've used a variable that isn't allowed for the chosen purpose (see below).
Built-in templates are read-only
System templates (and approved WhatsApp templates) can be viewed and previewed but not edited. To adapt one, clone it into a new template you own.
Merge variables
Merge variables are placeholders you drop into a subject or body. When GoVerse sends
the message, each one is replaced with that candidate's real detail. Type them in the
{{double_brace}} form, or use the Insert variable palette in the editor to click
them in — the palette only offers the variables that are valid for the template's
purpose.
The full list of variables
| Variable | Fills in with | Available in |
|---|---|---|
{{candidate_name}} |
Candidate's full name (falls back to "there") | All purposes |
{{first_name}} |
Candidate's first name | All purposes |
{{company_name}} |
Your company / team name | All purposes |
{{company_phone}} |
Your contact phone | All purposes |
{{company_address}} |
Your postal address | All purposes |
{{company_website}} |
Your website | All purposes |
{{support_email}} |
Your support / careers email | All purposes |
{{recruiter_name}} |
The sequence owner's name | All purposes |
{{recruiter_email}} |
The sequence owner's email | All purposes |
{{job_title}} |
The requisition's job title | Requisition only |
{{role_title}} |
Same as job title (used by some stage templates) | Requisition only |
{{requisition_link}} |
Link to the job / requisition | Requisition only |
Company details come from your settings
The {{company_*}} and {{support_email}} values are pulled from
Settings → Company Profile, so fill those in once and every template stays
consistent.
Job variables are gated on purpose
{{job_title}}, {{role_title}}, and {{requisition_link}} only work in
Requisition templates, because GoVerse can only look up a job when a
template is attached to one. If you use one of these in a Nurture, Survey,
or System template, the editor flags it and blocks saving until you remove
it or switch the purpose to Requisition.
Preview with test values
Before saving, select Preview to see the finished message. GoVerse lists every variable you've used with a box for a test value; fill them in and the preview renders the subject and body exactly as a candidate would receive them. It's the quickest way to catch a stray placeholder or an awkward line.
How sequences reuse templates
Templates and sequences work hand in hand. In the Sequence Editor, each step has a Template dropdown that lists the templates matching that step's channel and the sequence's purpose. Pick one and the step sends that template's subject and body — the template stays the single source of truth, so editing the template updates every step that uses it.
AI-generated copy lands here too
When you build a sequence with Generate with AI and save it, the generated copy for each step is saved into this library as a named, reusable template (you can set the name in the editor). After that it behaves like any other template — searchable, editable, and reusable across other sequences.
Settings
Menu: Settings · Always visible; individual sections depend on your plan and role
Settings is where you configure how GoVerse works for your account. It's a hub of cards — select a card to open that section. Which cards you see depends on your role and plan.
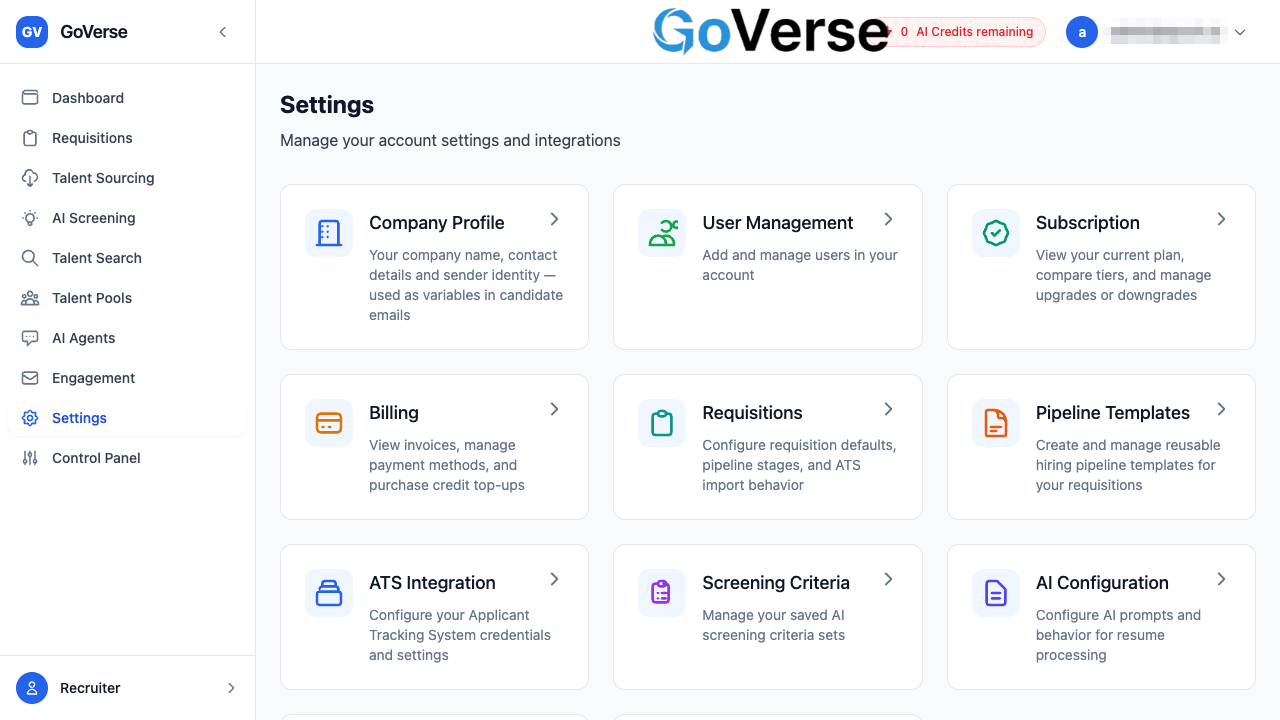
Who sees what
Most configuration sections are shown only to owners and admins: Company Profile, User Management, Subscription, Billing, Requisitions, Pipeline Templates, ATS Integration, and AI Configuration. Email Integration, Screening Criteria, and Theme are available to all members. Some sections also depend on your plan (see Plans & feature access).
How to get there
Select Settings in the left menu, then choose a section card.
Company Profile
Owner / admin
Your company name, contact details, and sender identity. These values populate the
merge variables used in candidate emails (for example {{company_name}} and the
recruiter/sender details), so keeping them accurate keeps your outreach on-brand.
- Settings → Company Profile.
- Fill in your company name, contact details, and sender identity.
- Save.
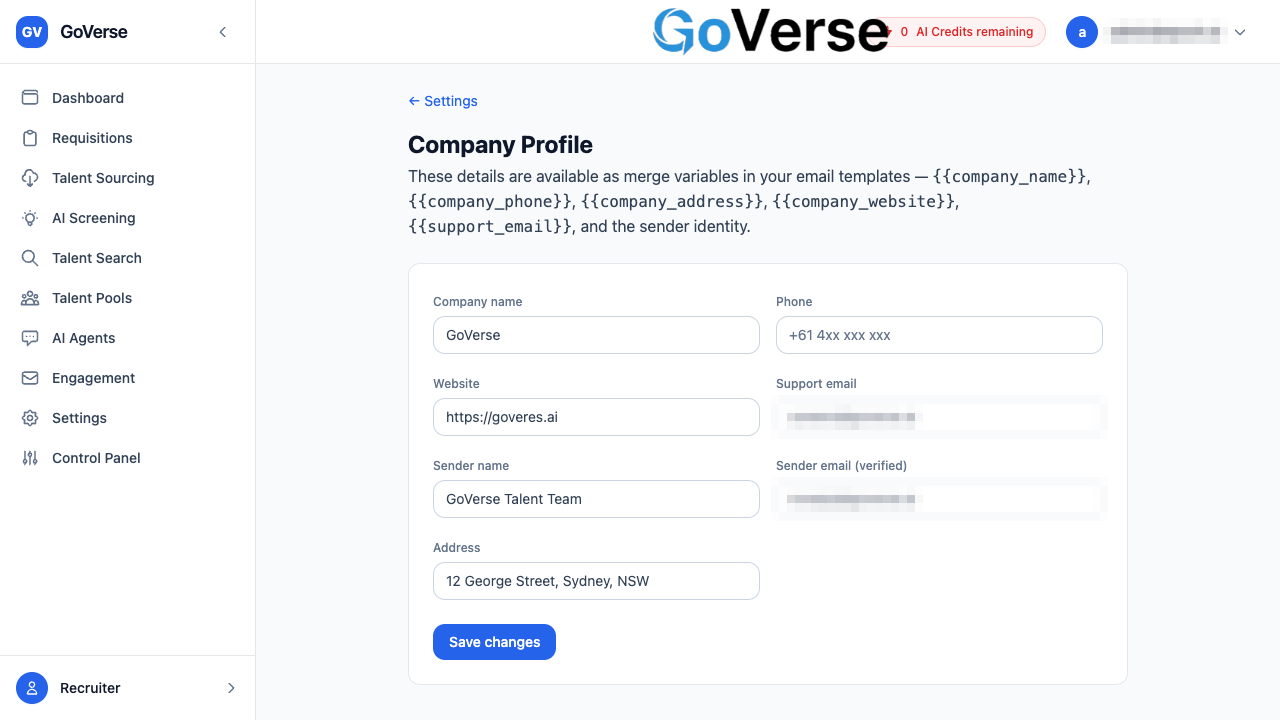
Tip
These fields feed the variables used by Templates and Sequences.
User Management
Owner / admin · multi-user requires the Agency plan
Add and manage the people in your account and their roles.
- Roles: Owner (full control incl. billing), Admin (manage settings and users), Member (day-to-day recruiting).
- Add a user: invite by email; they receive access to your account.
- Manage: change a user's role or remove them.
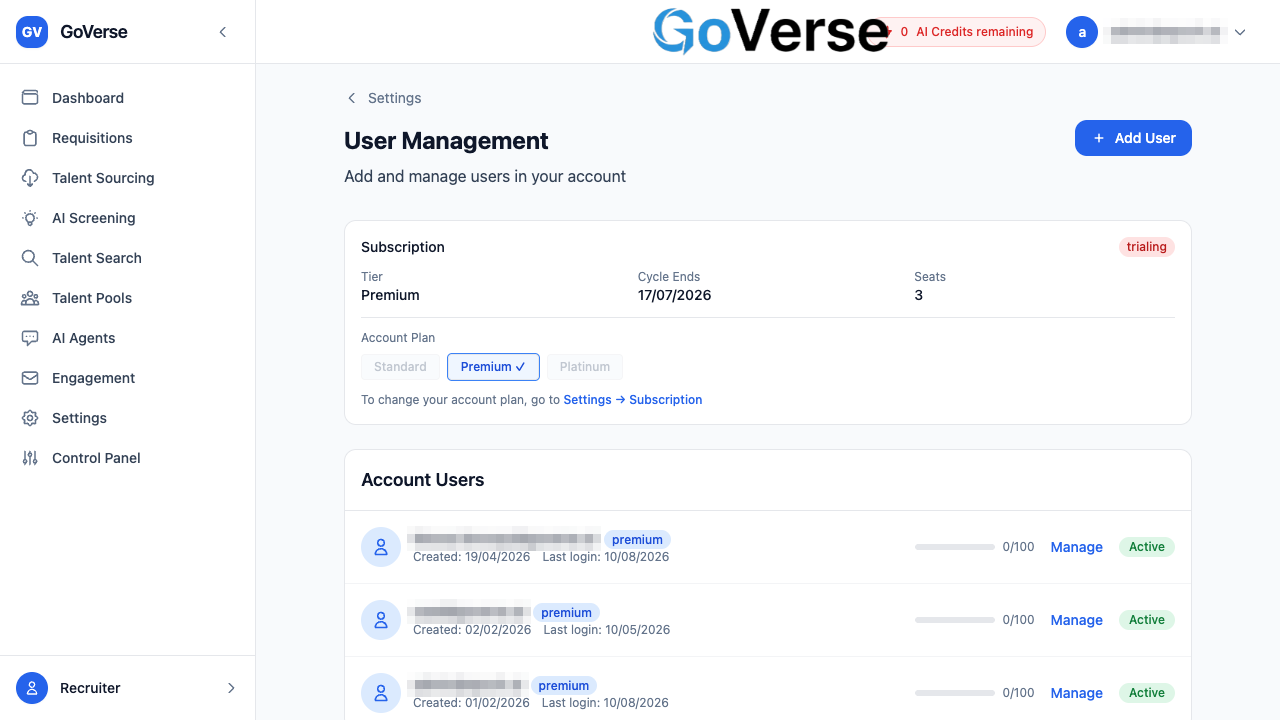
Plan limits
The number of members you can add depends on your plan (Free 1, Premium up to 10, Agency up to 50). See Plans & feature access.
Subscription
Owner / admin
View your current plan, compare tiers, and manage upgrades or downgrades.
- Settings → Subscription.
- Review your current plan and what each tier includes.
- Choose to upgrade or downgrade; follow the prompts to confirm.
Billing
Owner / admin
View invoices, manage payment methods, and purchase credit top-ups.
- Invoices: review and download past invoices.
- Payment methods: add or update a card.
- Credit top-ups: buy additional AI credits when you need more.
Requisitions
Owner / admin
Configure requisition defaults, pipeline stages, and ATS import behaviour — the starting point for every new role you open.
- Settings → Requisitions.
- Set your defaults (including default pipeline behaviour and how ATS imports map).
- Save. New requisitions pick up these defaults.
Tip
Related: manage the roles themselves in Requisitions.
Pipeline Templates
Owner / admin
Create and manage reusable hiring pipeline templates, so new requisitions start with a consistent set of stages instead of building them each time.
- Settings → Pipeline Templates.
- Create a template and define its ordered stages.
- Save; select it when creating a requisition.
ATS Integration
Owner / admin · plan-gated
Connect your Applicant Tracking System (SmartRecruiters or Workday) so you can import requisitions along with their candidates and keep stages in sync.
- Settings → ATS Integration.
- Enter your ATS credentials / connection settings.
- Save and connect; once connected you can import requisitions from the ATS.
Screening Criteria
All members
Manage your saved AI screening criteria sets — reusable definitions of what makes a strong candidate for a role. Save a set once and reuse it across screenings.
- Settings → Screening Criteria.
- Create a criteria set (the attributes/weights you want AI to evaluate).
- Reuse it from AI Screening.
AI Configuration
Owner / admin
Configure the AI prompts and behaviour used for resume processing (for example how resumes are parsed and enriched). Defaults work out of the box; adjust only if you need to tune extraction for your data.
Email Integration
All members · plan-gated
Connect an email account (Gmail or Outlook) and set routing rules so candidate attachments that arrive by email are imported automatically into GoVerse.
- Settings → Email Integration.
- Connect your mailbox and authorise access.
- Add routing rules that decide which incoming attachments are imported and where.
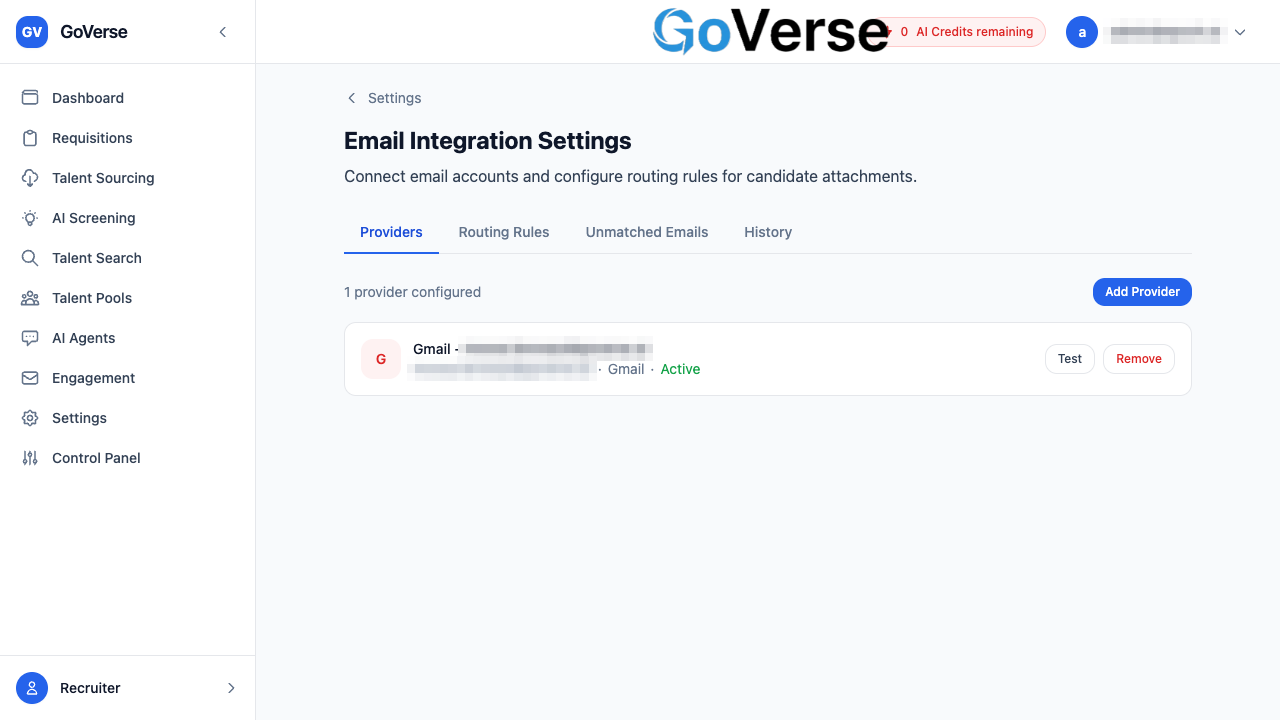
Theme
All members
Choose a colour theme for your workspace. This is a personal display preference and doesn't change anyone else's view.
- Settings → Theme.
- Pick a theme; it applies immediately.
More settings
GoVerse notes that more settings are on the way — the hub shows a "More settings coming soon" marker below the cards.
Plans & feature access
GoVerse shows or hides features based on your account's plan and your role. If a menu item described in this guide isn't visible to you, it's most likely gated by one of the tables below.
What each plan includes
| Capability | Standard | Premium | Platinum |
|---|---|---|---|
| Requisitions & basic search | ✅ | ✅ | ✅ |
| Resume upload & parsing | ✅ | ✅ | ✅ |
| AI Screening, Talent Search, Talent Pools | ✅ | ✅ | ✅ |
| ATS import (SmartRecruiters / Workday) | ✅ | ✅ | ✅ |
| Bulk operations | ✅ | ✅ | ✅ |
| Team management (multiple users) | ✅ | ✅ | ✅ |
| AI Agents (GoVerse Agents) | ❌ | ✅ | ✅ |
| AI Voice Screening | ❌ | ✅ | ✅ |
| Engagement (sequences & templates) | ❌ | ✅ | ✅ |
| Analytics & compliance | ❌ | ✅ | ✅ |
| Email integration (Gmail / Outlook) | ❌ | ✅ | ✅ |
| MCP access | ❌ | ❌ | ✅ |
| Priority support | ❌ | ❌ | ✅ |
Usage limits
| Limit | Standard | Premium | Platinum |
|---|---|---|---|
| AI credits / month | 100 | 300 | 600 |
| Approx. CV screens / month | ~5,000 | ~15,000 | ~30,000 |
How the menu maps to plan features
| Left-menu item | Requires |
|---|---|
| Dashboard, Requisitions, Talent Sourcing, Settings | Always available |
| AI Screening, Talent Search, Talent Pools | Standard+ |
| AI Agents (GoVerse Agents), AI Voice Screening | Premium+ |
| Engagement | Premium+ |
| MCP access | Platinum+ |
Note
To change your plan or add users, an account owner uses billing and Settings → User Management. Talk to your GoVerse contact about upgrades.