AI Screening
Menu: AI Screening · Requires a plan with advanced search (Premium+)
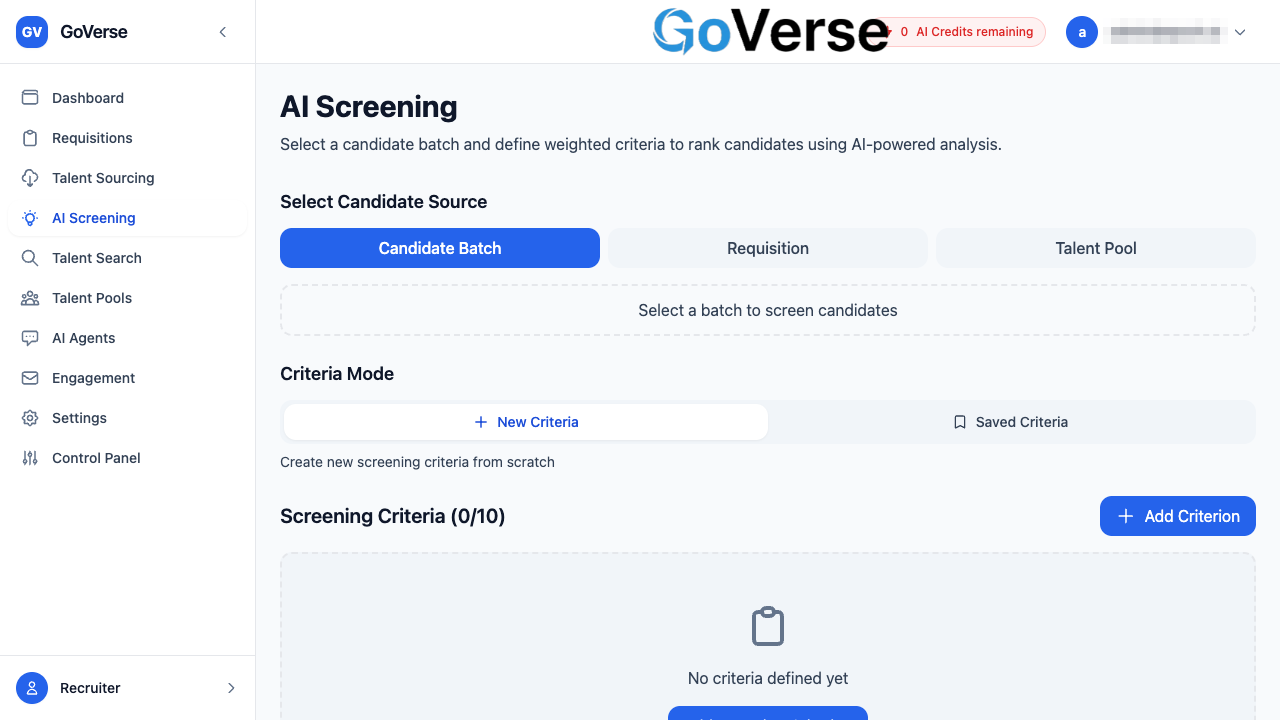
AI Screening reads a group of candidates, scores each one against the qualities you decide matter, and ranks them from best fit to worst — with a written explanation of why every candidate landed where they did. Instead of opening 50 CVs one by one, you tell GoVerse what a great hire looks like and let it do the first read for you.
What it's for
Use AI Screening when you have a pool of candidates and need to quickly find the strongest few. It is built for jobs like:
- Shortlisting a batch of applicants — you sourced or imported dozens (or hundreds) of candidates and want the top 10, 20 or 50 surfaced first.
- Comparing applicants to a specific role — screen everyone who applied to a requisition against that job's real requirements.
- Re-ranking a talent pool — take an existing pool and re-order it for a new opening.
- Keeping your standards consistent — save your criteria once and reuse the exact same yardstick across every candidate and every role.
The result is always the same shape: a ranked list, a score out of 100 for each person, and plain-language reasoning you can trust and share.
AI Screening assists — it does not decide
Every candidate stays fully visible with their score, evidence and CV. The ranking is a starting point to speed up your review, not a final hiring decision. You remain in control of who moves forward.
How to get there
Select AI Screening in the left-hand menu.
Don't see it in the menu?
AI Screening is part of the advanced-search capability, which is included in Premium and higher plans. If the menu item is missing, your current plan doesn't include it — contact your GoVerse administrator to upgrade.
You'll also need to be signed in. If you open the page while logged out, GoVerse shows an "Authentication Required" notice and the tools stay disabled until you log in.
Starting a screening
A screening is built in a few short steps on one page: pick who to screen, tell GoVerse what you're looking for, choose how many results you want, and press Start.
Step 1 — Choose who to screen (candidate source)
At the top of the page, pick one of three sources using the toggle buttons:
A batch is a group of candidates you sourced or uploaded together. Click Select a batch to screen candidates and choose from your completed batches. Each batch shows how many candidates it holds and the date it was created.
Only batches that have finished processing appear here.
Screen the people who applied to a specific job opening. Click Select a requisition to screen its applicants and pick from your open requisitions — each shows its requisition number, number of applicants and location.
Only requisitions that already have applicants are listed. Choosing a requisition also pulls in that job's description automatically (see Step 2).
Screen and re-rank an existing talent pool. Click Select a talent pool to screen candidates and pick an active pool — each shows its candidate count and whether it's a short-lived or long-lived pool.
Once you've chosen a source, its name appears in a highlighted card. Use the Change button on that card to switch to a different batch, requisition or pool at any time.
Step 2 — Review the job description (optional but recommended)
When you select a batch tied to a job, or a requisition, GoVerse shows a Job Description panel. Click the arrow to expand it and read the full description.
Let the job inspire your criteria
The job description is there to help you write better screening criteria — scan it for the must-have skills and experience, then turn those into the criteria in Step 3.
Step 3 — Define your screening criteria
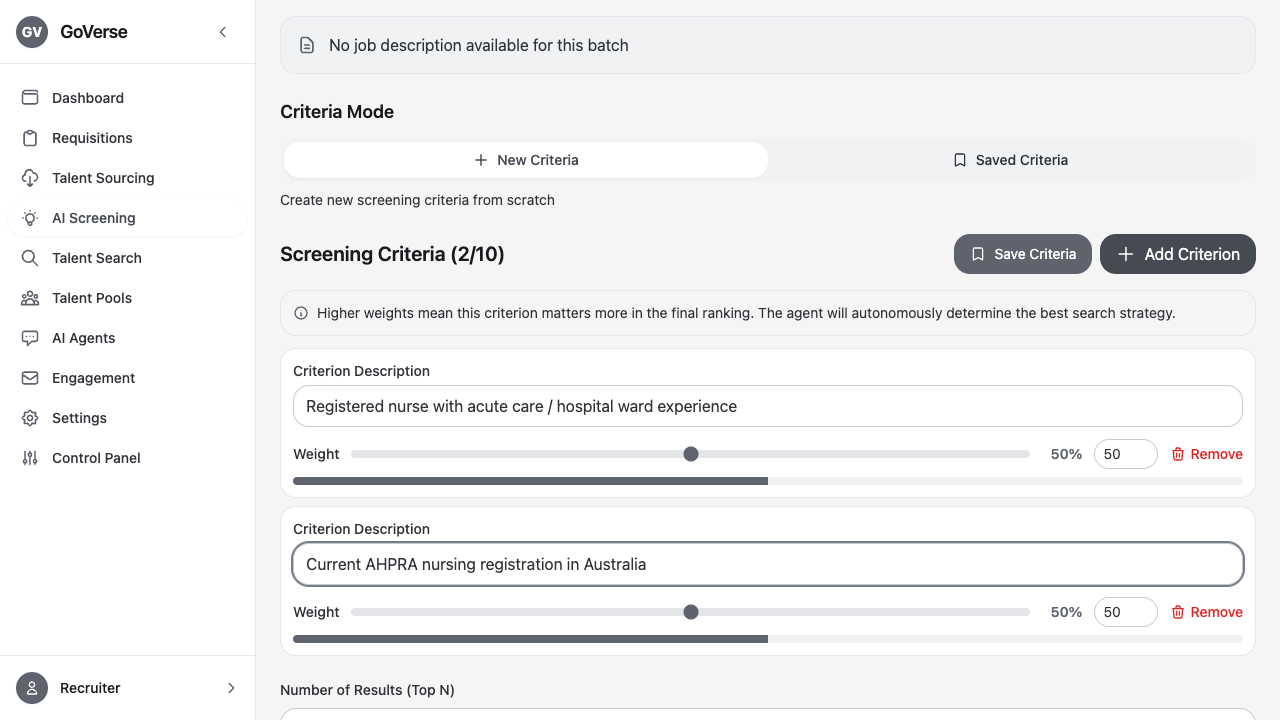
Criteria are the qualities GoVerse scores each candidate against — things like "5+ years of Python experience" or "has managed a team". This is the heart of the screening.
To add a criterion: click Add Criterion, then type a short, specific description of what you're looking for.
Weighting — telling GoVerse what matters most: each criterion has a weight slider. Slide it up to make a criterion count for more in the final ranking, or down to make it count for less. GoVerse automatically balances all your weights so they add up to 100%, and shows each one's share as a percentage.
| Rule | Detail |
|---|---|
| Minimum | At least 1 criterion is required to start |
| Maximum | Up to 10 criteria per screening |
| Length | Each criterion can be up to 500 characters |
| Weights | Automatically normalised to total 100% — you don't have to do the maths |
Write criteria the way you'd brief a colleague
Clear, concrete criteria give the best results. Prefer "Experience leading enterprise SaaS sales teams" over a vague "good leader". GoVerse works out the best way to search for and evaluate each one on its own.
Step 4 — Choose how many results
Under Number of Results (Top N), pick how many top candidates you want back: 10, 20, 30 or 50. GoVerse still evaluates everyone in your source — this just controls how many of the highest-ranked candidates it returns.
Step 5 — Start the screening
Press the Start Screening button (it shows the name of your chosen source, e.g. "Screen Senior Engineer Applicants").
Before it runs, GoVerse automatically checks your criteria against your organisation's active policies (see the Compliance section below). If everything passes, the screening kicks off and you're taken to the live status page.
Saved screening criteria (create & reuse)
Rather than retype the same criteria for every role, you can save a criteria set and reuse it later — keeping your screening standards consistent across candidates and across your team.
Saving a set
After building your criteria, click Save Criteria (or Save As New if you've edited a set you loaded). Give it a name (required, up to 100 characters) and an optional description of when to use it, then save.
Saving runs a policy check too
When you save, GoVerse validates the set against your active policies. If it violates a policy, saving is blocked and the reason is shown so you can fix the wording first.
Reusing a set
On the AI Screening page, switch the Criteria Mode toggle from New Criteria to Saved Criteria. A picker appears listing every set you've saved — with its criteria count and when it was last used. Select one and its criteria load instantly, ready to screen or tweak.
Non-compliant sets are locked
Each saved set shows a shield: a green Compliant badge or a red Non-Compliant one. Sets that violate an active policy are greyed out and can't be selected until they're edited to comply.
If you load a saved set and change it without saving, GoVerse marks it with an "Unsaved changes" badge and warns you before you switch modes and lose those edits.
Managing your saved sets
To rename, edit, preview or delete saved sets, go to Settings → Screening Criteria Management. There you can:
- Preview a set to see its criteria and weights.
- Edit the name, description, criteria and weights (weights are shown as percentages; the total must not exceed 100%).
- Delete a set you no longer need (this can't be undone).
- Validate All to re-check every set against your current policies at once.
Watching a screening run
After you start, GoVerse takes you to the live Screening Status page, which refreshes on its own every few seconds. You'll see:
- A progress bar with the current step, a short status message and an estimated time remaining.
- Agent Reasoning (Live) — a running commentary of what GoVerse is doing and why, step by step, including any retries it makes to get better results.
- Search Attempts — each strategy it tried and how many candidates each one returned.
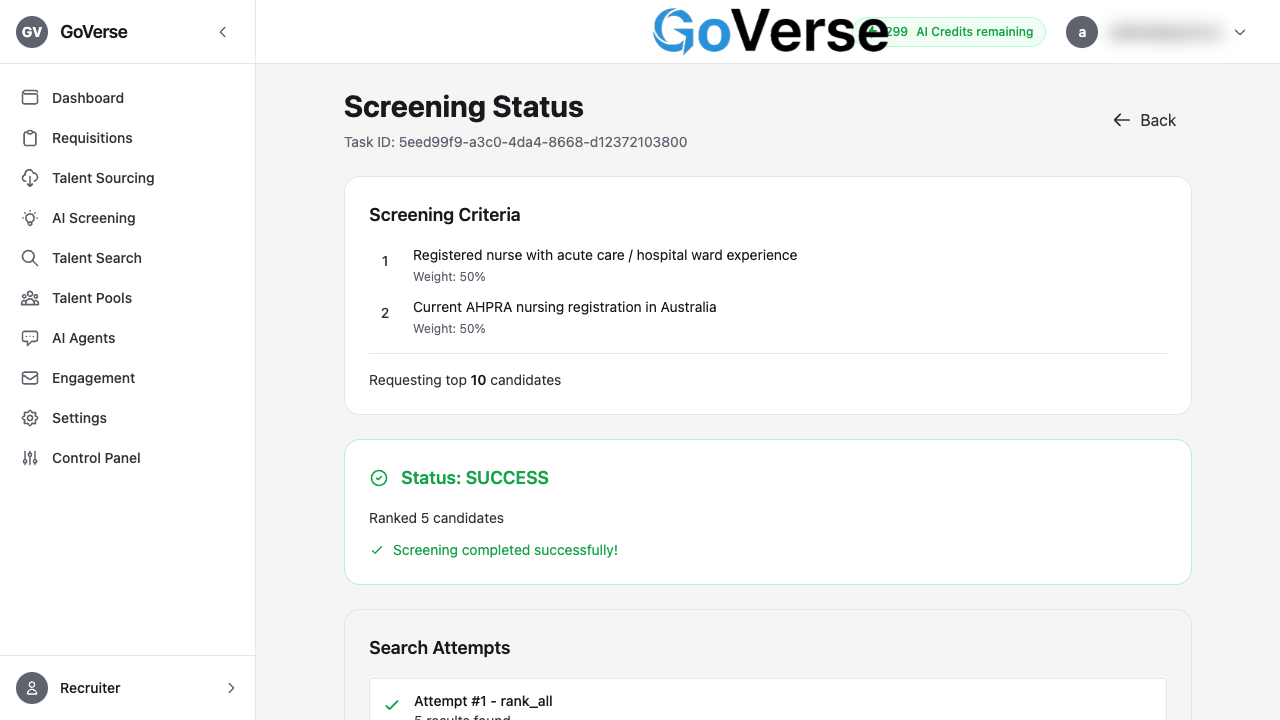
When it finishes, a View Results button appears. If a screening ever fails, you'll get a clear error and a Retry with Modified Criteria option. For the full technical trail, View Full Execution Log shows every logged step.
Screenings don't live forever
Results are kept for a limited time. If you open an old screening and see "Screening results expired", just run a new one — it only takes a moment.
Reading the AI scores and reasoning
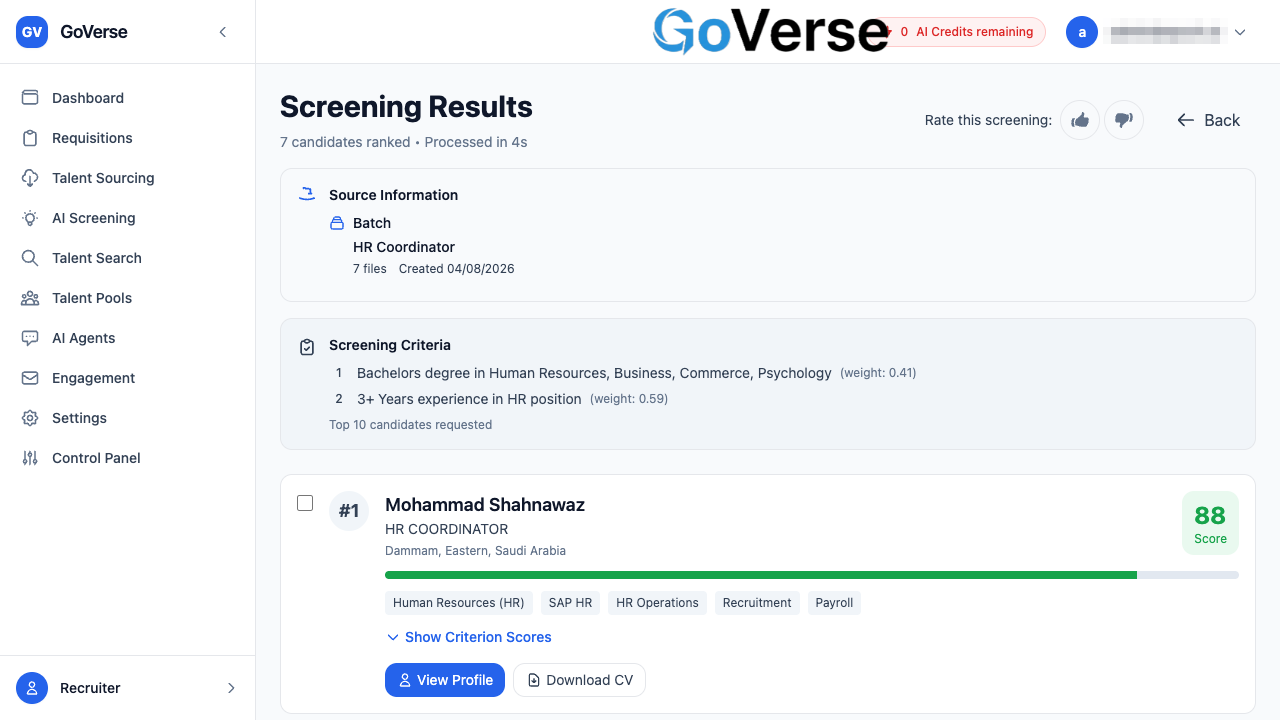
The Screening Results page shows your candidates ranked best-first. At the top you'll see how many candidates were ranked and how long the screening took, plus a reminder of the source and the exact criteria that were used.
The overall score
Every candidate gets a single score out of 100 and a coloured bar so you can scan the list at a glance. The colour is a quick health signal:
| Score | Colour | Read it as |
|---|---|---|
| 80–100 | Green | Strong match |
| 60–79 | Blue | Good match |
| 40–59 | Yellow | Partial match |
| 0–39 | Red | Weak match |
The reasoning behind the score
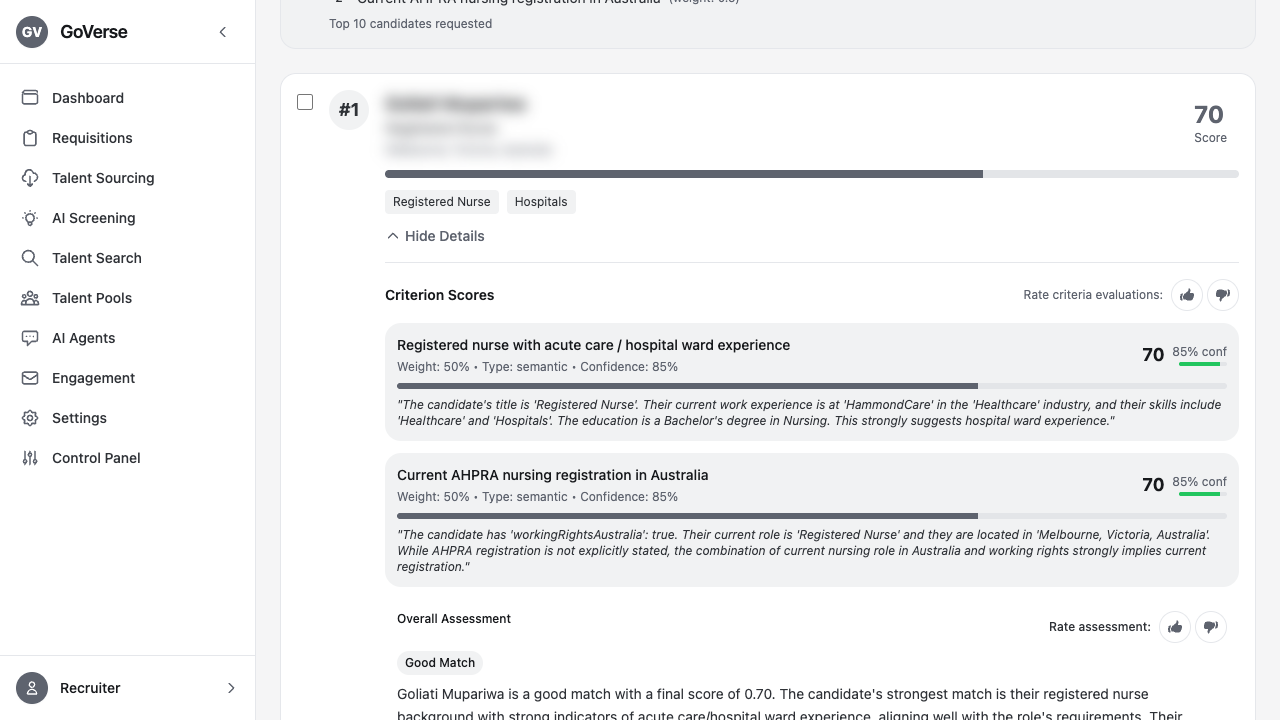
Click Show Criterion Scores on any candidate to open the full explanation. For each of your criteria you'll see:
- The criterion and its weight (how much it counted).
- A score out of 100 for that specific criterion.
- A confidence level — how sure GoVerse is about that judgement.
- A short evidence quote pulled from the candidate's profile or CV that backs up the score.
Below the criteria, an Overall Assessment summarises the fit with a Strong / Moderate / Weak Match label and a plain-language summary.
The evidence is the point
The number tells you the what; the evidence quote tells you the why. Skim the evidence to confirm a score makes sense before you act on it.
Tell GoVerse when it's right (or wrong)
Throughout the results you'll find thumbs-up / thumbs-down rating controls — on the whole screening, on the criterion scores, and on each candidate's overall assessment. Your feedback helps improve future screenings, so use it whenever a judgement looks especially good or off.
Acting on the results
Once you've reviewed the ranking, you can move candidates forward without leaving the page.
On a single candidate card:
- View Profile — open the candidate's full profile (their score and reasoning travel with you).
- Download CV — save the candidate's CV.
- Move Stage — for candidates sourced from Workday, advance them to the next hiring stage right from the card.
In bulk — tick the checkboxes on the candidates you want, and an action bar appears:
- Add to Requisition — attach the selected candidates to a job opening. You can search your active requisitions and add everyone in one go, with a progress bar as they're added.
- Add to Talent Pool — drop the selected candidates into a talent pool. Pick an existing pool from the picker; a confirmation banner tells you how many were added.
- Clear — deselect everyone and start over.
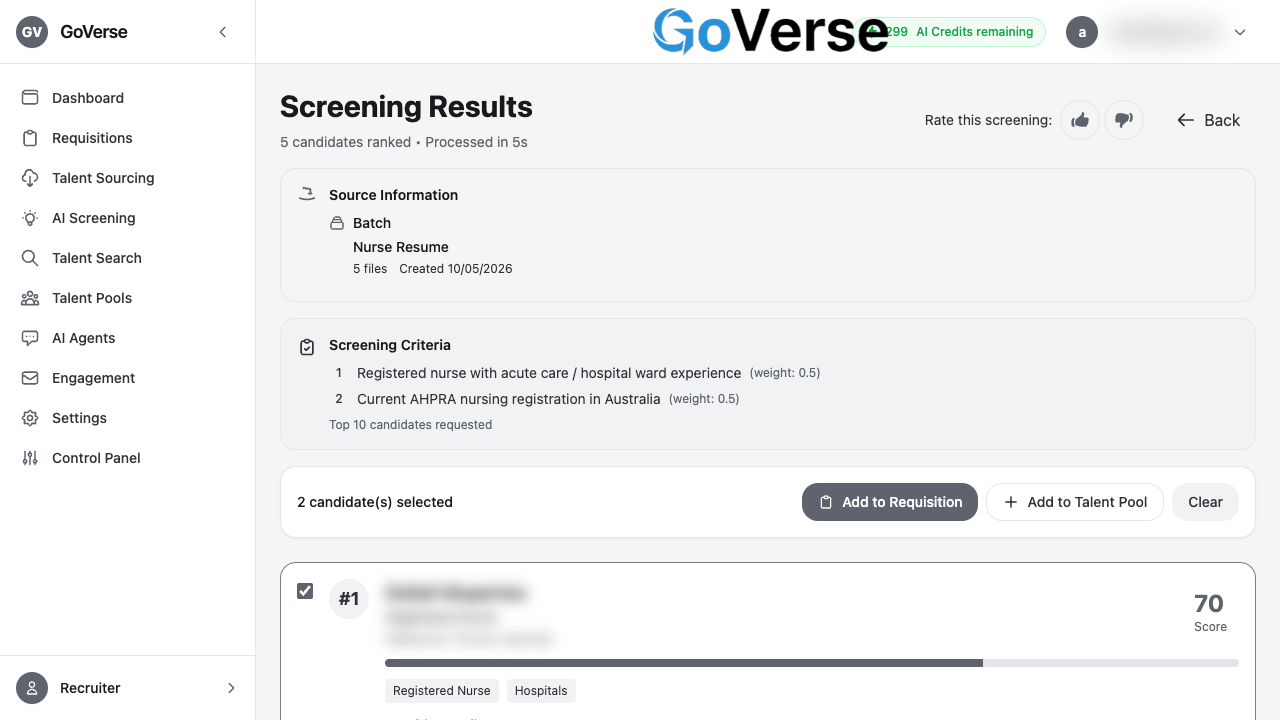
When you're done, use New Screening to start another run, or View Execution Log to inspect the details of this one.
Staying compliant
GoVerse checks your screening criteria against your organisation's active policies at two moments: when you save a criteria set, and again right before a screening runs. This helps keep your screening fair and within your company's hiring guidelines.
If a check fails, a Policy Compliance Check Failed window explains exactly what happened. For each policy it shows:
- Whether the criteria are Compliant or Non-Compliant, with a confidence level.
- The reasoning for the decision.
- Practical recommendations for how to reword your criteria to comply.
Adjust the flagged criteria and try again — the screening only proceeds once your criteria pass.
No policies set up? No problem
If your organisation hasn't configured any policies, the compliance check simply passes and your screening runs as normal.
Quick reference
| I want to… | Do this |
|---|---|
| Screen a group of candidates | AI Screening → pick a source → add criteria → Start Screening |
| Focus the ranking on what matters | Slide each criterion's weight up or down |
| Reuse the same criteria next time | Save Criteria, then load it via the Saved Criteria toggle |
| See why a candidate scored as they did | Open results → Show Criterion Scores |
| Move strong candidates forward | Tick candidates → Add to Requisition or Add to Talent Pool |
| Manage or delete saved criteria | Settings → Screening Criteria Management |