Requisitions
Menu: Requisitions · Available on every plan
A requisition is a single job you're hiring for. It's the home base for a role: you create it here, collect and review the people who apply, move them through your hiring stages, and invite the colleagues who help you decide. Every other part of GoVerse — sourcing, screening, talent pools, engagement — feeds candidates into a requisition, so this is the screen most recruiters live in day to day.
What it's for
- Open a new role with its title, location, salary, description, and the set of stages candidates will move through.
- Keep every applicant in one place — whether they were added inside GoVerse or imported from an outside system.
- Track progress by moving candidates from stage to stage and marking them hired, rejected, or withdrawn.
- Bring in your team so hiring managers, recruiters, and interviewers can collaborate on the same role.
- Report the outcome by marking a role Filled (with a little celebration) or Cancelled when it's no longer needed.
Available on every plan
Requisitions are part of the core product, so the Requisitions menu item is always visible regardless of your subscription. Some related features linked from a requisition — such as pipeline templates or AI screening — may depend on your plan.
How to get there
Select Requisitions in the left-hand menu. You land on the requisitions list, which shows every role in your account.
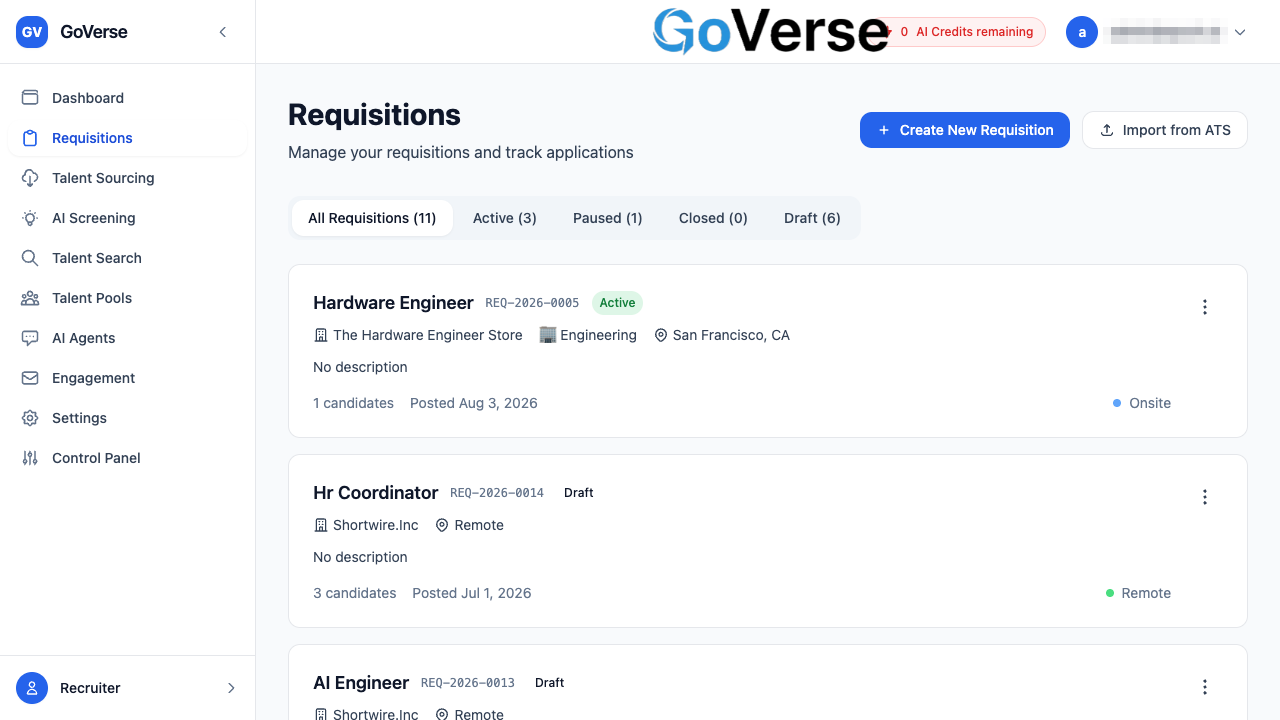
The requisitions list
The list is the first thing you see. At the top are the page title and two buttons; below them a row of filter tabs; and then one card per requisition.
The two action buttons
| Button | What it does |
|---|---|
| Create New Requisition | Opens the requisition form so you can add a brand-new role from scratch. |
| Import from ATS | Pulls existing jobs in from a connected system (SmartRecruiters or Workday) instead of retyping them. See Importing from an ATS. |
Filtering the list
Just under the buttons is a row of tabs. Each one shows a live count in brackets, so you can see at a glance how many roles are in each state:
- All Requisitions — everything.
- Active — roles that are open and accepting candidates.
- Paused — roles temporarily on hold.
- Closed — roles that have been closed off.
- Draft — roles you've started but not opened yet.
Selecting a tab instantly narrows the cards below to just that state.
Reading a requisition card
Each card is a compact summary of one role. Depending on what's been filled in, a card can show:
- The job title (select it to open the role).
- A requisition number (a short reference code).
- A status badge — colour-coded Active (green), Paused (yellow), Closed (grey), or Draft.
- An ATS badge — 🔶 Workday or 🔷 SmartRecruiters — if the role was imported.
- Company, department (🏢), and location (📍).
- The salary range, formatted with its currency.
- A two-line preview of the description.
- The candidate count ("12 candidates") and when the role was posted.
- A coloured dot showing the work mode: Remote (green), Hybrid (yellow), or On-site.
The card menu (⋮)
Every card has a ⋮ (three-dots) button on the right. Opening it gives you quick actions without leaving the list:
- View Details — opens the full requisition.
- Edit Requisition — opens the form pre-filled so you can change anything.
- Pause / Activate / Close — the options shown depend on the current status (for example, an Active role offers Pause and Close; a Paused role offers Activate).
- Delete Requisition — permanently removes the role. You'll be asked to confirm first, and this cannot be undone.
Delete is permanent
Deleting a requisition removes it and its tracking for good. If you just want to stop advertising a role, Pause or Close it instead — those keep the record and its candidates.
When the list is empty
- With no roles at all, you'll see "No requisitions created yet" and a Create Your First Requisition button.
- With a filter applied but nothing matching, you'll see "No [status] requisitions" — switch back to All Requisitions to see everything.
Creating a requisition
Select Create New Requisition (from the list or its card menu). A form opens as a large pop-up window. It's a single scrolling form — no multi-step wizard — so you can fill it top to bottom and submit once.
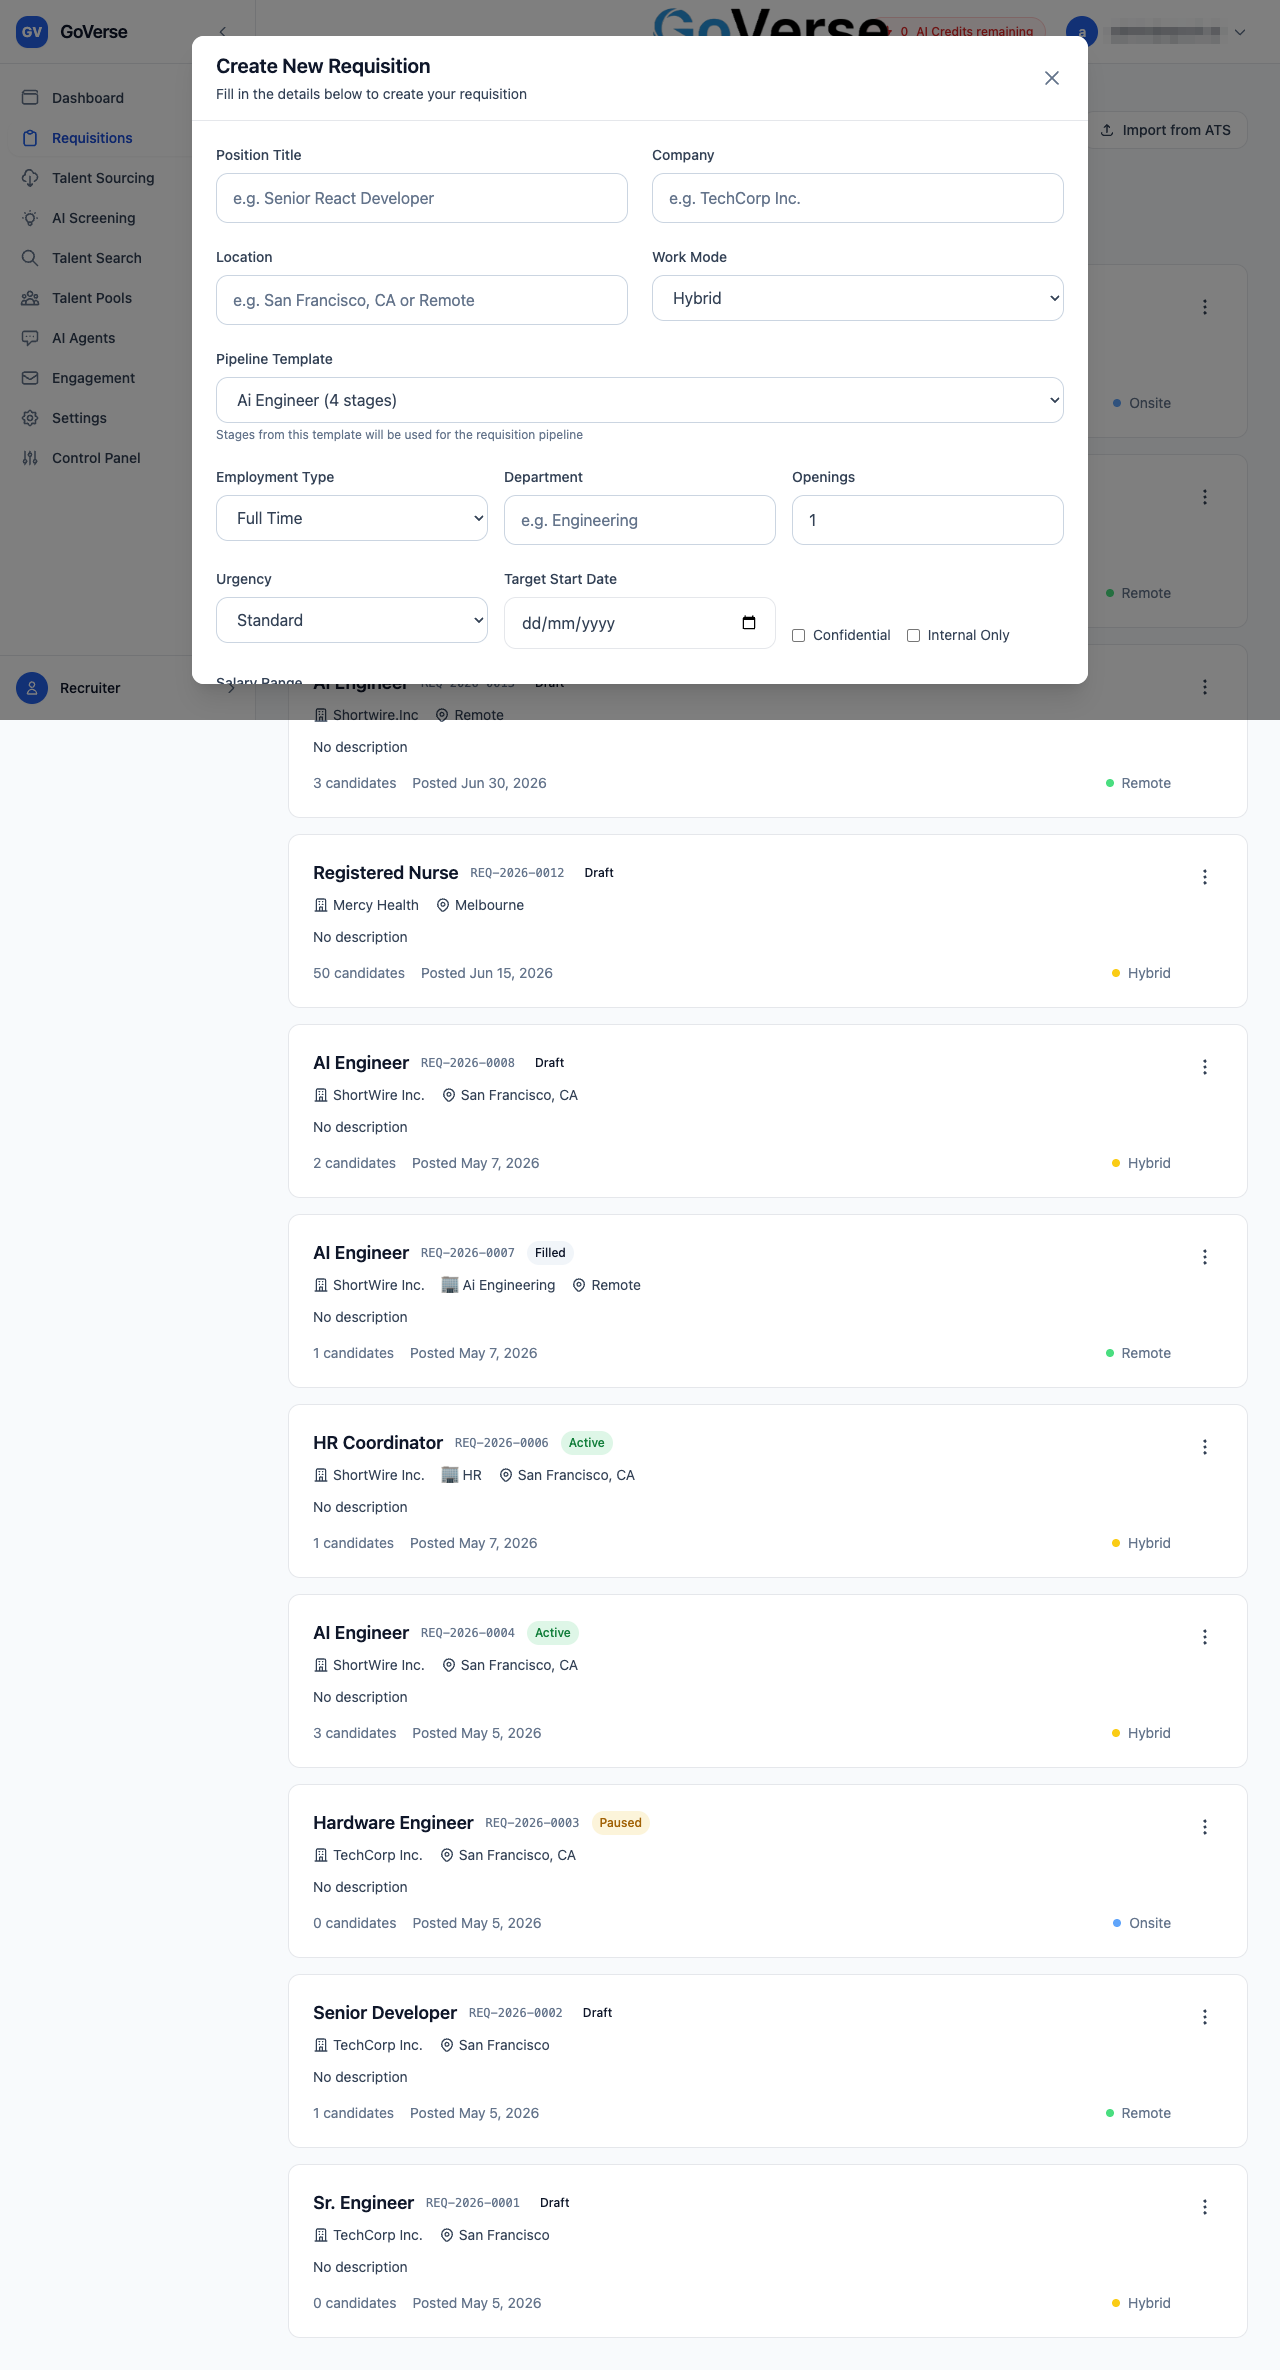
The fields, top to bottom
Fields marked required must be filled in before you can save.
| Field | Type | Notes |
|---|---|---|
| Position Title (required) | Text | e.g. Senior React Developer |
| Company (required) | Text | e.g. TechCorp Inc. |
| Location (required) | Text | e.g. San Francisco, CA or Remote |
| Work Mode (required) | Dropdown | Remote · Hybrid · On-site (default Hybrid) |
| Pipeline Template | Dropdown | Create mode only. Chooses the set of stages the role starts with. The organisation default is marked with a ★. |
| Employment Type | Dropdown | Full Time · Part Time · Contract · Casual · Internship |
| Department | Text | e.g. Engineering |
| Openings | Number | How many people you're hiring for this role (default 1) |
| Urgency | Dropdown | Standard · Urgent · Critical |
| Target Start Date | Date | When you'd like the hire to begin |
| Confidential | Checkbox | Flags the role as confidential |
| Internal Only | Checkbox | Marks the role as internal |
| Salary Range | Min / Max / Currency | Two numbers plus a currency (AUD · USD · EUR · GBP · NZD, default AUD) |
| Position Description (required) | Long text | The role, responsibilities, and what makes it exciting |
| Requirements | Repeatable list | Select Add Requirement for each must-have; remove any extra rows |
| Preferred Skills (optional) | Repeatable list | Select Add Skill for each nice-to-have |
The pipeline template sets your stages
The Pipeline Template you pick decides which hiring stages the new role starts with (for example Screening → Interview → Offer). Pick the one that best fits the job — you're not locked in, and templates are managed separately by your admins.
Requirements and skills
Requirements and Preferred Skills are lists you build one line at a time. Select Add Requirement (or Add Skill) to add a row, type the item, and repeat. Use the Remove link beside a row to delete it. Blank rows are ignored when you save.
Saving
At the bottom are Cancel and Create Requisition. If a required field is missing, an inline red message points you to it. While the role is being saved the button reads Saving…; once it succeeds the form closes and you're returned to the list with the new role in place.
Editing an existing requisition
Choosing Edit Requisition opens the same form, pre-filled with the current details and titled Edit Requisition. Make your changes and select Update Requisition. (The pipeline template chooser only appears when creating a role, not when editing one.)
Importing from an ATS
If your roles already live in SmartRecruiters or Workday, select Import from ATS on the list to bring them across instead of retyping.
- Pick the source system from the dropdown — SmartRecruiters or Workday.
- GoVerse shows the jobs it found. Each row lists the title, location (📍), department (🏢), company, its candidate count (👤), and status.
- Tick the jobs you want. Select all / Deselect all toggles everything at once. Jobs you've already imported are dimmed and tagged Imported.
- Select Import [N] selected.
When it finishes you'll see a result line such as "✅ 3 imported, 1 skipped", and the new roles appear in your list carrying the matching ATS badge.
Imported candidates arrive in the background
After an ATS import, GoVerse downloads the associated CVs and builds candidate profiles behind the scenes. While that's happening the role's Applications tab shows a "Syncing candidates from ATS…" banner — it clears on its own once the import completes.
The requisition detail view
Selecting a role opens its detail page. A breadcrumb at the top (Requisitions / [job title]) takes you back to the list.
The header
The header summarises the role and is where you change its overall status:
- The requisition number, plus badges for ATS Import and Confidential where they apply.
- The job title.
- The Status with a colour-coded badge (Active, Paused, Filled, Cancelled, Pending Approval, or Draft), and for imported roles an ATS sync indicator.
- A metadata row: location, work mode, department, salary, and the created date.
- Three headline metrics: Candidates, Openings, and Pipeline Stages.
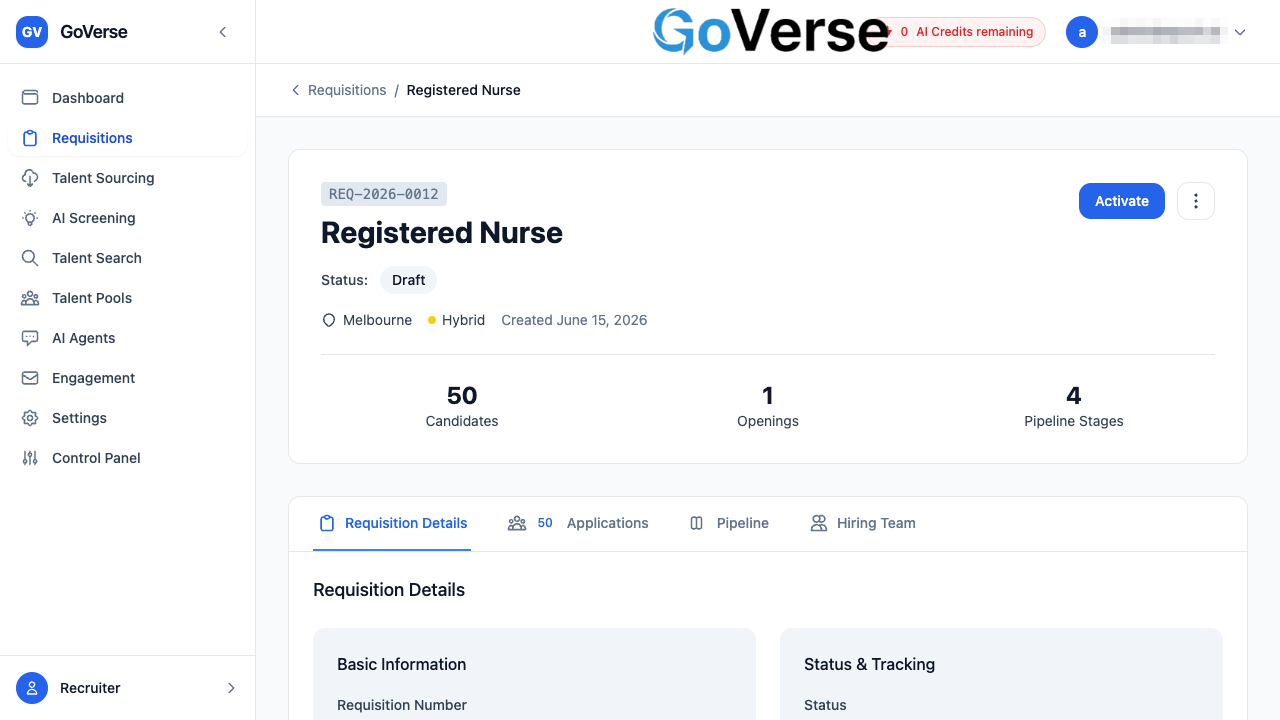
Changing a role's status
The buttons on the right of the header change depending on where the role is:
| Current status | Buttons available |
|---|---|
| Draft | Activate |
| Active | Pause, Mark Filled |
| Paused | Resume, Mark Filled |
| Filled or Cancelled | Reactivate |
A ⋮ menu on active/paused roles adds Cancel Requisition and Delete Requisition.
- Mark Filled asks you to confirm, then closes any active postings and celebrates the hire — complete with a confetti animation and the names of the hired candidates. Once filled, the header lists the Hired Candidate(s); you can select any of them to open their profile.
- Cancel Requisition permanently cancels the role and rejects remaining candidates — it asks you to confirm and can't be undone.
- Reactivate brings a Filled or Cancelled role back to Active. As a safety step you must type REACTIVATE to confirm.
Confirmations protect the big actions
Filling, cancelling, reactivating, and deleting all ask you to confirm first, so you won't trigger them by accident.
The four tabs
Below the header the role is organised into four tabs:
- Requisition Details — the full role definition.
- Applications — everyone who's applied, with a live count on the tab.
- Pipeline — a visual board of your hiring stages.
- Hiring Team — the colleagues collaborating on the role.
Requisition Details tab
A read-only summary of everything about the role, laid out in cards:
- Basic Information — requisition number, title, company, department, location, work mode, employment type, salary, and number of openings.
- Status & Tracking — status, origin (created in GoVerse vs. ATS Import), total candidates, urgency, key dates, and when it was created / last updated / closed.
- ATS Integration — only for imported roles — the source system, external ID, sync mode, and sync status.
- Position Description, Requirements (a bulleted list), and Preferred Skills (shown as tags).
To change any of this, use Edit Requisition (from the list or the card menu).
Applications tab
This is where you work with the actual people. At the top, four tiles summarise the role: Active, Hired, Rejected, and Withdrawn. A Status dropdown (All · Active · Hired · Rejected · Withdrawn) filters the list below, and a count shows how many applications match.
Each applicant appears as a card showing their initials avatar, name, a status badge, their current stage, where they came from (GoVerse or ATS Import), the application number, headline, email, location, when they applied, and — when available — their AI Score and top skills. Selecting the avatar or name opens that person's full candidate profile.
For applicants who are still Active, each card has action buttons:
| Action | What happens |
|---|---|
| Move Stage | Opens a menu of your pipeline stages; pick one to move the candidate there. A Notify candidate checkbox controls whether they're emailed about the move. |
| Hire | Marks the candidate hired (closes their application as a win). |
| Reject | Marks the candidate rejected. |
| Withdraw | Records that the candidate withdrew. |
Adding candidates by uploading CVs
You can bring candidates straight into a requisition by uploading their CVs — no separate sourcing run to wire up afterwards. In the top-right of the Applications tab, use Add candidates and choose one of two paths:
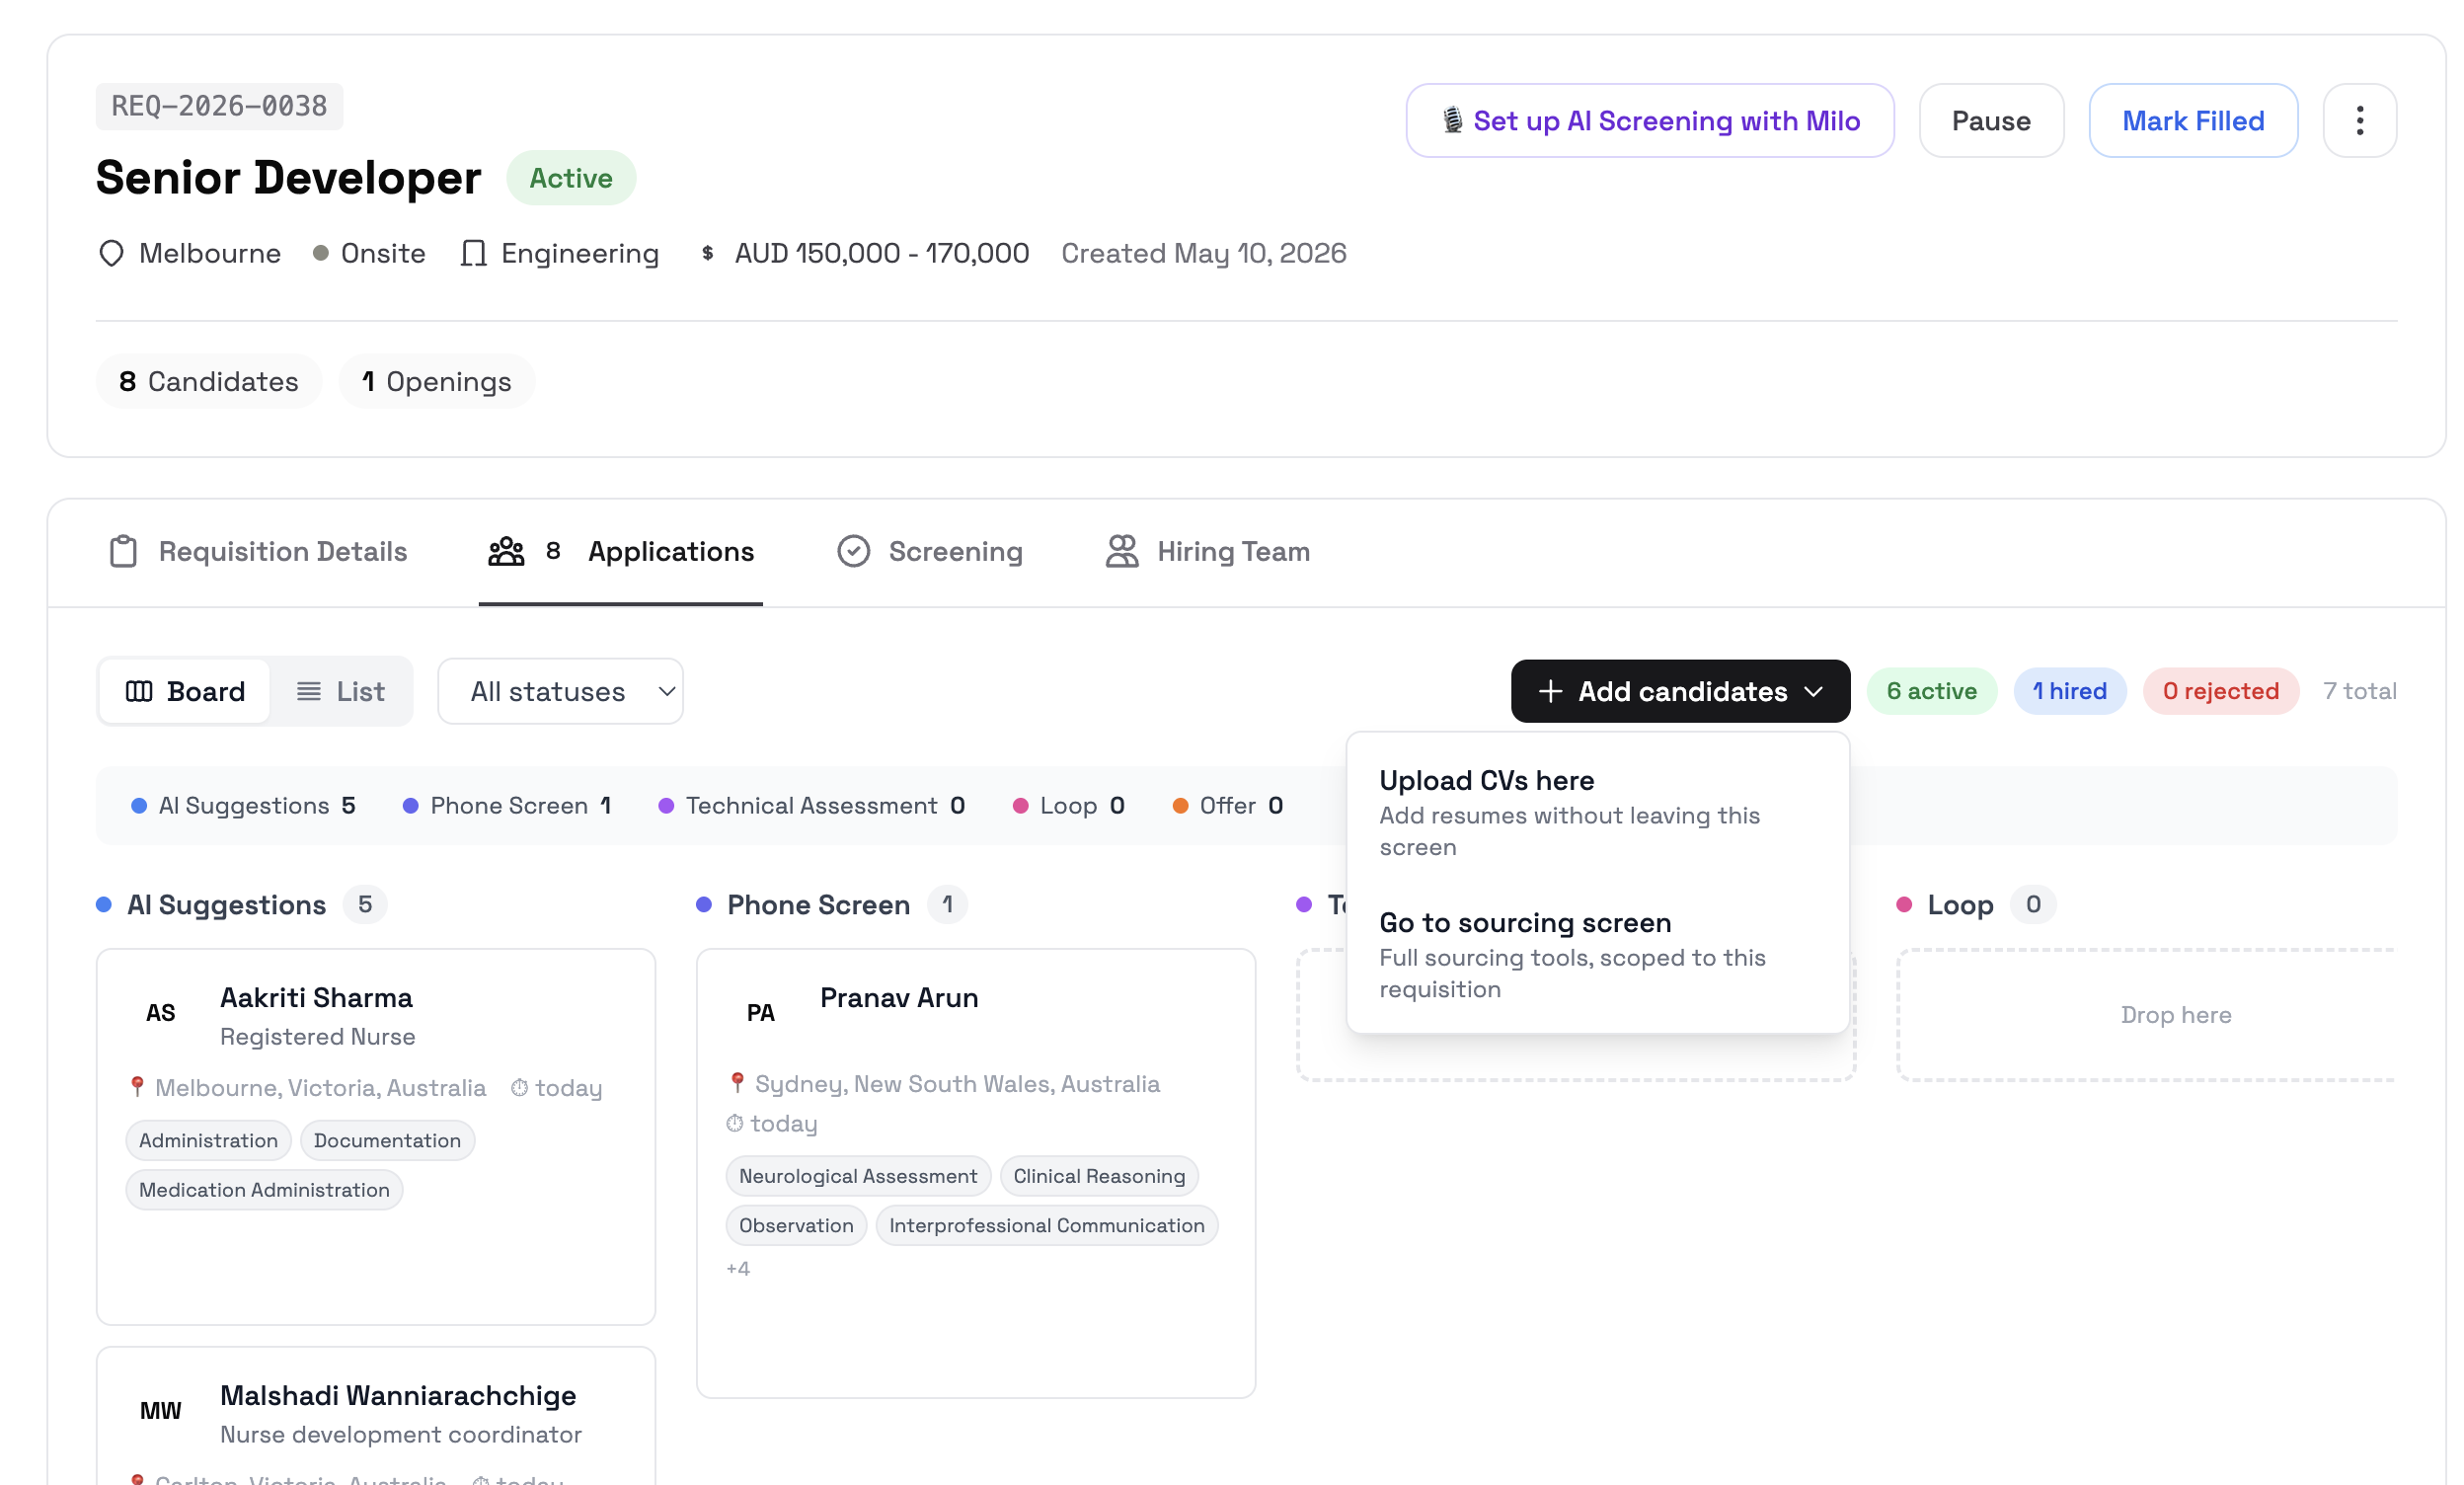
| Option | What it does |
|---|---|
| Upload CVs here | Opens a dialog right on the Applications tab. Drop or select PDF, DOC or DOCX files and upload. GoVerse parses each CV, and as processing finishes the candidates are added to this requisition automatically. |
| Go to sourcing screen | Takes you to the full sourcing upload screen, already scoped to this requisition (a banner confirms it). Upload there and the resulting candidates flow back into this requisition on completion. |
Once the upload finishes processing, the new people appear as applicants on the board:
- If the requisition has a pipeline, they land in its default entry stage (for the standard pipeline that's AI Suggestions), ready for you to review and move along.
- If the requisition has no pipeline, they appear under Applicants.
Duplicate CVs for someone already on this requisition are skipped, so re-uploading is safe. The Add candidates button only appears while a requisition is open to new applicants — it's hidden once a role is Filled, Cancelled or Closed.
Processing takes a moment
Uploaded CVs are parsed and enriched before they become applicants, so there's a short delay between finishing the upload and seeing the candidates on the board. The dialog keeps you posted and refreshes the list when they're ready.
Moving candidates happens here
The Pipeline tab is a visual overview; the actual moving of a candidate from one stage to the next is done from the Applications tab using Move Stage. Keep the Notify candidate box ticked to let them know automatically.
If no one has applied yet, the tab shows "No Applications."
Pipeline tab — working the stages
The Pipeline tab lays your hiring stages out left to right as columns, with arrows showing the flow between them. It's your at-a-glance board for seeing where everyone stands.
- Each column is a stage, shown in its configured order with an icon (📋 standard, 🤖 AI suggestions, 🎉 offer), the stage name, and a big count of how many candidates are in it.
- Inside each column, candidates appear as small cards with their initials, name, and headline. Selecting one opens their candidate profile.
- An Outcomes column (🏁) collects candidates who've reached a final result: ⭐ hired, ❌ rejected, or 🚪 withdrawn.
- Any candidates not yet placed in a stage are gathered under No stage assigned.
If the board looks different
- If this role doesn't use a pipeline, you'll see a note that candidates are "shown without stage assignment" and a simple flat list instead of columns.
- If no stages have been set up, you'll see "No pipeline stages configured."
To move someone forward, switch to the Applications tab and use Move Stage (the Pipeline tab reflects the change immediately).
Hiring Team tab
This tab lists the colleagues collaborating on the role and lets you manage who's involved.
- Select Add Member to open a short form: choose a person from the user dropdown (people in your account), pick their role, and select Add.
- Each team member appears in a row with their avatar, email, a role dropdown (change it right there to reassign them), and a Remove button.
The available roles are:
| Role |
|---|
| Hiring Manager |
| Recruiter |
| Sourcer |
| Technical Interviewer |
| Engineering Manager |
| HRBP |
Who can be added
Only people who already have an account in your GoVerse workspace can be added to a hiring team. If you try to add someone who isn't set up yet, you'll see "User not found in this account" — ask an admin to invite them first. You also can't add the same person twice.
If no one has been added, the tab reads "No hiring team members assigned yet."
Quick reference
| I want to… | Where to go |
|---|---|
| Open a new role | Create New Requisition on the list |
| Bring roles in from SmartRecruiters / Workday | Import from ATS on the list |
| Change a role's details | Card menu → Edit Requisition |
| Pause, close, or delete a role | Card menu, or the header buttons on the detail page |
| See everyone who applied | Detail page → Applications tab |
| Add candidates by uploading their CVs | Applications tab → Add candidates |
| Move a candidate to the next stage | Applications tab → Move Stage |
| See the whole pipeline at a glance | Detail page → Pipeline tab |
| Add a hiring manager or interviewer | Detail page → Hiring Team tab |
| Mark the role as successfully hired | Header → Mark Filled |